Data Projector - ソニー製品情報
Data Projector - ソニー製品情報
Data Projector - ソニー製品情報

Create successful ePaper yourself
Turn your PDF publications into a flip-book with our unique Google optimized e-Paper software.
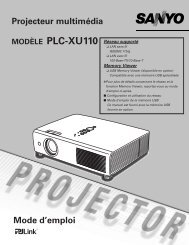
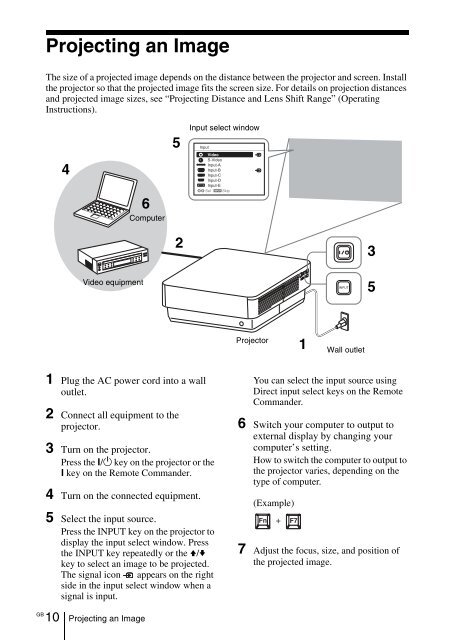
Projecting an Image<br />
The size of a projected image depends on the distance between the projector and screen. Install<br />
the projector so that the projected image fits the screen size. For details on projection distances<br />
and projected image sizes, see “Projecting Distance and Lens Shift Range” (Operating<br />
Instructions).<br />
4<br />
6<br />
Computer<br />
5<br />
Input select window<br />
Input<br />
Video<br />
S-Videoo<br />
Input-A<br />
Input-B<br />
Input-C<br />
Input-D<br />
Input-E<br />
Sel Skip<br />
2<br />
3<br />
Video equipment<br />
INPUT<br />
5<br />
<strong>Projector</strong><br />
1<br />
Wall outlet<br />
1 Plug the AC power cord into a wall<br />
outlet.<br />
2 Connect all equipment to the<br />
projector.<br />
3 Turn on the projector.<br />
Press the ?/1 key on the projector or the<br />
? key on the Remote Commander.<br />
4 Turn on the connected equipment.<br />
5 Select the input source.<br />
Press the INPUT key on the projector to<br />
display the input select window. Press<br />
the INPUT key repeatedly or the V/v<br />
key to select an image to be projected.<br />
The signal icon appears on the right<br />
side in the input select window when a<br />
signal is input.<br />
You can select the input source using<br />
Direct input select keys on the Remote<br />
Commander.<br />
6 Switch your computer to output to<br />
external display by changing your<br />
computer’s setting.<br />
How to switch the computer to output to<br />
the projector varies, depending on the<br />
type of computer.<br />
(Example)<br />
+<br />
7 Adjust the focus, size, and position of<br />
the projected image.<br />
GB<br />
10 Projecting an Image