Data Projector - ソニー製品情報
Data Projector - ソニー製品情報
Data Projector - ソニー製品情報

You also want an ePaper? Increase the reach of your titles
YUMPU automatically turns print PDFs into web optimized ePapers that Google loves.
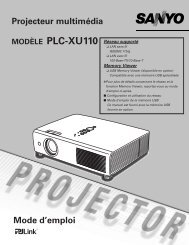
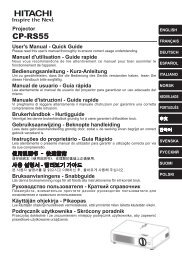
3 Loosen the three screws on the lamp<br />
then pull out the lamp by its grab.<br />
Screws<br />
Disposal of the used lamp<br />
For the customers in the USA<br />
Lamp in this product contains mercury.<br />
Disposal of these materials may be<br />
regulated due to environmental<br />
considerations. For disposal or<br />
recycling information, please contact<br />
your local authorities or the<br />
Telecommunications Industry<br />
Association (www.eiae.org).<br />
Screws<br />
Grab<br />
Note<br />
Lamp 1 and Lamp 2 are of the same type.<br />
They are installed in opposite vertical<br />
orientation to each other. When removing,<br />
note the orientation of each lamp.<br />
4 Insert the new lamp all the way in until<br />
it is securely in place. Tighten the<br />
three screws.<br />
5 Close the lamp cover and tighten the<br />
two screws.<br />
Notes<br />
• The lamp cover cannot be closed if the<br />
screws that secure the lamps are<br />
loosened.<br />
• Be sure to install the lamp and lamp<br />
cover securely as it was. If not, the<br />
projector cannot be turned on.<br />
When lamp replacement is completed<br />
Replace the air filter cartridge.<br />
Replacing the Lamp<br />
15 GB