Data Projector - ソニー製品情報
Data Projector - ソニー製品情報
Data Projector - ソニー製品情報

Create successful ePaper yourself
Turn your PDF publications into a flip-book with our unique Google optimized e-Paper software.
Attaching/Removing the Projection<br />
Lens<br />
Notes<br />
• Turn off the projector and disconnect the AC power cord from a wall outlet before you remove/<br />
attach the projection lens.<br />
• Be careful not to drop the projection lens.<br />
• Avoid removing/attaching the lens with the projector installed suspended from a ceiling.<br />
• Avoid touching the lens surface.<br />
• For usable projection lenses and a lens adapter, see “Specifications”.<br />
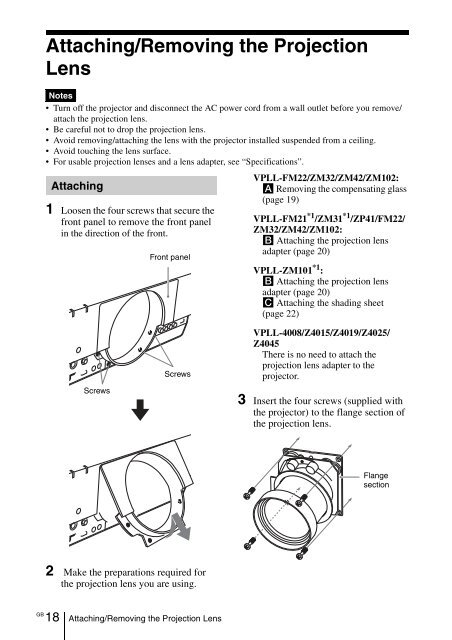
Attaching<br />
1 Loosen the four screws that secure the<br />
front panel to remove the front panel<br />
in the direction of the front.<br />
Front panel<br />
VPLL-FM22/ZM32/ZM42/ZM102:<br />
A Removing the compensating glass<br />
(page 19)<br />
VPLL-FM21 *1 /ZM31 *1 /ZP41/FM22/<br />
ZM32/ZM42/ZM102:<br />
B Attaching the projection lens<br />
adapter (page 20)<br />
VPLL-ZM101 *1 :<br />
B Attaching the projection lens<br />
adapter (page 20)<br />
C Attaching the shading sheet<br />
(page 22)<br />
Screws<br />
Screws<br />
VPLL-4008/Z4015/Z4019/Z4025/<br />
Z4045<br />
There is no need to attach the<br />
projection lens adapter to the<br />
projector.<br />
3 Insert the four screws (supplied with<br />
the projector) to the flange section of<br />
the projection lens.<br />
Flange<br />
section<br />
2 Make the preparations required for<br />
the projection lens you are using.<br />
GB<br />
18 Attaching/Removing the Projection Lens