


Create successful ePaper yourself
Turn your PDF publications into a flip-book with our unique Google optimized e-Paper software.
Rudder and Elevator Control Horn/Seiten- und Höhenruderhorn/Guignols de dérive et de profondeur/SQUADRETTE PER TIMONE ED ELEVATORE<br />
7<br />
8<br />
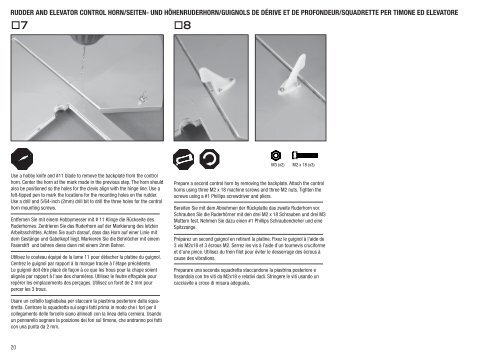
M3 (x2)<br />
M2 x 18 (x3)<br />
Use a hobby knife and #11 blade to remove the backplate from the control<br />
horn. Center the horn at the mark made in the previous step. The horn should<br />
also be positioned so the holes for the clevis align with the hinge line. Use a<br />
felt-tipped pen to mark the locations for the mounting holes on the rudder.<br />
Use a drill and 5/64-inch (2mm) drill bit to drill the three holes for the control<br />
horn mounting screws.<br />
Entfernen Sie mit einem <strong>Hobby</strong>messer mit # 11 Klinge die Rückseite des<br />
Ruderhornes. Zentrieren Sie das Ruderhorn auf der Markierung des letzten<br />
Arbeitsschrittes. Achten Sie auch darauf, dass das Horn auf einer Linie mit<br />
dem Gestänge und Gabelkopf liegt. Markieren Sie die Bohrlöcher mit einem<br />
Faserstift und bohren diese dann mit einem 2mm Bohrer.<br />
Utilisez le couteau équipé de la lame 11 pour détacher la platine du guignol.<br />
Centrez le guignol par rapport à la marque tracée à l’étape précédente.<br />
Le guignol doit être placé de façon à ce que les trous pour la chape soient<br />
alignés par rapport à l’axe des charnières. Utilisez le feutre effaçable pour<br />
repérer les emplacements des perçages. Utilisez un foret de 2 mm pour<br />
percer les 3 trous.<br />
Prepare a second control horn by removing the backplate. Attach the control<br />
horns using three M2 x 18 machine screws and three M2 nuts. Tighten the<br />
screws using a #1 Phillips screwdriver and pliers.<br />
Bereiten Sie mit dem Abnehmen der Rückplatte das zweite Ruderhorn vor.<br />
Schrauben Sie die Ruderhörner mit den drei M2 x 18 Schrauben und drei M3<br />
Muttern fest. Nehmen Sie dazu einen #1 Phillips Schraubendreher und eine<br />
Spitzzange.<br />
Préparez un second guignol en retirant la platine. Fixez le guignol à l’aide de<br />
3 vis M2x18 et 3 écrous M2. Serrez les vis à l’aide d’un tournevis cruciforme<br />
et d’une pince. Utilisez du frein filet pour éviter le desserrage des écrous à<br />
cause des vibrations.<br />
Preparare una seconda squadretta staccandone la piastrina posteriore e<br />
fissandola con tre viti da M2x18 e relativi dadi. Stringere le viti usando un<br />
cacciavite a croce di misura adeguata.<br />
Usare un coltello tagliabalsa per staccare la piastrina posteriore dalla squadretta.<br />
Centrare la squadretta sui segni fatti prima in modo che i fori per il<br />
collegamento delle forcelle siano allineati con la linea della cerniera. Usando<br />
un pennarello segnare la posizione dei fori sul timone, che andranno poi fatti<br />
con una punta da 2 mm.<br />
20


