Create successful ePaper yourself
Turn your PDF publications into a flip-book with our unique Google optimized e-Paper software.
18<br />
Radio/Sender/Emetteur/trasmettitore<br />
1<br />
2<br />
Connect the line from the clunk to the carburetor. Trim the tubing as necessary<br />
to prevent it from kinking inside the cowl. Use a tie wrap (not included)<br />
to secure the tubing to the carburetor, as the oils in the fuel may cause it to<br />
become disconnected. Route the vent line out of the bottom of the fuselage.<br />
Use a tie wrap (not included) to secure it, but don’t over-tighten the tie wrap,<br />
which could pinch the line closed.<br />
Schließen Sie die Leitung vom Tankansaugstutzen an den Vergaser an.<br />
Kürzen Sie die Leitung passend um ein Knicken des Schlauches im Rumpf<br />
zu verhindern. Sichern Sie den Schlauch am Vergaser mit einem Kabelbinder,<br />
da sich dieser durch den Ölanteil im Sprit lösen könnte. Führen Sie die<br />
Entlüftung aus dem Rumpfboden heraus. Sichern Sie diesen Schlauch mit<br />
einem Kabelbinder. Ziehen Sie den Kabelbinder nicht zu fest, da er sonst die<br />
Entlüftungsleitung blockieren könnte.<br />
Reliez la durite d’alimentation au carburateur. Couper la durite à longueur<br />
nécessaire pour éviter le pincement par le capot. Utilisez un collier (non fourni)<br />
pour maintenir la durite au carburateur, l’huile contenue dans le carburant<br />
pourrait faire qu’elle se débranche. Guidez l’autre durite vers le bas du fuselage.<br />
Utilisez un collier (non inclus) pour la maintenir en place, attention de ne<br />
pas trop serrer ce collier afin de ne pas écraser la durite.<br />
Collegare al carburatore il tubetto miscela proveniente dal serbatoio, tagliandolo<br />
nella misura giusta per evitare che si attorcigli dentro alla capottina.<br />
Fissare il tubetto alla presa sul carburatore con una fascetta per evitare che<br />
si stacchi. Portare la linea di sfiato fuori dalla fusoliera fissandola con una<br />
fascetta non troppo stretta per evitare di chiuderla.<br />
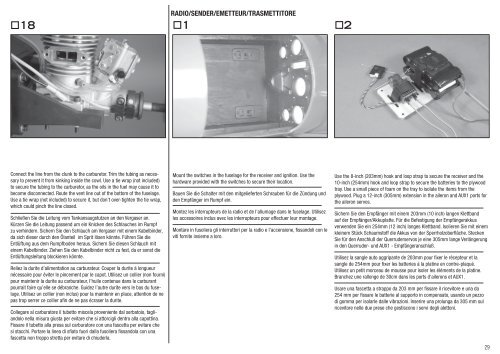
Mount the switches in the fuselage for the receiver and ignition. Use the<br />
hardware provided with the switches to secure their location.<br />
Bauen Sie die Schalter mit den mitgelieferten Schrauben für die Zündung und<br />
den Empfänger im Rumpf ein.<br />
Montez les interrupteurs de la radio et de l’allumage dans le fuselage. Utilisez<br />
les accessoires inclus avec les interrupteurs pour effectuer leur montage.<br />
Montare in fusoliera gli interruttori per la radio e l’accensione, fissandoli con le<br />
viti fornite insieme a loro.<br />
Use the 8-inch (203mm) hook and loop strap to secure the receiver and the<br />
10-inch (254mm) hook and loop strap to secure the batteries to the plywood<br />
tray. Use a small piece of foam on the tray to isolate the items from the<br />
plywood. Plug a 12-inch (305mm) extension in the aileron and AUX1 ports for<br />
the aileron servos.<br />
Sichern Sie den Empfänger mit einem 203mm (10 inch) langen Klettband<br />
auf der Empfänger/Akkuplatte. Für die Befestigung der Empfängerakkus<br />
verwenden Sie ein 254mm (12 inch) langes Klettband. Isolieren Sie mit einem<br />
kleinem Stück Schaumstoff die Akkus von der Sperrholzoberfläche. Stecken<br />
Sie für den Anschluß der Querruderservos je eine 305mm lange Verlängerung<br />
in den Querruder- und AUX1 - Empfängeranschluß.<br />
Utilisez la sangle auto aggripante de 203mm pour fixer le récepteur et la<br />
sangle de 254mm pour fixer les batteries à la platine en contre-plaqué.<br />
Utilisez un petit morceau de mousse pour isoler les éléments de la platine.<br />
Branchez une rallonge de 30cm dans les ports d’ailerons et AUX1.<br />
Usare una fascetta a strappo da 203 mm per fissare il ricevitore e una da<br />
254 mm per fissare le batterie al supporto in compensato, usando un pezzo<br />
di gomma per isolarle dalle vibrazioni. Inserire una prolunga da 305 mm sul<br />
ricevitore nelle due prese che gestiscono i servi degli alettoni.<br />
29


