


You also want an ePaper? Increase the reach of your titles
YUMPU automatically turns print PDFs into web optimized ePapers that Google loves.
L<br />
R<br />
L<br />
R<br />
L<br />
R<br />
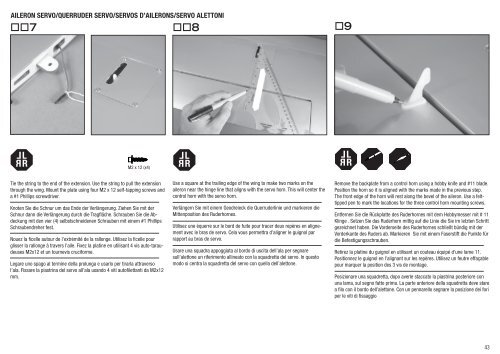
Aileron Servo/Querruder Servo/Servos d’ailerons/SERVO ALETTONI<br />
7<br />
8<br />
9<br />
L<br />
R<br />
M2 x 12 (x4)<br />
L<br />
R<br />
L<br />
R<br />
Tie the string to the end of the extension. Use the string to pull the extension<br />
through the wing. Mount the plate using four M2 x 12 self-tapping screws and<br />
a #1 Phillips screwdriver.<br />
Knoten Sie die Schnur um das Ende der Verlängerung. Ziehen Sie mit der<br />
Schnur dann die Verlängerung durch die Tragfläche. Schrauben Sie die Abdeckung<br />
mit den vier (4) selbstschneidenen Schrauben mit einem #1 Phillips<br />
Schraubendreher fest.<br />
Nouez la ficelle autour de l’extrémité de la rallonge. Utilisez la ficelle pour<br />
glisser la rallonge à travers l’aile. Fixez la platine en utilisant 4 vis auto-taraudeuses<br />
M2x12 et un tournevis cruciforme.<br />
Legare uno spago al termine della prolunga e usarlo per tirarla attraverso<br />
l’ala. Fissare la piastrina del servo all’ala usando 4 viti autofilettanti da M2x12<br />
mm.<br />
Use a square at the trailing edge of the wing to make two marks on the<br />
aileron near the hinge line that aligns with the servo horn. This will center the<br />
control horn with the servo horn.<br />
Verlängern Sie mit einem Geodreieck die Querruderlinie und markieren die<br />
Mittenposition des Ruderhornes.<br />
Utilisez une équerre sur le bord de fuite pour tracer deux repères en alignement<br />
avec le bras de servo. Cela vous permettra d’aligner le guignol par<br />
rapport au bras de servo.<br />
Usare una squadra appoggiata al bordo di uscita dell’ala per segnare<br />
sull’alettone un riferimento allineato con la squadretta del servo. In questo<br />
modo si centra la squadretta del servo con quella dell’alettone.<br />
Remove the backplate from a control horn using a hobby knife and #11 blade.<br />
Position the horn so it is aligned with the marks made in the previous step.<br />
The front edge of the horn will rest along the bevel of the aileron. Use a felttipped<br />
pen to mark the locations for the three control horn mounting screws.<br />
Entfernen Sie die Rückplatte des Ruderhornes mit dem <strong>Hobby</strong>messer mit # 11<br />
Klinge . Setzen Sie das Ruderhorn mittig auf die Linie die Sie im letzten Schritt<br />
gezeichnet haben. Die Vorderseite des Ruderhornes schließt bündig mit der<br />
Vorderkante des Ruders ab. Markieren Sie mit einem Faserstift die Punkte für<br />
die Befestigungsschrauben.<br />
Retirez la platine du guignol en utilisant un couteau équipé d’une lame 11.<br />
Positionnez le guignol en l’alignant sur les repères. Utilisez un feutre effaçable<br />
pour marquer la position des 3 vis de montage.<br />
Posizionare una squadretta, dopo averle staccato la piastrina posteriore con<br />
una lama, sul segno fatto prima. La parte anteriore della squadretta deve stare<br />
a filo con il bordo dell’alettone. Con un pennarello segnare la posizione dei fori<br />
per le viti di fissaggio<br />
43


