


Create successful ePaper yourself
Turn your PDF publications into a flip-book with our unique Google optimized e-Paper software.
L<br />
R<br />
L<br />
R<br />
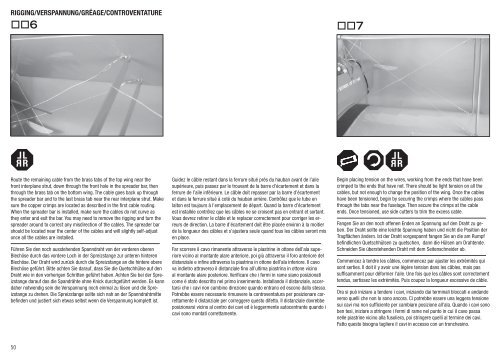
Rigging/Verspannung/Gréage/CONTROVENTATURE<br />
6<br />
7<br />
L<br />
R<br />
L<br />
R<br />
Route the remaining cable from the brass tabs of the top wing near the<br />
front interplane strut, down through the front hole in the spreader bar, then<br />
through the brass tab on the bottom wing. The cable goes back up through<br />
the spreader bar and to the last brass tab near the rear interplane strut. Make<br />
sure the copper crimps are located as described in the first cable routing.<br />
When the spreader bar is installed, make sure the cables do not curve as<br />
they enter and exit the bar. You may need to remove the rigging and turn the<br />
spreader around to correct any misdirection of the cables. The spreader bar<br />
should be located near the center of the cables and will slightly self-adjust<br />
once all the cables are installed.<br />
Führen Sie den noch ausstehenden Spanndraht von der vorderen oberen<br />
Blechöse durch das vordere Loch in der Spreizstange zur unteren hinteren<br />
Blechöse. Der Draht wird zurück durch die Spreizstange an die hintere obere<br />
Blechöse geführt. Bitte achten Sie darauf, dass Sie die Quetschhülse auf den<br />
Draht wie in den vorherigen Schritten geführt haben. Achten Sie bei der Spreizstange<br />
darauf das die Spandrähte ohne Knick durchgeführt werden. Es kann<br />
daher notwendig sein die Verspannung noch einmal zu lösen und die Spreizstange<br />
zu drehen. Die Spreizstange sollte sich nah an der Spanndrahtmitte<br />
befinden und justiert sich etwas selbst wenn die Verspannung komplett ist.<br />
Guidez le câble restant dans la ferrure situé près du hauban avant de l’aile<br />
supérieure, puis passez par le trouvant de la barre d’écartement et dans la<br />
ferrure de l’aile inférieure. Le câble doit repasser par la barre d’écartement<br />
et dans la ferrure situé à coté du hauban arrière. Contrôlez que le tube en<br />
laiton est toujours à l’emplacement de départ. Quand la barre d’écartement<br />
est installée contrôlez que les câbles ne se croisent pas en entrant et sortant.<br />
Vous devrez retirer le câble et le replacer correctement pour corriger les erreurs<br />
de direction. La barre d’écartement doit être placée environ à la moitier<br />
de la longueur des câbles et s’ajustera seule quand tous les câbles seront mis<br />
en place.<br />
Far scorrere il cavo rimanente attraverso le piastrine in ottone dell’ala superiore<br />
vicino al montante alare anteriore, poi giù attraverso il foro anteriore del<br />
distanziale e infine attraverso la piastrina in ottone dell’ala inferiore. Il cavo<br />
va indietro attraverso il distanziale fino all’ultima piastrina in ottone vicino<br />
al montante alare posteriore. Verificare che i fermi in rame siano posizionati<br />
come è stato descritto nel primo inserimento. Installando il distanziale, accertarsi<br />
che i cavi non cambino direzione quando entrano ed escono dallo stesso.<br />
Potrebbe essere necessario rimuovere la controventatura per posizionare correttamente<br />
il distanziale per correggere questo difetto. Il distanziale dovrebbe<br />
posizionarsi vicino al centro dei cavi ed è leggermente autocentrante quando i<br />
cavi sono montati correttamente.<br />
Begin placing tension on the wires, working from the ends that have been<br />
crimped to the ends that have not. There should be light tension on all the<br />
cables, but not enough to change the position of the wing. Once the cables<br />
have been tensioned, begin by securing the crimps where the cables pass<br />
through the tabs near the fuselage. Then secure the crimps at the cable<br />
ends. Once tensioned, use side cutters to trim the excess cable.<br />
Fangen Sie an den noch offenen Enden an Spannung auf den Draht zu geben.<br />
Der Draht sollte eine leichte Spannung haben und nicht die Position der<br />
Tragflächen ändern. Ist der Draht vorgespannt fangen Sie an die am Rumpf<br />
befindlichen Quetschhülsen zu quetschen, dann die Hülsen am Drahtende.<br />
Schneiden Sie überstehenden Draht mit dem Seitenschneider ab.<br />
Commencez à tendre les câbles, commencez par ajuster les extrémités qui<br />
sont serties. Il doit il y avoir une légère tension dans les câbles, mais pas<br />
suffisamment pour déformer l’aile. Une fois que les câbles sont correctement<br />
tendus, sertissez les extrémités. Puis coupez la longueur excessive de câble.<br />
Ora si può iniziare a tendere i cavi, iniziando dai terminali bloccati e andando<br />
verso quelli che non lo sono ancora. Ci potrebbe essere una leggera tensione<br />
sui cavi ma non sufficiente per cambiare posizione all’ala. Quando i cavi sono<br />
ben tesi, iniziare a stringere i fermi di rame nel punto in cui il cavo passa<br />
nelle piastrine vicino alla fusoliera, poi stringere quelli al termine dei cavi.<br />
Fatto questo bisogna tagliere il cavi in eccesso con un tronchesino.<br />
50


