


Create successful ePaper yourself
Turn your PDF publications into a flip-book with our unique Google optimized e-Paper software.
L<br />
R<br />
L<br />
R<br />
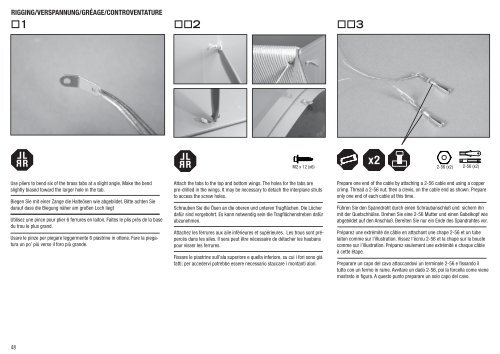
Rigging/Verspannung/Gréage/CONTROVENTATURE<br />
1<br />
2<br />
3<br />
L<br />
R<br />
L<br />
R<br />
M2 x 12 (x6)<br />
x2<br />
2-56 (x2) 2-56 (x2)<br />
Use pliers to bend six of the brass tabs at a slight angle. Make the bend<br />
slightly biased toward the larger hole in the tab.<br />
Biegen Sie mit einer Zange die Halteösen wie abgebildet. Bitte achten Sie<br />
darauf dass die Biegung näher am großen Loch liegt<br />
Utilisez une pince pour plier 6 ferrures en laiton. Faites le plis près de la base<br />
du trou le plus grand.<br />
Usare le pinze per piegare leggermente 6 piastrine in ottone. Fare la piegatura<br />
un po’ più verso il foro più grande.<br />
Attach the tabs to the top and bottom wings. The holes for the tabs are<br />
pre-drilled in the wings. It may be necessary to detach the interplane struts<br />
to access the screw holes.<br />
Schrauben Sie die Ösen an die oberen und unteren Tragflächen. Die Löcher<br />
dafür sind vorgebohrt. Es kann notwendig sein die Tragflächenstreben dafür<br />
abzunehmen.<br />
Attachez les ferrures aux aile inférieures et supérieures. Les trous sont prépercés<br />
dans les ailes. Il sera peut être nécessaire de détacher les haubans<br />
pour visser les ferrures.<br />
Fissare le piastrine sull’ala superiore e quella inferiore, su cui i fori sono già<br />
fatti; per accedervi potrebbe essere necessario staccare i montanti alari.<br />
Prepare one end of the cable by attaching a 2-56 cable end using a copper<br />
crimp. Thread a 2-56 nut, then a clevis, on the cable end as shown. Prepare<br />
only one end of each cable at this time.<br />
Führen Sie den Spanndraht durch einen Schraubanschluß und sichern ihn<br />
mit der Quetschhülse. Drehen Sie eine 2-56 Mutter und einen Gabelkopf wie<br />
abgebildet auf den Anschluß. Bereiten Sie nur ein Ende des Spandrahtes vor.<br />
Préparez une extrémité de câble en attachant une chape 2-56 et un tube<br />
laiton comme sur l’illustration. Vissez l’écrou 2-56 et la chape sur la boucle<br />
comme sur l’illustration. Préparez seulement une extrémité e chaque câble<br />
à cette étape.<br />
Preparare un capo del cavo attaccandovi un terminale 2-56 e fissando il<br />
tutto con un fermo in rame. Avvitare un dado 2-56, poi la forcella come viene<br />
mostrato in figura. A questo punto preparare un solo capo del cavo.<br />
48


