CE Source Four jr & CE Source Four jr Zoom - SXS Events
CE Source Four jr & CE Source Four jr Zoom - SXS Events
CE Source Four jr & CE Source Four jr Zoom - SXS Events

You also want an ePaper? Increase the reach of your titles
YUMPU automatically turns print PDFs into web optimized ePapers that Google loves.
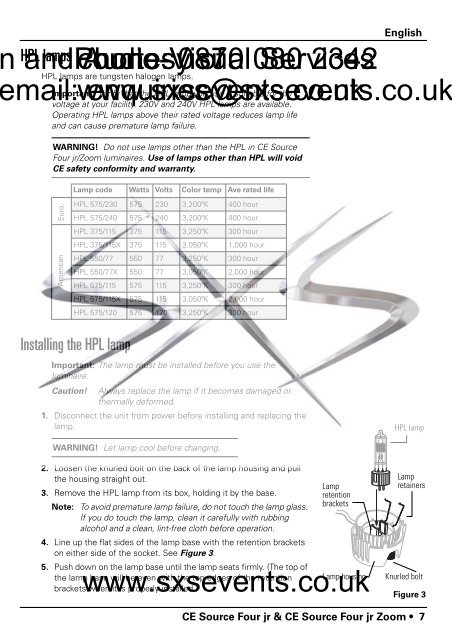
and Phone: courtesy Audio-Visual 0870 of 080 Services 2342HPL lampsEnglishHPL lamps are tungsten halogen lamps.mail:Important:www.sxsevents.co.ukenquiries@sxsevents.co.ukVerify that the HPL lamp you use is suitable for thevoltage at your facility. 230V and 240V HPL lamps are available.Operating HPL lamps above their rated voltage reduces lamp lifeand can cause premature lamp failure.WARNING! Do not use lamps other than the HPL in <strong>CE</strong> <strong>Source</strong><strong>Four</strong> <strong>jr</strong>/<strong>Zoom</strong> luminaires. Use of lamps other than HPL will void<strong>CE</strong> safety conformity and warranty.Lamp code Watts Volts Color temp Ave rated lifeEuro.AmericanHPL 575/230 575 230 3,200ºK 400 hourHPL 575/240 575 240 3,200ºK 400 hourHPL 375/115 375 115 3,250ºK 300 hourHPL 375/115X 375 115 3,050ºK 1,000 hourHPL 550/77 550 77 3,250ºK 300 hourHPL 550/77X 550 77 3,050ºK 2,000 hourHPL 575/115 575 115 3,250ºK 300 hourHPL 575/115X 575 115 3,050ºK 2,000 hourHPL 575/120 575 120 3,250ºK 300 hourInstalling the HPL lampImportant: The lamp must be installed before you use theluminaire.Caution!Always replace the lamp if it becomes damaged orthermally deformed.1. Disconnect the unit from power before installing and replacing thelamp.HPL lampWARNING! Let lamp cool before changing.2. Loosen the knurled bolt on the back of the lamp housing and pullthe housing straight out.3. Remove the HPL lamp from its box, holding it by the base.Note: To avoid premature lamp failure, do not touch the lamp glass.If you do touch the lamp, clean it carefully with rubbingalcohol and a clean, lint-free cloth before operation.Lampretentionbrackets4. Line up the flat sides of the lamp base with the retention bracketson either side of the socket. See Figure 3.5. Push down on the lamp base until the lamp seats firmly. (The top ofthe lamp base will be with the top edges of the retention Lamp housingbrackets www.sxsevents.co.ukwhen it is properly installed.)LampretainersKnurled boltFigure 3<strong>CE</strong> <strong>Source</strong> <strong>Four</strong> <strong>jr</strong> & <strong>CE</strong> <strong>Source</strong> <strong>Four</strong> <strong>jr</strong> <strong>Zoom</strong> • 7