Create successful ePaper yourself
Turn your PDF publications into a flip-book with our unique Google optimized e-Paper software.
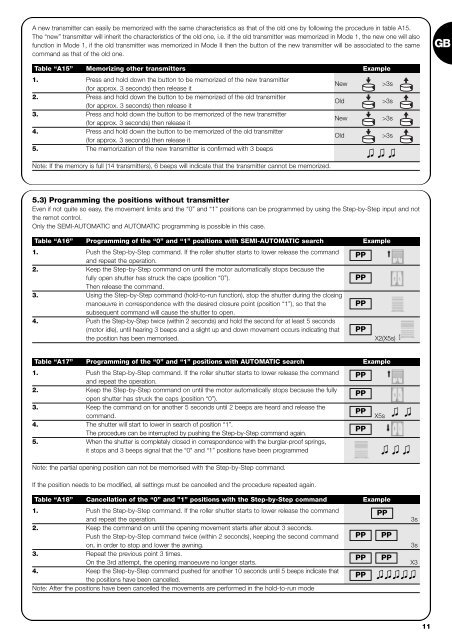
A new transmitter can easily be memorized with the same characteristics as that of the old one by following the procedure in table A15.The “new” transmitter will inherit the characteristics of the old one, i.e. if the old transmitter was memorized in Mode 1, the new one will alsofunction in Mode 1, if the old transmitter was memorized in Mode II then the button of the new transmitter will be associated to the same<strong>com</strong>mand as that of the old one.GBTable “A15” Memorizing other transmitters Example1. Press and hold down the button to be memorized of the new transmitter(for approx. 3 seconds) then release it2. Press and hold down the button to be memorized of the old transmitter(for approx. 3 seconds) then release it3. Press and hold down the button to be memorized of the new transmitter(for approx. 3 seconds) then release it4. Press and hold down the button to be memorized of the old transmitter(for approx. 3 seconds) then release itNewOldNewOld>3s>3s>3s>3s5. The memorization of the new transmitter is confirmed with 3 beepsNote: If the memory is full (14 transmitters), 6 beeps will indicate that the transmitter cannot be memorized.5.3) Programming the positions without transmitterEven if not quite so easy, the movement limits and the “0” and “1” positions can be programmed by using the Step-by-Step input and notthe remot control.Only the SEMI-AUTOMATIC and AUTOMATIC programming is possible in this case.Table “A16” Programming of the “0” and “1” positions with SEMI-AUTOMATIC search Example1. Push the Step-by-Step <strong>com</strong>mand. If the roller shutter starts to lower release the <strong>com</strong>mandand repeat the operation.2. Keep the Step-by-Step <strong>com</strong>mand on until the motor automatically stops because thefully open shutter has struck the caps (position “0”).Then release the <strong>com</strong>mand.3. Using the Step-by-Step <strong>com</strong>mand (hold-to-run function), stop the shutter during the closingmanoeuvre in correspondence with the desired closure point (position “1”), so that thesubsequent <strong>com</strong>mand will cause the shutter to open.4. Push the Step-by-Step twice (within 2 seconds) and hold the second for at least 5 seconds(motor idle), until hearing 3 beeps and a slight up and down movement occurs indicating thatthe position has been memorised.PPPPPPPPX2(X5s)Table “A17” Programming of the “0” and “1” positions with AUTOMATIC search Example1. Push the Step-by-Step <strong>com</strong>mand. If the roller shutter starts to lower release the <strong>com</strong>mandand repeat the operation.2. Keep the Step-by-Step <strong>com</strong>mand on until the motor automatically stops because the fullyopen shutter has struck the caps (position “0”).3. Keep the <strong>com</strong>mand on for another 5 seconds until 2 beeps are heard and release the<strong>com</strong>mand.4. The shutter will start to lower in search of position “1”.The procedure can be interrupted by pushing the Step-by-Step <strong>com</strong>mand again.5. When the shutter is <strong>com</strong>pletely closed in correspondence with the burglar-proof springs,it stops and 3 beeps signal that the “0" and “1” positions have been programmedNote: the partial opening position can not be memorised with the Step-by-Step <strong>com</strong>mand.If the position needs to be modified, all settings must be cancelled and the procedure repeated again.PPPPPPPPX5sTable “A18” Cancellation of the “0” and ”1” positions with the Step-by-Step <strong>com</strong>mand Example1. Push the Step-by-Step <strong>com</strong>mand. If the roller shutter starts to lower release the <strong>com</strong>mandand repeat the operation.2. Keep the <strong>com</strong>mand on until the opening movement starts after about 3 seconds.Push the Step-by-Step <strong>com</strong>mand twice (within 2 seconds), keeping the second <strong>com</strong>mandon, in order to stop and lower the awning.3. Repeat the previous point 3 times.On the 3rd attempt, the opening manoeuvre no longer starts.4. Keep the Step-by-Step <strong>com</strong>mand pushed for another 10 seconds until 5 beeps indicate thatthe positions have been cancelled.Note: After the positions have been cancelled the movements are performed in the hold-to-run modePPPPPPPPPPPP3s3sX311


