ml510 cover.qxp - Chamberlain
ml510 cover.qxp - Chamberlain
ml510 cover.qxp - Chamberlain
- No tags were found...

You also want an ePaper? Increase the reach of your titles
YUMPU automatically turns print PDFs into web optimized ePapers that Google loves.
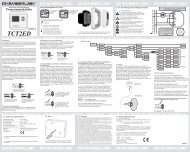
9.3Program another remote controlThe supplied remote control is already programmed.When purchasing additional remote controls, program the receiverto match the additional remote control codes.Program:1. Press „S“ for 1-2 seconds. LED1 begins to glow (for approx.10 seconds).2. Briefly press a button of the remote control twice.3. LED1 goes out. The Code is programmed.NOTE: Only one of the two buttons can be programmed.The last programmed button functions.Delete:All programmed remote control codes will be deleted. Press „S“ andhold it until LED1 goes out (approx. 8 seconds). All programmed codesare now erased. Reprogram each remote control you wish to use.NOTE: Only the original remote controls from the manufacturer shouldbe used. Remote controls that may look very similar, but do notoriginate from the manufacturer are not compatible. Such third-partyremotes create malfunctions such as automatic opening, and theguarantee on the function and safety expires.10Operation of the door openerAutomatic opening / closing of the door:The door opener can be operated using the following devices:• Handheld transmitter: Press the button until the door starts to move.• Wall switch (if this accessory is installed): Press the pushbutton untilthe door starts to move.• External key switch or wireless keypad (if this optional accessoryis installed).Manual opening of the door (by hand):If possible, the door must be closed completely. Weak ordefective springs can cause a rapid shutting down of theopendoor, which can lead to property damage or seriouspersonal injury.RELEASE: Briefly turn the red handle down. Then open the door byhand. Open close door without pulling the cable!LOCK: With the next upward or downward movement, it is automaticallylocked again.Function sequence:When operating the door opener by radio control or wall switch:- closes the door when it is fully open,- opens the door when it is fully closed,- stops the door if it opening or closing,- the door moves in the opposite direction to the last completed move,if it is partially open,- drives back the door to the open door position, if it hits anobstruction while closing,- stops the door, if it encounters an obstacle during opening.- Light barrier (optional): By means of the light barrier, a closing dooris lifted up or an open door is obstructed while closing, if a person locatedin the door area interrupts the sensor beam.11Cleaning and maintenanceBefore any maintenance, cleaning and relatedmaintenance work, the mains supply plug should bepulled out. Danger from electric shock!Maintenance of the door openerA proper installation ensures the optimum performance of the dooropener with minimum maintenance. An additional lubrication is notrequired. Gross dirt accumulation in the guide rail may impair thefunction and must be removed.11.1CleaningClean the drive head, wall switch and handheld transmitter with a soft,dry cloth.Do not use liquids.11.2 MaintenanceCheck the system often, especially cables, springs andfasteners, for signs of wear, damage or lack of balance.Do not use if repair or adjustment work must be performed,because an error in the system or an incorrectly balanced door maycause injury.Once a month:• Check automatic safety reverse again and reset if necessary.• Operate door manually. If the door is unbalanced or stuck, pleasecontact the service centre.• Check for complete opening and closing of the door.Where appropriate, readjust limit switches and / or power.Twice a year:• Check the chain tension. For this, first disconnect the carriage fromthe drive. If necessary, adjust chain tension.• Lightly lubricate the guide rail with standard grease (lubrication).Once a year (at the door):• Lubricate door roller, bearings and joints. An additional lubrication ofthe door opener is not required.Do not grease the door rails!Limit switch adjustment and force regulation:These settings must be checked and undertaken properly during the installationof the opener. Due to weathering, minor changes can occurduring operation of the opener that need to be addressed by a new setting.This can particularly happen in the first year of operation.Follow the instructions for setting limit switches and traction (see 9.1)carefully and re-check the automatic safety reverse after eachresetting.enThe operator light switches on in the following cases:1. First turning on of the door opener (short)2. Power interruption (short)3. With each turning on of the door opener.The light turns off automatically after 2 1/2 minutes.6