

Samsung 23''Série7 Moniteur station d'accueil C23A750 (LC23A750XS/EN ) - Manuel de l'utilisateur 7.74 MB, pdf, Anglais
Samsung 23''Série7 Moniteur station d'accueil C23A750 (LC23A750XS/EN ) - Manuel de l'utilisateur 7.74 MB, pdf, Anglais
Samsung 23''Série7 Moniteur station d'accueil C23A750 (LC23A750XS/EN ) - Manuel de l'utilisateur 7.74 MB, pdf, Anglais

Create successful ePaper yourself
Turn your PDF publications into a flip-book with our unique Google optimized e-Paper software.
2<br />
Using "HUB Monitor"<br />
network information such as the IP address to the PC, and the transmitted network information is<br />
automatically registered to the network settings on the PC. The DHCP service is convenient and useful<br />
especially in an environment where multiple PCs are used. Theoretically, the IP address changes each<br />
time the PC boots up (or an IP allotment request is sent); in many cases, however, the existing IP address<br />
is re-allotted. An Internet router performs two roles: creating a private IP address (NAT service) and<br />
automatically allotting the IP address to each PC (DHCP service) at the same time.<br />
When using your HUB Monitor’s or notebook PC’s LAN network, ensure you insert a LAN cable into<br />
only one <strong>de</strong>vice. Otherwise, a system crash may occur.<br />
Dynamic IP User<br />
1 To use a dynamic IP address, connect a LAN to your HUB Monitor.<br />
2 Next, go to the network settings menu and activate the HUB Monitor’s network <strong>de</strong>vice (select<br />
“Use”).<br />
<br />
Go to Control Panel Network and Internet Network and Sharing Center Change<br />
adapter settings. Next, right-click on the HUB Monitor’s network <strong>de</strong>vice (marked “LAN9512/<br />
LAN9514 USB 2.0 to Ethernet 10/100 Adapter #7”) and select Use.<br />
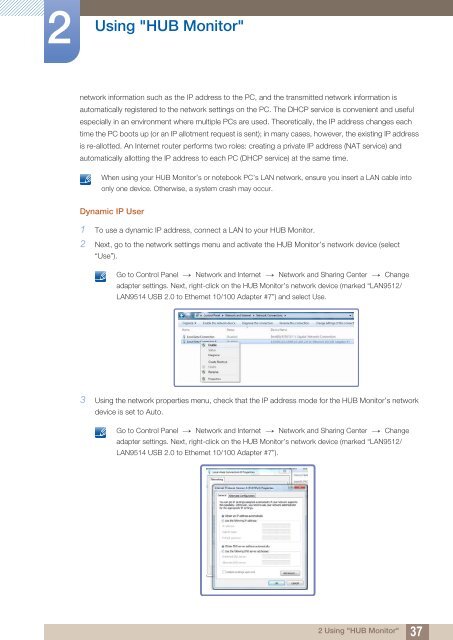
3 Using the network properties menu, check that the IP address mo<strong>de</strong> for the HUB Monitor’s network<br />
<strong>de</strong>vice is set to Auto.<br />
<br />
Go to Control Panel Network and Internet Network and Sharing Center Change<br />
adapter settings. Next, right-click on the HUB Monitor’s network <strong>de</strong>vice (marked “LAN9512/<br />
LAN9514 USB 2.0 to Ethernet 10/100 Adapter #7”).<br />
2 Using "HUB Monitor"<br />
37


