Cover CB124.qxp - Chamberlain
Cover CB124.qxp - Chamberlain
Cover CB124.qxp - Chamberlain

Create successful ePaper yourself
Turn your PDF publications into a flip-book with our unique Google optimized e-Paper software.
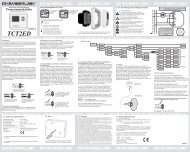
DESCRIPTION<br />
FUNCTION<br />
L<br />
connector L 230V supply<br />
N<br />
connector N 230V supply<br />
30VDC connector for a battery kit +/-<br />
CM475 + 041ADBL-0115<br />
Motor MASTER<br />
motor 1 (master opens first) red/blue<br />
Motor SECOND<br />
motor 2 (Second opens second)<br />
red/blue<br />
To check correct polarity refer to section basic setting and<br />
functionality P1+P2+P3<br />
24V/150mA<br />
flashing light (accessory)<br />
Motor1 MASTER<br />
BRN<br />
brown cable<br />
GRN<br />
green cable<br />
WHT<br />
white cable<br />
YEL<br />
yellow cable<br />
Motor2 SECOND<br />
BRN<br />
brown cable<br />
GRN<br />
green cable<br />
WHT<br />
white cable<br />
YEL<br />
yellow cable<br />
Light Contact<br />
gate monitor/ yard lighting<br />
PED<br />
connection for emergency stop or<br />
COM<br />
negative pole<br />
STOP<br />
stop switch<br />
Key symbol<br />
key switch<br />
COM<br />
negative pole<br />
PHOTO3<br />
photocells 3 (open)<br />
PHOTO2<br />
photocells 2 (close & open)<br />
PHOTO1<br />
photocells 1 (close)<br />
COM<br />
negative pole<br />
EDGE<br />
safety edge with 8.2KOhms<br />
8.2kOhms<br />
RADIO<br />
connection for radio module<br />
Antenna symol<br />
connection for antenna 75Ohms<br />
E-lock symbol<br />
connection for E-lock control board<br />
INPUT 24VAC<br />
24V power input from transformer.<br />
can be connected with any polarity.<br />
Transformer 230VAC 230V supply to transformer. Can be<br />
connected with any polarity.<br />
250V/2A<br />
fuse 250V/2A (2x included)<br />
DESCRIPTION OF LED´S (LIGHT EMITTING DIODE)<br />
DESCRIPTION COLOUR STATUS<br />
Stop green Stop Switch<br />
ON: Stop Active<br />
OFF: OK<br />
(Requires wire bridge if no<br />
switch is connected)<br />
Edge green Safety Edge 8.2KOhm<br />
ON: Activated<br />
OFF: OK<br />
(Requires 8.2KOhm resistor if not used)<br />
“Key symbol” red Key-switch 2-wing opening<br />
ON: Activated<br />
OFF: OK<br />
PED red Key-switch 1-wing opening<br />
ON: Activated<br />
OFF: OK<br />
PHO 1 red Photocell 1 (close)<br />
ON: OK, photocell<br />
connected (no problem)<br />
OFF: No photocells connected<br />
Dimming: Photocell blocked,<br />
function & diagnostic is<br />
blinking<br />
PHO 2 red Photocell 2 (open & close)<br />
(Refer to photocell 1)<br />
PHO 3 red Photocell 3 (open)<br />
(Refer to photocell 1)<br />
LEARN yellow Programming indicator<br />
ON: (flashing)<br />
programming is active<br />
OFF: off<br />
DGN red Diagnostic, Refer to page 15,<br />
section: Indication of diagnostic blinks<br />
CH1 red Remote control<br />
programming 2-wing opening<br />
ON: New remote can be<br />
programmed<br />
OFF: off<br />
Refer to section RADIO<br />
for programming details.<br />
en-6<br />
CH2 red Remote control programming<br />
1-wing opening (Refer to CH1)<br />
FUNCTIONALITY OVERVIEW OF THE PUSH BUTTONS P1, P2, & P3<br />
Button<br />
Function<br />
P1+P2+P3 Manual operation. The gate wings can be moved electrically in a manual mode. Activate Function: Push P1+P2+P3<br />
simultaneously. The LED DGN starts to flash as long as feature is activated. Button P1 operates Motor1. Button P2 operates<br />
Motor2. Deactivate: Wait for 20 seconds or disconnect logic board power. If wings close at first reverse wires red and blue.<br />
P1<br />
For automatic programming of the automatic travel distance limits of the gate.<br />
P1 + P2<br />
For the advanced programming of the travel distance limits of the gate<br />
P2 + P3<br />
Electric lock delay time<br />
P1 + P3<br />
Wing delay adjustment.<br />
P2<br />
Automatic closing time. Requires also P3 to confirm.<br />
P3<br />
Software-reset to factory defaults. Push & hold for 10 seconds. Does not reset the remote control memory (see section “radio”).<br />
Radio jumper + P1 Programming Remote for Channel 1<br />
Command for both motors (wings)<br />
Radio jumper + P2 Programming Remote for Channel 2<br />
Command for single motor (Motor1).