F7000 - F7001
F7000 - F7001
F7000 - F7001

You also want an ePaper? Increase the reach of your titles
YUMPU automatically turns print PDFs into web optimized ePapers that Google loves.
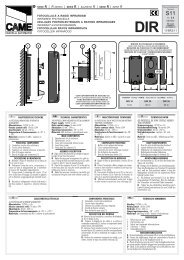
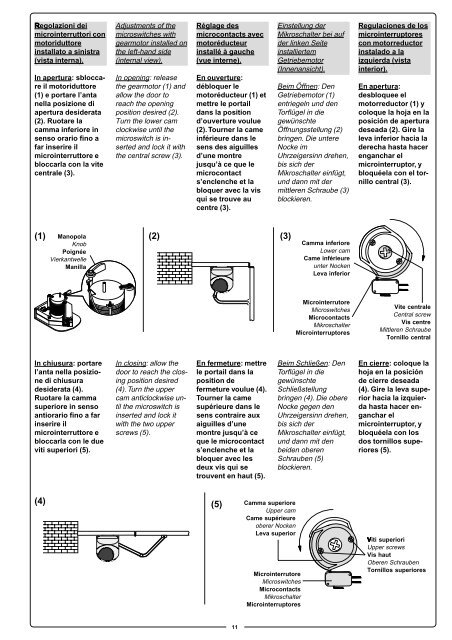
Regolazioni dei<br />
microinterruttori con<br />
motoriduttore<br />
installato a sinistra<br />
(vista interna).<br />
In apertura: sbloccare<br />
il motoriduttore<br />
(1) e portare l’anta<br />
nella posizione di<br />
apertura desiderata<br />
(2). Ruotare la<br />
camma inferiore in<br />
senso orario fino a<br />
far inserire il<br />
microinterruttore e<br />
bloccarla con la vite<br />
centrale (3).<br />
Adjustments of the<br />
microswitches with<br />
gearmotor installed on<br />
the left-hand side<br />
(internal view).<br />
In opening: release<br />
the gearmotor (1) and<br />
allow the door to<br />
reach the opening<br />
position desired (2).<br />
Turn the lower cam<br />
clockwise until the<br />
microswitch is inserted<br />
and lock it with<br />
the central screw (3).<br />
Réglage des<br />
microcontacts avec<br />
motoréducteur<br />
installé à gauche<br />
(vue interne).<br />
En ouverture:<br />
débloquer le<br />
motoréducteur (1) et<br />
mettre le portail<br />
dans la position<br />
d’ouverture voulue<br />
(2). Tourner la came<br />
inférieure dans le<br />
sens des aiguilles<br />
d’une montre<br />
jusqu’à ce que le<br />
microcontact<br />
s’enclenche et la<br />
bloquer avec la vis<br />
qui se trouve au<br />
centre (3).<br />
Einstellung der<br />
Mikroschalter bei auf<br />
der linken Seite<br />
installiertem<br />
Getriebemotor<br />
(Innenansicht).<br />
Beim Öffnen: Den<br />
Getriebemotor (1)<br />
entriegeln und den<br />
Torflügel in die<br />
gewünschte<br />
Öffnungsstellung (2)<br />
bringen. Die untere<br />
Nocke im<br />
Uhrzeigersinn drehen,<br />
bis sich der<br />
Mikroschalter einfügt,<br />
und dann mit der<br />
mittleren Schraube (3)<br />
blockieren.<br />
Regulaciones de los<br />
microinterruptores<br />
con motorreductor<br />
instalado a la<br />
izquierda (vista<br />
interior).<br />
En apertura:<br />
desbloquee el<br />
motorreductor (1) y<br />
coloque la hoja en la<br />
posición de apertura<br />
deseada (2). Gire la<br />
leva inferior hacia la<br />
derecha hasta hacer<br />
enganchar el<br />
microinterruptor, y<br />
bloquéela con el tornillo<br />
central (3).<br />
(1) (2) (3)<br />
Manopola<br />
Knob<br />
Poignée<br />
Vierkantwelle<br />
Manilla<br />
Camma inferiore<br />
Lower cam<br />
Came inférieure<br />
unter Nocken<br />
Leva inferior<br />
Microinterrutore<br />
Microswitches<br />
Microcontacts<br />
Mikroschalter<br />
Microinterruptores<br />
Vite centrale<br />
Central screw<br />
Vis centre<br />
Mittleren Schraube<br />
Tornillo central<br />
In chiusura: portare<br />
l’anta nella posizione<br />
di chiusura<br />
desiderata (4).<br />
Ruotare la camma<br />
superiore in senso<br />
antiorario fino a far<br />
inserire il<br />
microinterruttore e<br />
bloccarla con le due<br />
viti superiori (5).<br />
In closing: allow the<br />
door to reach the closing<br />
position desired<br />
(4). Turn the upper<br />
cam anticlockwise until<br />
the microswitch is<br />
inserted and lock it<br />
with the two upper<br />
screws (5).<br />
En fermeture: mettre<br />
le portail dans la<br />
position de<br />
fermeture voulue (4).<br />
Tourner la came<br />
supérieure dans le<br />
sens contraire aux<br />
aiguilles d’une<br />
montre jusqu’à ce<br />
que le microcontact<br />
s’enclenche et la<br />
bloquer avec les<br />
deux vis qui se<br />
trouvent en haut (5).<br />
Beim Schließen: Den<br />
Torflügel in die<br />
gewünschte<br />
Schließstellung<br />
bringen (4). Die obere<br />
Nocke gegen den<br />
Uhrzeigersinn drehen,<br />
bis sich der<br />
Mikroschalter einfügt,<br />
und dann mit den<br />
beiden oberen<br />
Schrauben (5)<br />
blockieren.<br />
En cierre: coloque la<br />
hoja en la posición<br />
de cierre deseada<br />
(4). Gire la leva superior<br />
hacia la izquierda<br />
hasta hacer enganchar<br />
el<br />
microinterruptor, y<br />
bloquéela con los<br />
dos tornillos superiores<br />
(5).<br />
(4) (5)<br />
Camma superiore<br />
Upper cam<br />
Came supérieure<br />
oberer Nocken<br />
Leva superior<br />
Microinterrutore<br />
Microswitches<br />
Microcontacts<br />
Mikroschalter<br />
Microinterruptores<br />
Viti superiori<br />
Upper screws<br />
Vis haut<br />
Oberen Schrauben<br />
Tornillos superiores<br />
11