

Samsung DIGIMAX i6 - User Manual_8.15 MB, pdf, ENGLISH
Samsung DIGIMAX i6 - User Manual_8.15 MB, pdf, ENGLISH
Samsung DIGIMAX i6 - User Manual_8.15 MB, pdf, ENGLISH

Create successful ePaper yourself
Turn your PDF publications into a flip-book with our unique Google optimized e-Paper software.
PictBridge : Print Setting<br />
Custom Set : You can select the Paper Size, Print Format, Paper Type, Print<br />
Quality, Date Print, and File Name Print menus for printed pictures.<br />
1. Use the LEFT and RIGHT buttons to select the<br />
[CUSTOM SET] menu tab.<br />
CUSTOM SET<br />
Size<br />
<br />
2. Use the UP and DOWN buttons to select the<br />
Layout<br />
<br />
Type<br />
<br />
desired submenu value, and then press the<br />
Quality<br />
<br />
Date<br />
<br />
RIGHT button.<br />
Exit:MENU<br />
Move: <br />
3. Use the UP and DOWN buttons to select the<br />
desired submenu value, and then press the OK button.<br />
The menus you can set up are as follows:<br />
Menu<br />
Function<br />
Sub menu<br />
Size<br />
Layout<br />
Type<br />
Quality<br />
Date<br />
File Name<br />
Set the size of the printing paper<br />
Auto, PostCard, Card, 4X6, L, 2L,<br />
Letter, A4, A3<br />
Set the number of pictures to be<br />
printed on a sheet of paper<br />
Auto, Full, 1, 2, 4, 8, 9, 16, Index<br />
Set the quality of the printing<br />
paper<br />
Auto, Plain, Photo, FastPhoto<br />
Set the quality of the picture to<br />
be printed<br />
Auto, Draft, Normal, Fine<br />
Set whether to print the date Auto, Off, On<br />
Set whether to print the file name<br />
Auto, Off, On<br />
Some menu options are not supported on all printers.<br />
If not supported, the menus are still displayed in the LCD, but are not selectable.<br />
If the setting values are not changed in the automatic/ manual setting, the setting<br />
values are automatically kept.<br />
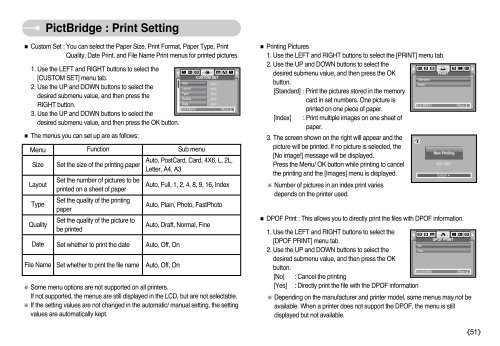
Printing Pictures<br />
1. Use the LEFT and RIGHT buttons to select the [PRINT] menu tab.<br />
2. Use the UP and DOWN buttons to select the<br />
desired submenu value, and then press the OK<br />
PRINT<br />
Standard<br />
button.<br />
Index<br />
[Standard] : Print the pictures stored in the memory<br />
card in set numbers. One picture is<br />
Exit:MENU<br />
printed on one piece of paper.<br />
[Index] : Print multiple images on one sheet of<br />
paper.<br />
3. The screen shown on the right will appear and the<br />
picture will be printed. If no picture is selected, the<br />
[No image!] message will be displayed.<br />
Press the Menu/ OK button while printing to cancel<br />
the printing and the [Images] menu is displayed.<br />
Number of pictures in an index print varies<br />
depends on the printer used.<br />
Now Printing<br />
001 / 001<br />
Cancel:<br />
Move: <br />
DPOF Print : This allows you to directly print the files with DPOF information.<br />
1. Use the LEFT and RIGHT buttons to select the<br />
DPOF PRINT<br />
[DPOF PRINT] menu tab.<br />
No<br />
2. Use the UP and DOWN buttons to select the<br />
Yes<br />
desired submenu value, and then press the OK<br />
button.<br />
Exit:MENU<br />
Move: <br />
[No] : Cancel the printing<br />
[Yes] : Directly print the file with the DPOF information<br />
Depending on the manufacturer and printer model, some menus may not be<br />
available. When a printer does not support the DPOF, the menu is still<br />
displayed but not available.<br />
51


