Dispensette® - Brand
Dispensette® - Brand
Dispensette® - Brand

Create successful ePaper yourself
Turn your PDF publications into a flip-book with our unique Google optimized e-Paper software.
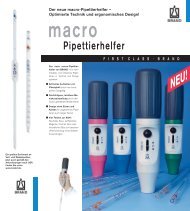
4. Mounting the<br />
filling tube and<br />
recirculation tube<br />
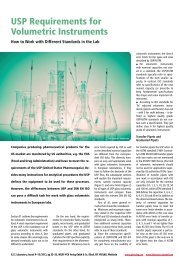
5. Mounting and<br />
aligning the instru-<br />
ment on a bottle<br />
Note:<br />
Dispensette ® III and Dispensette ® Organic:<br />
The adapters supplied with the instrument are made of polypropylene<br />
(PP), and can only be used for media which do not attack PP.<br />
If a higher chemical resistance is required, please use a EFTE/PTFE<br />
bottle adapter (Accessories, page 54).<br />
Dispensette ® HF:<br />
The adapters supplied with the instrument are made of ETFE and<br />
PTFE.<br />
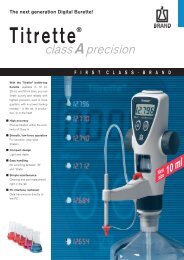
6. Transporting the<br />
instrument<br />
Warning:<br />
Adjust the length of the telescoping filling<br />
tube to the bottle height and attach<br />
it. If a SafetyPrime recirculation valve<br />
(optional) is used, the recirculation tube<br />
must also be mounted. Insert the recirculation<br />
tube with the opening pointing<br />
outward (Fig. 4).<br />
Screw the instrument (GL 45 thread)<br />
onto the reagent bottle and then align<br />
the discharge tube with the bottle label.<br />
By turning the valve block. (Fig. 5). To<br />
prevent tipping over use a bottle stand<br />
for small bottles.<br />
For bottles with other thread sizes, select a suitable adapter.<br />
When mounted to a reagent bottle,<br />
always carry the instrument as shown in<br />
the figure (Fig. 6)!<br />
Always wear protective gloves when touching the instrument or the<br />
bottle, especially when using dangerous liquids (e.g. HF).<br />
4<br />
5<br />
6<br />
First Steps<br />
English<br />
39