Dispensette® - Brand
Dispensette® - Brand
Dispensette® - Brand

You also want an ePaper? Increase the reach of your titles
YUMPU automatically turns print PDFs into web optimized ePapers that Google loves.
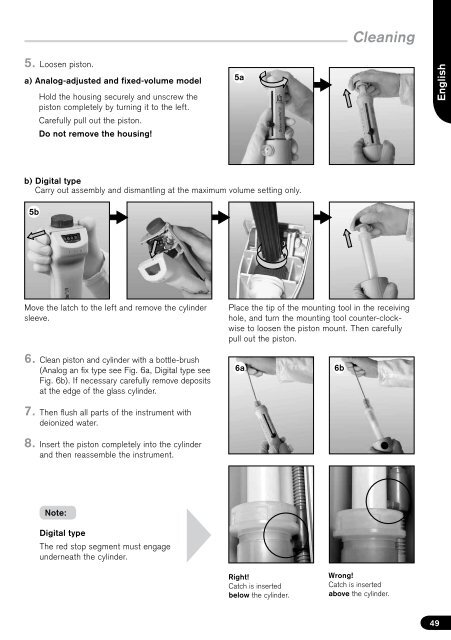
5. Loosen piston.<br />
a) Analog-adjusted and fixed-volume model<br />
5b<br />
Hold the housing securely and unscrew the<br />
piston completely by turning it to the left.<br />
Carefully pull out the piston.<br />
Do not remove the housing!<br />
b) Digital type<br />
Carry out assembly and dismantling at the maximum volume setting only.<br />
Move the latch to the left and remove the cylinder<br />
sleeve.<br />
6. Clean piston and cylinder with a bottle-brush<br />
(Analog an fix type see Fig. 6a, Digital type see<br />
Fig. 6b). If necessary carefully remove deposits<br />
at the edge of the glass cylinder.<br />
7. Then flush all parts of the instrument with<br />
deionized water.<br />
8. Insert the piston completely into the cylinder<br />
and then reassemble the instrument.<br />
Note:<br />
Digital type<br />
The red stop segment must engage<br />
underneath the cylinder.<br />
5a<br />
6a 6b<br />
Right!<br />
Catch is inserted<br />
below the cylinder.<br />
Cleaning<br />
Place the tip of the mounting tool in the receiving<br />
hole, and turn the mounting tool counter-clockwise<br />
to loosen the piston mount. Then carefully<br />
pull out the piston.<br />
Wrong!<br />
Catch is inserted<br />
above the cylinder.<br />
English<br />
49