
Create successful ePaper yourself
Turn your PDF publications into a flip-book with our unique Google optimized e-Paper software.
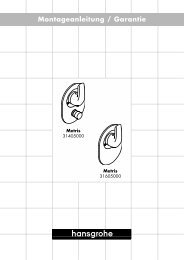
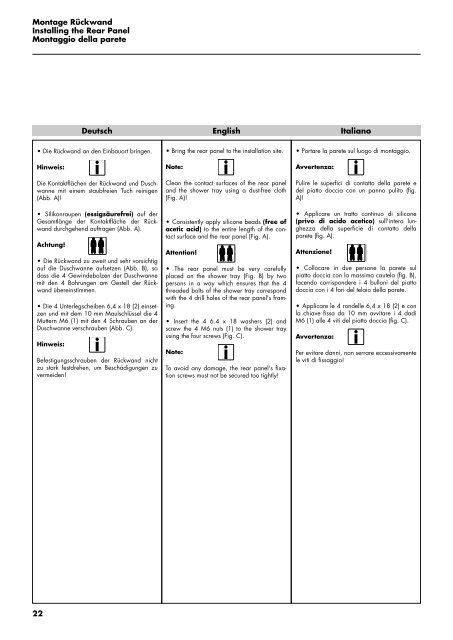
Montage Rückwand<br />
Installing the Rear Panel<br />
Montaggio della parete<br />
22<br />
Deutsch<br />
• Die Rückwand an den Einbauort bringen.<br />
Hinweis:<br />
Die Kontaktflächen der Rückwand und Duschwanne<br />
mit einem staubfreien Tuch reinigen<br />
(Abb. A)!<br />
• Silikonraupen (essigsäurefrei) auf der<br />
Gesamtlänge der Kontaktfläche der Rückwand<br />
durchgehend auftragen (Abb. A).<br />
Achtung!<br />
• Die Rückwand zu zweit und sehr vorsichtig<br />
auf die Duschwanne aufsetzen (Abb. B), so<br />
dass die 4 Gewindebolzen der Duschwanne<br />
mit den 4 Bohrungen am Gestell der Rückwand<br />
übereinstimmen.<br />
• Die 4 Unterlegscheiben 6,4 x 18 (2) einsetzen<br />
und mit dem 10 mm Maulschlüssel die 4<br />
Muttern M6 (1) mit den 4 Schrauben an der<br />
Duschwanne verschrauben (Abb. C).<br />
Hinweis:<br />
Befestigungsschrauben der Rückwand nicht<br />
zu stark festdrehen, um Beschädigungen zu<br />
vermeiden!<br />
English<br />
• Bring the rear panel to the installation site.<br />
Note:<br />
Clean the contact surfaces of the rear panel<br />
and the shower tray using a dust-free cloth<br />
(Fig. A)!<br />
• Consistently apply silicone beads (free of<br />
acetic acid) to the entire length of the contact<br />
surface and the rear panel (Fig. A).<br />
Attention!<br />
• The rear panel must be very carefully<br />
placed on the shower tray (Fig. B) by two<br />
persons in a way which ensures that the 4<br />
threaded bolts of the shower tray correspond<br />
with the 4 drill holes of the rear panel's framing.<br />
• Insert the 4 6.4 x 18 washers (2) and<br />
screw the 4 M6 nuts (1) to the shower tray<br />
using the four screws (Fig. C).<br />
Note:<br />
To avoid any damage, the rear panel's fixation<br />
screws must not be secured too tightly!<br />
Italiano<br />
• Portare la parete sul luogo di montaggio.<br />
Avvertenza:<br />
Pulire le superfici di contatto della parete e<br />
del piatto doccia con un panno pulito (fig.<br />
A)!<br />
• Applicare un tratto continuo di silicone<br />
(privo di acido acetico) sull'intera lunghezza<br />
della superficie di contatto della<br />
parete (fig. A).<br />
Attenzione!<br />
• Collocare in due persone la parete sul<br />
piatto doccia con la massima cautela (fig. B),<br />
facendo corrispondere i 4 bulloni del piatto<br />
doccia con i 4 fori del telaio della parete.<br />
• Applicare le 4 rondelle 6,4 x 18 (2) e con<br />
la chiave fissa da 10 mm avvitare i 4 dadi<br />
M6 (1) alle 4 viti del piatto doccia (fig. C).<br />
Avvertenza:<br />
Per evitare danni, non serrare eccessivamente<br />
le viti di fissaggio!