
Create successful ePaper yourself
Turn your PDF publications into a flip-book with our unique Google optimized e-Paper software.
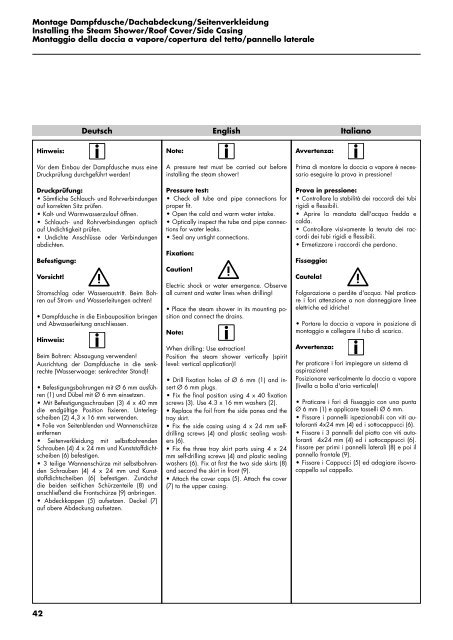
Montage Dampfdusche/Dachabdeckung/Seitenverkleidung<br />
Installing the Steam Shower/Roof Cover/Side Casing<br />
Montaggio della doccia a vapore/copertura del tetto/pannello laterale<br />
Hinweis:<br />
42<br />
Deutsch<br />
Vor dem Einbau der Dampfdusche muss eine<br />
Druckprüfung durchgeführt werden!<br />
Druckprüfung:<br />
• Sämtliche Schlauch- und Rohrverbindungen<br />
auf korrekten Sitz prüfen.<br />
• Kalt- und Warmwasserzulauf öffnen.<br />
• Schlauch- und Rohrverbindungen optisch<br />
auf Undichtigkeit prüfen.<br />
• Undichte Anschlüsse oder Verbindungen<br />
abdichten.<br />
Befestigung:<br />
Vorsicht!<br />
Stromschlag oder Wasseraustritt. Beim Bohren<br />
auf Strom- und Wasserleitungen achten!<br />
• Dampfdusche in die Einbauposition bringen<br />
und Abwasserleitung anschliessen.<br />
Hinweis:<br />
Beim Bohren: Absaugung verwenden!<br />
Ausrichtung der Dampfdusche in die senkrechte<br />
(Wasserwaage: senkrechter Stand)!<br />
• Befestigungsbohrungen mit Ø 6 mm ausführen<br />
(1) und Dübel mit Ø 6 mm einsetzen.<br />
• Mit Befestigungsschrauben (3) 4 x 40 mm<br />
die endgültige Position fixieren. Unterlegscheiben<br />
(2) 4,3 x 16 mm verwenden.<br />
• Folie von Seitenblenden und Wannenschürze<br />
entfernen<br />
• Seitenverkleidung mit selbstbohrenden<br />
Schrauben (4) 4 x 24 mm und Kunststoffdichtscheiben<br />
(6) befestigen.<br />
• 3 teilige Wannenschürze mit selbstbohrenden<br />
Schrauben (4) 4 x 24 mm und Kunststoffdichtscheiben<br />
(6) befestigen. Zunächst<br />
die beiden seitlichen Schürzenteile (8) und<br />
anschließend die Frontschürze (9) anbringen.<br />
• Abdeckkappen (5) aufsetzen. Deckel (7)<br />
auf obere Abdeckung aufsetzen.<br />
Note:<br />
English<br />
A pressure test must be carried out before<br />
installing the steam shower!<br />
Pressure test:<br />
• Check all tube and pipe connections for<br />
proper fit.<br />
• Open the cold and warm water intake.<br />
• Optically inspect the tube and pipe connections<br />
for water leaks.<br />
• Seal any untight connections.<br />
Fixation:<br />
Caution!<br />
Electric shock or water emergence. Observe<br />
all current and water lines when drilling!<br />
• Place the steam shower in its mounting position<br />
and connect the drains.<br />
Note:<br />
When drilling: Use extraction!<br />
Position the steam shower vertically (spirit<br />
level: vertical application)!<br />
• Drill fixation holes of Ø 6 mm (1) and insert<br />
Ø 6 mm plugs.<br />
• Fix the final position using 4 x 40 fixation<br />
screws (3). Use 4.3 x 16 mm washers (2).<br />
• Replace the foil from the side panes and the<br />
tray skirt.<br />
• Fix the side casing using 4 x 24 mm selfdrilling<br />
screws (4) and plastic sealing washers<br />
(6).<br />
• Fix the three tray skirt parts using 4 x 24<br />
mm self-drilling screws (4) and plastic sealing<br />
washers (6). Fix at first the two side skirts (8)<br />
and second the skirt in front (9).<br />
• Attach the cover caps (5). Attach the cover<br />
(7) to the upper casing.<br />
Avvertenza:<br />
Italiano<br />
Prima di montare la doccia a vapore è necessario<br />
eseguire la prova in pressione!<br />
Prova in pressione:<br />
• Controllare la stabilità dei raccordi dei tubi<br />
rigidi e flessibili.<br />
• Aprire la mandata dell'acqua fredda e<br />
calda.<br />
• Controllare visivamente la tenuta dei raccordi<br />
dei tubi rigidi e flessibili.<br />
• Ermetizzare i raccordi che perdono.<br />
Fissaggio:<br />
Cautela!<br />
Folgorazione o perdite d'acqua. Nel praticare<br />
i fori attenzione a non danneggiare linee<br />
elettriche ed idriche!<br />
• Portare la doccia a vapore in posizione di<br />
montaggio e collegare il tubo di scarico.<br />
Avvertenza:<br />
Per praticare i fori impiegare un sistema di<br />
aspirazione!<br />
Posizionare verticalmente la doccia a vapore<br />
(livella a bolla d'aria verticale)!<br />
• Praticare i fori di fissaggio con una punta<br />
Ø 6 mm (1) e applicare tasselli Ø 6 mm.<br />
• Fissare i pannelli ispezionabili con viti autoforanti<br />
4x24 mm (4) ed i sottocappucci (6).<br />
• Fissare i 3 pannelli del piatto con viti autoforanti<br />
4x24 mm (4) ed i sottocappucci (6).<br />
Fissare per primi i pannelli laterali (8) e poi il<br />
pannello frontale (9).<br />
• Fissare i Cappucci (5) ed adagiare ilsovracappello<br />
sul cappello.