Create successful ePaper yourself
Turn your PDF publications into a flip-book with our unique Google optimized e-Paper software.
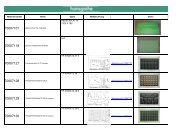
M o n t a g e a n l e i t u n g<br />
Installation Instructions<br />
Istruzioni di montaggio<br />
<strong>Aquafun</strong><br />
<strong>Aquafun</strong> 140 DL 10 Comfort 21116000<br />
<strong>Aquafun</strong> 140 DL 10 Deluxe 21124000<br />
Deutsch<br />
English<br />
Italiano
Inhaltsverzeichnis<br />
Contents<br />
Indice<br />
2<br />
Deutsch<br />
Vorwort/Anschlussmaße 4<br />
Ansichten vermaßt 5<br />
Ausstattung 6<br />
Serviceteile 8<br />
Sicherheitshinweise 10<br />
Verwendete Symbole 11<br />
Technische Daten 13<br />
Checkliste 14<br />
Verpackungsinhalt 15<br />
Benötigte Werkzeuge 16<br />
Einstellung Wannenfüße/Ausrichtung Duschwanne 18<br />
Seitenverkleidung abnehmen 20<br />
Montage Rückwand 22<br />
Vorbereitung Montage Türrahmen 24<br />
Schiebetür einbauen/einstellen 30<br />
Montage obere Abdeckung (Dach) 32<br />
Erdungsmaßnahme/Stromversorgung 34<br />
Anschluss Beleuchtung/Lautsprecher 36<br />
Montage Verbindungsschläuche/Kopfbrause 38<br />
Montage Dampfdusche/Dachabdeckung/Seitenverkleidung<br />
42<br />
Schiebetür einstellen 44<br />
Montage Schlauch/Handbrause 46<br />
Thermostat einstellen/warten 48<br />
Brausenfunktionen 50<br />
Elektronisches Bedienelement 54<br />
Störungen und Abhilfen 70<br />
English<br />
Preface/Connection Dimensions 4<br />
Preface/Connection Dimensions 5<br />
Equipment 6<br />
Spare Parts 8<br />
Safety Instructions 10<br />
Used Symbols 11<br />
Technical Information 13<br />
Check list 14<br />
Packaging Contents 15<br />
Required Tools 16<br />
Shower Tray Feet Setting/Shower Tray Alignment 18<br />
Removing the Side Casing 20<br />
Installing the Rear Panel 22<br />
Preparing the Door frame Installation 24<br />
Installing/Adjusting the Slide Door 30<br />
Installing the Top Cover 32<br />
Earthing Measure/Power Supply 34<br />
Connecting the Illumination/Loudspeaker 36<br />
Installing the Connection Tubes/Head Shower 38<br />
Installing the Steam Shower/Roof Cover/Side Casing 42<br />
Adjusting the Slide Door 44<br />
Installing the Tube/Hand Shower 46<br />
Thermostat Adjusting/Servicing 48<br />
Shower Functions Setting 50<br />
Electronic Operating Element 54<br />
Failures and Rectifications 70
Italiano<br />
Introduzione/quote di collegamento 4<br />
Quote di collegamento 5<br />
Equipaggiamento 6<br />
Parti Di Ricambio 8<br />
Norme di sicurezza 10<br />
Simboli utilizzati 11<br />
Dati tecnici 13<br />
Elenco di controllo 14<br />
Contenuto della confezione 15<br />
Attrezzi necessari 16<br />
Regolazione dei piedi del piatto doccia/posizionamento del<br />
piatto doccia 18<br />
Smontaggio del pannello laterale 20<br />
Montaggio della parete 22<br />
Preparativi per la chiusura 24<br />
Montaggio/regolazione della porta scorrevole 30<br />
Montaggio della copertura superiore 32<br />
Messa a terra/alimentazione elettrica 34<br />
Collegamento dell‘illuminazione/altoparlante 36<br />
Montaggio dei tubi flessibili di raccordo/soffione doccia<br />
38<br />
Montaggio della doccia a vapore/copertura del tetto/<br />
pannello laterale 42<br />
Regolazione della porta scorrevole 44<br />
Montaggio del tubo flessibile/doccia manuale 46<br />
Regolazione/manutenzione del termostatico 48<br />
Funzioni della doccia 50<br />
Elemento di comando elettronico (Deluxe) 54<br />
Anomalie e rimedi 70<br />
Inhaltsverzeichnis<br />
Contents<br />
Indice<br />
3<br />
Deutsch<br />
English<br />
Italiano
Vorwort/Anschlussmaße<br />
Preface/Connection Dimensions<br />
Introduzione/quote di collegamento<br />
4<br />
Deutsch<br />
Die Montageanleitung enthält die wichtigsten<br />
Montageschritte und Installationshinweise für<br />
die auf der Titelseite bezeichneten Produkte.<br />
Lesen Sie die Montageanleitung aufmerksam,<br />
um Montagefehler zu vermeiden. Die Dampfdusche<br />
wurde nach den geltenden Richtlinien<br />
hergestellt. Unsachgemäße Montage kann zu<br />
Verletzungen führen!<br />
Information<br />
Die Dampfdusche wurde konform mit den<br />
Niederspannungsrichtlinien 73/23/EWG,<br />
93/68 EWG und der Norm CEI 64-8 (IEC<br />
364) hergestellt. Die Schutzart der Dampfdusche<br />
ist IPX4, die Nennspannung ist 230 V,<br />
die Nennleistung ist 2400 W für die Ausführung<br />
Steam und Deluxe.<br />
Die von der "Europarichtlinie" für elektromagnetische<br />
Verträglichkeit auferlegten Sicherheitsanforderungen<br />
(Richtlinie 89/336/<br />
EWG, 92/31/EWG, 93/68/EWG) und die<br />
Konformität wird durch die Anwendung folgender<br />
europäischer Normen gewährleistet;<br />
EN 55014, EN 55104, EN 61000-3-2 und<br />
EN 61000-3-3.<br />
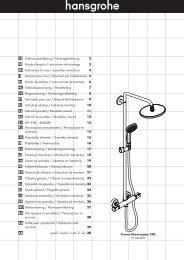
Anschlussmaße<br />
(Abb. B)<br />
Position 1: Empfohlene Stelle für den<br />
Austritt der elektrischen Versorgung aus der<br />
Wand (Kabel 3 x 1,5 mm 2 / Kabellänge<br />
2600 mm).<br />
Position 2: Empfohlene Stelle für den Kaltwasseranschluss<br />
DN 15 1/2" Innengewinde<br />
für die Verbindung zum Thermostat.<br />
Position 3: Empfohlene Stelle für den<br />
Warmwasseranschluss DN 15 1/2" Innengewinde<br />
für die Verbindung zum Thermostat.<br />
Position 4: Empfohlener Bereich für den<br />
Wasserablauf DN 50.<br />
Hinweis:<br />
Mindestraumhöhe von 2400 mm notwendig!<br />
Einbau in fertig gefliestes Bad mit<br />
"Fliesenspiegel" auf mindestens 2300<br />
mm!<br />
Erdungskabel: Querschnitt von mindestens<br />
4 mm 2 und einer Länge von ca. 2600 mm!<br />
English<br />
These installation instructions contain the most<br />
important installing procedures and installation<br />
notes for the products stated on the front<br />
page. Please read these instructions carefully<br />
in order to avoid incorrect installation.<br />
The steam shower has been manufactured<br />
in accordance with the applicable regulations.<br />
Any improper installation may lead to<br />
injuries!<br />
Information<br />
The steam shower has been manufactured in<br />
compliance with the 73/23/EEC Low-Voltage<br />
Electrical Equipment Directive, 93/68 EEC<br />
Low-Voltage Electrical Equipment Directive<br />
and the CEI 64-8 (IEC 364) standard. The<br />
steam shower's degree of protection is IPX4,<br />
its rated voltage is 230 V, its rated output for<br />
the Steam and Deluxe versions is 2400 W.<br />
The compliance with the safety requirements<br />
(89/336/EEC, 92/31/EEC, 93/68/EEC<br />
guidelines) specified by the "European<br />
Guideline" for electro-magnetic compatibility<br />
is assured by the application of the following<br />
European standards; EN 55014, EN 55104,<br />
EN 61000-3-2 and EN 61000-3-3.<br />
Connection dimensions<br />
(Fig. B)<br />
Position 1: Recommended position for electrical<br />
supply cable exit from the wall (cable<br />
3 x 1.5 mm 2 / cable length 2600 mm).<br />
Position 2: Recommended position for<br />
cold water connection DN 15 1/2" internal<br />
thread for connection to the thermostat.<br />
Position 3: Recommended position for<br />
warm water connection DN 15 1/2" internal<br />
thread for connection to the thermostat.<br />
Position 4: Recommended area for water<br />
drainage DN 50.<br />
Note:<br />
A minimum room height of 2400 mm is<br />
required! Installation into completely<br />
tiled bathroom with a minimum "tiled<br />
area" of 2300 mm!<br />
Earthing cable: Cross section of at least<br />
4 mm 2 and a length of approx. 2600 mm!<br />
Italiano<br />
Le istruzioni di montaggio descrivono le<br />
più importanti operazioni di montaggio e<br />
le avvertenze di installazione per i prodotti<br />
indicati nella pagina di copertina. Leggere<br />
attentamente le istruzioni di montaggio per<br />
evitare errori. La doccia a vapore è stata<br />
realizzata conformemente alle direttive<br />
vigenti. Il montaggio scorretto può provocare<br />
lesioni!<br />
Informazione<br />
La doccia a vapore è stata realizzata<br />
conformemente alla direttiva sulla bassa<br />
tensione 73/23/CEE, 93/68 CEE ed alla<br />
norma CEI 64-8 (IEC 364). La classe di<br />
protezione della doccia a vapore è IPX4,<br />
la tensione nominale di 230 V e la potenza<br />
nominale di 2400 W per i modelli Steam e<br />
Deluxe.<br />
I requisiti di sicurezza previsti dalla direttiva<br />
europea sulla compatibilità elettromagnetica<br />
(direttiva 89/336/CEE, 92/31/CEE, 93/<br />
68/CEE) e la conformità vengono garantiti<br />
dall'applicazione delle seguenti norme<br />
europee: EN 55014, EN 55104, EN 61000-<br />
3-2 e EN 61000-3-3.<br />
Quote di collegamento<br />
(fig. B)<br />
Posizione 1: punto consigliato per la<br />
fuoriuscita del cavo di alimentazione elettrica<br />
dalla parete (cavo 3 x 1,5 mm 2 / lunghezza<br />
2600 mm).<br />
Posizione 2: punto consigliato per il<br />
raccordo dell'acqua fredda DN 15 1/2"<br />
con filettatura interna per il collegamento al<br />
termostatico.<br />
Posizione 3: punto consigliato per il<br />
raccordo dell'acqua calda DN 15 1/2"<br />
con filettatura interna per il collegamento al<br />
termostatico.<br />
Posizione 4: zona consigliata per lo<br />
scarico dell'acqua DN 50.<br />
Avvertenza:<br />
Altezza minima del locale 2400 mm!<br />
Montaggio in stanza da bagno<br />
piastrellata con altezza minima della<br />
piastrellatura di 2300 mm!<br />
Cavo di terra: sezione minima<br />
4 mm 2 e lunghezza di circa 2600 mm!
Innenansicht<br />
Inside view<br />
Vista interna<br />
Anschlussmaße<br />
Connection dimensions<br />
Quote di collegamento<br />
1<br />
3<br />
2<br />
4<br />
A<br />
B<br />
Markierter Bereich (4): Ideal für Wasserablauf<br />
Marked area (4): ideal for water drainage<br />
Zona a tratteggio (4): raccomandata per lo scarico<br />
Grundriss<br />
Ground plan<br />
Pianta<br />
C<br />
Ansichten vermaßt<br />
Preface/Connection Dimensions<br />
Quote di collegamento<br />
1<br />
3<br />
2<br />
4<br />
5<br />
Deutsch<br />
English<br />
Italiano
Ausstattung<br />
Equipment<br />
Equipaggiamento<br />
6<br />
Deutsch<br />
Grundausstattung:<br />
1. Deckel<br />
2. Obere Abdeckung (Dach)<br />
3. Rückwand<br />
4. Ausgleichsprofil (vorne rechts)<br />
5. Trägerrahmen<br />
6. Duschwanne<br />
7. Wannenschürze<br />
8. Schiebetür (links oder rechts)<br />
9. Ausgleichsprofil (vorne links)<br />
10. Seitenverkleidung<br />
<strong>Aquafun</strong> Deluxe<br />
Duschkabine, Duschwanne und Wannenschürze<br />
sind aus ABS/PMMA. Schiebetür<br />
aus Sicherheitsglas zum Wenden (Links- oder<br />
Rechtsanschlag in einem).<br />
Steuerung der Duschfunktion:<br />
Thermostat (1/2") manuell, Ab- und Umstellung<br />
manuell.<br />
Brausenbestückung (Anzahl):<br />
- 8 Pharo Seitenbrausen (Massagestrahl)<br />
- 12 Pharo Rückenbrausen (Massagestrahl)<br />
- 8 Nackenjets<br />
- Handbrause Mistral 3 (3 Strahlarten)<br />
- Raindance Kopfbrause (5 Strahlarten)<br />
- Unica D Brausenstange<br />
(höhenverstellbar um 600 mm)<br />
- Kombination der Brausen<br />
Steuerung der Dampffunktion über ein elektronisches<br />
Bedienelement:<br />
- Dampf an/aus (Leistung Dampfgenerator<br />
2,4 kW)<br />
- Einstellbare Dampfzeit<br />
- Leistungsregulierung<br />
- Dufteinlass mit Aromasieb<br />
Kaskadenfunktion und schottische Dusche,<br />
Beleuchtung mit Farblicht (LED) und einem<br />
integrierten Radio.<br />
English<br />
Basic equipment:<br />
1. Cover<br />
2. Top cover (roof)<br />
3. Rear panel<br />
4. Compensation profile (right front)<br />
5. Support frame<br />
6. Shower tray<br />
7. Tray skirt<br />
8. Slide door (left or right)<br />
9. Compensation profile (left front)<br />
10. Side casing<br />
<strong>Aquafun</strong> Deluxe<br />
The shower cabin, shower tray and tray skirt<br />
are made of ABS/PMMA. Reversible slide<br />
door made of safety glass (combining a left<br />
and right hinging option).<br />
Shower function control:<br />
Manual thermostat (1/2"), manual off-switch<br />
and adjustment.<br />
Shower equipment (number):<br />
- 8 Pharo side showers (massaging jet)<br />
- 12 Pharo back showers (massaging jet)<br />
- 8 neck jets<br />
- Mistral 3 hand shower (3 jet types)<br />
- Raindance head shower (5 jet types)<br />
- Unica D shower bar<br />
(height-adjustable by 600 mm)<br />
- Shower combination<br />
Steam control function via an electronic operating<br />
element:<br />
- Steam on/off (The steam generator's out<br />
put amounts to 2.4 kW.)<br />
- Adjustable steam time<br />
- Output regulation<br />
- Fragrance admission via an aroma filter<br />
Cascades function and Scotch shower, colored-light<br />
illumination (LED) and an integrated<br />
radio. (Further equipment identical with the<br />
<strong>Aquafun</strong> Shower version!)<br />
Italiano<br />
Equipaggiamento di base:<br />
1. Controcappello<br />
2. Cappello<br />
3. Parete doccia<br />
4. Profilato di compensazione<br />
(anteriore destro)<br />
5. Telaio<br />
6. Chiusura<br />
7 Pannello piatto doccia<br />
8. Porta scorrevole (a sinistra o a destra)<br />
9. Profilato di compensazione<br />
(anteriore sinistro)<br />
10. Pannello laterale<br />
<strong>Aquafun</strong> Deluxe<br />
La cabina doccia, il piatto doccia ed il pannello<br />
del piatto doccia e sono di ABS/PMMA.<br />
Porta scorrevole con vetro di sicurezza invertibile<br />
(apertura verso destra o verso sinistra).<br />
Controllo della funzione doccia:<br />
termostatico (1/2") manuale, spegnimento e<br />
commutazione manuali.<br />
Numero di docce:<br />
- 8 docce laterali Pharo (per massaggio)<br />
- 12 docce posteriori Pharo (per massaggio)<br />
- 8 ugelli per la nuca<br />
- doccia manuale Mistral 3 (3 tipi di getto)<br />
- soffione doccia Raindance (5 tipi di getto)<br />
- asta scorrevole Unica D<br />
(regolabile in altezza di 600 mm)<br />
- combinazione delle docce<br />
Controllo della funzione vapore mediante<br />
elemento di comando elettronico<br />
- vapore on/off (Potenza del generatore di<br />
vapore 2,4 kW)<br />
- durata del vapore regolabile<br />
- regolazione della potenza<br />
- ingresso essenze con filtro aroma<br />
Funzione a cascata e doccia scozzese, illuminazione<br />
con luce colorata (LED) ed apparecchio<br />
radio integrato.
5<br />
10<br />
9 10<br />
1<br />
2<br />
3 4<br />
6<br />
7 8<br />
Ausstattung<br />
Equipment<br />
Equipaggiamento<br />
7<br />
Deutsch<br />
English<br />
Italiano
Serviceteile<br />
Spare Parts<br />
Parti Di Ricambio<br />
Pos.<br />
1<br />
8<br />
2<br />
3<br />
4<br />
5<br />
6<br />
7<br />
8<br />
9<br />
10<br />
11<br />
12<br />
13<br />
14<br />
15<br />
16<br />
17<br />
18<br />
19<br />
20<br />
21<br />
22<br />
23<br />
24<br />
25<br />
26<br />
27<br />
28<br />
29<br />
30<br />
31<br />
32<br />
33<br />
34<br />
---<br />
---<br />
Bezeichnung<br />
Chromotherapielicht kpl.<br />
Weißlicht (Comfort)<br />
Lautsprecher<br />
Deckel für Lautsprecher<br />
Abdeckung<br />
Ab- / Umstellventil<br />
Griff<br />
Rosette Ø 68 mm<br />
Mutter<br />
Temperatur Regeleinheit<br />
Thermostatgriff<br />
Anschlaghülse<br />
Bedienelement<br />
Wandstange<br />
Schieber U‘D kpl.<br />
Handbrause<br />
Brauseschlauch<br />
Nacken Düse<br />
Seitenbrause<br />
Magnetventil 1 Weg / 12V<br />
Bajonettverschluss 3/4" M<br />
Dampfgenerator kpl.<br />
Wasserstandsensor<br />
Potentiometer für Wasserstandsensor<br />
Magnetventil<br />
Zulauf Dampfgenerator<br />
Magnetventil Wasserabfluss<br />
ampfgenerator<br />
Heizspirale (230V/2400W)<br />
Überhitzungsschutz Thermostat<br />
Schaltkasten<br />
Dampfaustritt<br />
Staro 90 Color Set<br />
Staro 90 Grundset<br />
Reling (240mm)<br />
Wannenfüße<br />
Seitenverkleidung rechts<br />
Seitenverkleidung links<br />
Wandausgleichschiene<br />
(links/rechts)<br />
Kopfbrause<br />
Wannenschürze<br />
Türgriff<br />
Türstopper<br />
Schiebetür<br />
Gleitrolle<br />
Dichtung (Tür unten)<br />
Dichtung (Tür oben)<br />
Dichtung<br />
Glasabtrennung/Duschwanne<br />
Ausgleichsprofil<br />
Dichtung<br />
Tür fest<br />
Eckprofil<br />
Duschwanne inkl. Ventil<br />
Dachabdeckung<br />
Dach (Deluxe)<br />
Dach (Comfort)<br />
Befestigungssatz<br />
Satz Zierkappen<br />
Description<br />
chromptherapy lamp<br />
light (Comfort)<br />
speaker<br />
cover for speaker<br />
cover<br />
shut off unit with selector<br />
handle<br />
escutcheon Ø 68 mm<br />
nut<br />
thermostat cartridge<br />
handle for thermostat<br />
sleeve<br />
control panel<br />
wall bar<br />
support U‘D<br />
handshower<br />
shower hose<br />
neck jet<br />
body shower<br />
1 way 12V solenoid valve<br />
3/4“ male bayonet fitting<br />
boiler<br />
water level sensor<br />
potentiometer for water level<br />
sensor<br />
solenoid valve<br />
water supply boiler<br />
solenoid drain valve<br />
heating spiral(230V/2400W)<br />
overheating protection for thermostat<br />
control unit<br />
steam outlet<br />
Staro 90 coloure kit<br />
Staro 90 basic kit<br />
rail (240mm)<br />
shower tray feet<br />
side casing right<br />
side casing left<br />
wall closure rail (right/left)<br />
head shower<br />
skirt<br />
door handles<br />
door stopper<br />
sliding door<br />
sliding roller<br />
seal (bottom of the door)<br />
seal (top of the door)<br />
seal<br />
glass/shower tray<br />
closure rail<br />
seal<br />
fixed door<br />
corner profile<br />
shower tub incl. drain outlet<br />
top cover<br />
top (Deluxe)<br />
top (Comfort)<br />
mounting kit<br />
set of caps<br />
Descrizione<br />
cromoterapia<br />
luce bianca (Comfort)<br />
altoparlante<br />
altoparlante<br />
cappello<br />
cartuccia deviatore<br />
maniglia deviatore<br />
copertura Ø 68 mm<br />
ghiera di fissaggio<br />
cartuccia termostatica<br />
maniglia termostatico<br />
cappuccio<br />
display di comando<br />
asta doccia<br />
supporto doccetta<br />
doccetta<br />
flessibile<br />
getti cervicali<br />
doccia laterale<br />
elettrovalvola 1 via 12V<br />
Raccordo 3/4“ M con innesto a<br />
Baionetta<br />
corpo caldaia<br />
asta livello<br />
sensore di livello<br />
elettrovalvola<br />
connessione caldaia<br />
elettrovalvola scarico<br />
resistenza (230V/2400W)<br />
termofusibile<br />
centralina<br />
diffusore di vapore<br />
set colorato Staro 90<br />
corpo base Staro 90<br />
ferma oggetti (240mm)<br />
piedini del piatto doccia<br />
pannello ispezionabile dx<br />
pannello ispezionabile sx<br />
profilo compensatore<br />
(sinistro/destro)<br />
soffione doccia<br />
pannello frontale piatto<br />
maniglie per porte<br />
ferma porta<br />
anta scorrevole<br />
porta scorrevole<br />
guarnizione<br />
(parte inferiore dell‘anta fissa)<br />
guarnizione<br />
(parte superiore anta fissa)<br />
guarnizione piatto<br />
profilo compensatore<br />
guarnizione<br />
anta fissa<br />
raccordo unione<br />
piatto completo di scarico<br />
sovracappello<br />
capello (Deluxe)<br />
capello (Comfort)<br />
set di fissaggio<br />
set di cappa<br />
Nr.<br />
96949000<br />
97974000<br />
96950000<br />
96951000<br />
97454000<br />
96645000<br />
36093000<br />
96944000<br />
96945000<br />
94282000<br />
36391000<br />
96946000<br />
96952000<br />
25957000<br />
96190000<br />
28524000<br />
28246000<br />
96954000<br />
25944000<br />
96955000<br />
97374000<br />
96956000<br />
96957000<br />
96958000<br />
97352000<br />
96959000<br />
96960000<br />
97124000<br />
96962000<br />
96963000<br />
60055000<br />
96964000<br />
96965000<br />
96967000<br />
96973320<br />
96974320<br />
96978000<br />
97366000<br />
96987320<br />
96989000<br />
96990000<br />
96999000<br />
97003000<br />
97004000<br />
96992000<br />
96991000<br />
96993000<br />
97353000<br />
97005000<br />
97007000<br />
97015320<br />
97018320<br />
97115320<br />
97023320<br />
96970000<br />
97434000<br />
VE<br />
1<br />
1<br />
1<br />
1<br />
1<br />
1<br />
1<br />
1<br />
1<br />
1<br />
1<br />
1<br />
1<br />
1<br />
1<br />
1<br />
1<br />
1<br />
1<br />
1<br />
1<br />
1<br />
1<br />
1<br />
1<br />
1<br />
1<br />
1<br />
1<br />
1<br />
1<br />
1<br />
1<br />
1<br />
1<br />
1<br />
1<br />
1<br />
1<br />
1<br />
1<br />
2<br />
1<br />
1<br />
1<br />
1<br />
2<br />
1<br />
1<br />
1<br />
1<br />
1<br />
1<br />
1
2<br />
18<br />
11<br />
12<br />
21<br />
14<br />
3<br />
16<br />
15<br />
31 32<br />
25<br />
27<br />
26<br />
30<br />
28<br />
33<br />
1<br />
34<br />
23<br />
7<br />
9<br />
8<br />
22<br />
13<br />
10<br />
20<br />
29<br />
17<br />
19<br />
24<br />
Serviceteile<br />
Spare Parts<br />
Parti Di Ricambio<br />
6<br />
5<br />
4<br />
9<br />
Deutsch<br />
English<br />
Italiano
Sicherheitshinweise<br />
Safety Instructions<br />
Norme di sicurezza<br />
10<br />
Deutsch<br />
Vor dem Einbau bitte prüfen:<br />
1. Die Tragfähigkeit des Fußbodens muss<br />
einer Belastung von 200 kg/m 2 entsprechen.<br />
2. Der Fußboden muss ausreichend nivelliert<br />
sein, d.h. ein waagerechter und ebener Fußboden.<br />
3. Der Fußboden muss im Einbaubereich<br />
gefliest sein.<br />
Gefahr!<br />
Allgemein:<br />
Während Reinigungs- und Wartungsarbeiten<br />
muss der Hauptschalter auf "OFF" gestellt<br />
sein.<br />
Wartungs- und Einstellarbeiten dürfen nur von<br />
einem Fachmann durchgeführt werden.<br />
Nach Wartungsarbeiten müssen die Serviceabdeckungen<br />
ordnungsgemäß montiert<br />
werden.<br />
Bestehende Sicherheitsvorkehrungen und Sicherheitseinrichtungen<br />
dürfen nicht verändert<br />
oder entfernt werden.<br />
Hinweis:<br />
Die Dampfdusche darf in ihrer Bauart nicht<br />
verändert werden. Nur Originalersatzteile<br />
verwenden.<br />
Stromversorgung:<br />
Der Elektroanschluss sollte ausschließlich vom<br />
Elektrofachmann, Ihrem Elektro-Installateur<br />
durchgeführt werden. Die gesamte Stromversorgung<br />
erfolgt über einen 230 V/50 Hz<br />
Wechselstromanschluss und muss über einen<br />
2-poligen FI-Schalter mit 30 mA Fehlerstrom<br />
abgesichert werden.<br />
Bei der Elektro-Installation sind die entsprechenden<br />
VDE-, Landes- und EVU-Vorschriften<br />
in der jeweils gültigen Fassung einzuhalten.<br />
Die Installations- und Prüfungsarbeiten sind<br />
von einem zugelassenen Elektrofachmann<br />
auszuführen, unter Berücksichtigung von VDE<br />
0100 Teil 701. Sämtliche Arbeiten an der<br />
Dampfdusche dürfen nur im spannungsfreien<br />
Zustand vorgenommen werden!<br />
English<br />
Please assure before installation:<br />
1. The floor's carrying capacity must correspond<br />
to a load of 200 kg/m 2 .<br />
2. The floor must be sufficiently leveled, i.e. it<br />
must be horizontal and even.<br />
3. The floor's installation area must be tiled.<br />
Danger!<br />
General:<br />
The main switch must be set to "OFF" during<br />
cleaning and maintenance works.<br />
Maintenance and adjustment works must be<br />
carried out by experts only.<br />
All service covers must be appropriately reinstalled<br />
after maintenance works.<br />
Any installed safety provisions or safety<br />
equipment may not be modified or removed.<br />
Note:<br />
The steam shower's construction must not be<br />
changed. Only original components may be<br />
used.<br />
Power supply:<br />
The electrical connection should only be carried<br />
out by an electrician, i.e. your electrical<br />
installer. The entire power supply is realized<br />
via a 230 V/50 Hz AC connection and must<br />
be fused via a 2-pole RCCB with a residual<br />
current of 30 mA.<br />
For electrical installation, all applicable VDE,<br />
country-specific and EVU regulations in their<br />
respectively valid versions must be observed.<br />
All installation and inspection works must be<br />
carried out by an approved electrician and<br />
in accordance with VDE 0100 Part 701. All<br />
works at the steam shower may only be carried<br />
out in a de-energized state!<br />
Italiano<br />
Da controllare prima del montaggio:<br />
1. La portata minima del pavimento deve<br />
essere di 200 kg/m 2 .<br />
2. Il pavimento deve essere livellato e sufficientemente<br />
piano.<br />
3. La zona del pavimento su cui si monta la<br />
cabina deve essere piastrellata.<br />
Pericolo!<br />
Generalità:<br />
Durante i lavori di pulizia e di manutenzione,<br />
l'interruttore generale deve essere su "OFF".<br />
Gli interventi di manutenzione e regolazione<br />
devono essere svolti solo da un tecnico autorizzato.<br />
Al termine della manutenzione si devono<br />
rimontare correttamente le coperture di servizio.<br />
I dispositivi di sicurezza installati non devono<br />
essere né modificati né rimossi.<br />
Avvertenza:<br />
La struttura della doccia a vapore non deve<br />
essere modificata. Usare solo ricambi originali.<br />
Alimentazione elettrica:<br />
L'allacciamento elettrico deve essere eseguito<br />
solo da un tecnico (elettricista esperto).<br />
L'intero sistema viene alimentato a tensione<br />
alternata a 230 V/50 Hz e l'impianto deve<br />
possedere un interruttore di sicurezza per<br />
correnti di guasto (salvavita) bipolare con<br />
corrente di apertura di 30 mA.<br />
Per l'impianto elettrico si devono rispettare le<br />
norme CEI e dell'azienda elettrica vigenti.<br />
I lavori di installazione e di collaudo devono<br />
essere svolti da un tecnico autorizzato.<br />
Qualsiasi intervento sulla doccia a vapore va<br />
eseguito solo dopo aver staccato la tensione<br />
elettrica!
Deutsch<br />
Die in der Montageanleitung verwendeten<br />
Symbole sind im folgenden Text näher beschrieben.<br />
Gefahr durch Stromschlag!<br />
Gefahr!<br />
Bezeichnet eine unmittelbar drohende Gefahr<br />
durch Stromschlag. Wenn diese nicht<br />
gemieden wird, sind Tod oder schwerste<br />
Verletzungen die Folge!<br />
Warnung!<br />
Bezeichnet eine möglicherweise gefährliche<br />
Situation. Wenn diese nicht gemieden wird,<br />
können Tod oder schwerste Verletzungen<br />
die Folge sein!<br />
Vorsicht!<br />
Bezeichnet eine möglicherweise gefährliche<br />
Situation. Wenn diese nicht gemieden wird,<br />
können leichte oder geringfügige Verletzungen<br />
sowie Sachschäden die Folge<br />
sein!<br />
Achtung, zwei Personen<br />
notwendig!<br />
Achtung!<br />
Bezeichnet eine bestimmte Vorgehensweise.<br />
Wenn diese nicht eingehalten wird kann das<br />
Produkt oder etwas in seiner Umgebung beschädigt<br />
werden. (Die Montage der Dampfdusche<br />
muss von zwei Personen durchgeführt<br />
werden)!<br />
English<br />
The symbols used within these installation<br />
instructions are further described within the<br />
following text.<br />
Danger of electric shock!<br />
Danger!<br />
Describes an imminent danger of electric<br />
shock. If this danger is not evaded, the consequences<br />
are death or serious injuries!<br />
Warning!<br />
Describes a possibly dangerous situation. If<br />
this situation is not evaded, the consequences<br />
are death or serious injuries!<br />
Caution!<br />
Describes a possibly dangerous situation. If<br />
this situation is not evaded, the consequences<br />
are slight or insignificant injuries as<br />
well as property damage!<br />
Attention, two persons required!<br />
Attention!<br />
Describes a specific procedure. If this procedure<br />
is not observed, the product or objects<br />
within its environment may be damaged. (The<br />
steam shower's installation must be carried<br />
out by two persons!)<br />
Verwendete Symbole<br />
Used Symbols<br />
Simboli utilizzati<br />
Italiano<br />
I simboli utilizzati in queste istruzioni di montaggio<br />
vengono descritti dettagliatamente qui<br />
di seguito.<br />
Pericolo di folgorazione elettrica!<br />
Pericolo!<br />
Indica un pericolo imminente di folgorazione<br />
elettrica. Ne derivano la morte o<br />
gravissime lesioni!<br />
Avvertimento!<br />
Indica una situazione pericolosa. Ne possono<br />
derivare la morte o gravissime lesioni!<br />
Cautela!<br />
Indica una situazione pericolosa. Ne possono<br />
derivare lievi lesioni o danni materiali!<br />
Attenzione: sono necessarie<br />
due persone!<br />
Attenzione!<br />
Indica un determinato procedimento. Se non<br />
viene rispettato, il prodotto o oggetti nelle<br />
sue vicinanze possono essere danneggiati (il<br />
montaggio della doccia a vapore deve essere<br />
eseguito da due persone)!<br />
11<br />
Deutsch<br />
English<br />
Italiano
Verwendete Symbole<br />
Used Symbols<br />
Simboli utilizzati<br />
Hinweis:<br />
12<br />
Deutsch<br />
(Hinweisschild z.B. i )<br />
Bezeichnet Anwendungstipps und andere<br />
besondere nützliche Situationen, wobei keine<br />
gefährlichen oder schädlichen Situationen<br />
auftreten.<br />
Installateur notwendig!<br />
Installateur!<br />
Beschreibt Montagearbeiten die nur von einem<br />
Installateur durchgeführt werden dürfen.<br />
Elektriker notwendig!<br />
Elektriker!<br />
Beschreibt Montagearbeiten, die nur von<br />
einem Elektrofachmann durchgeführt werden<br />
dürfen.<br />
Note:<br />
English<br />
(Note sign, e.g. i )<br />
Describes application tips and further particularly<br />
useful situations, however, no dangerous<br />
or harmful situations.<br />
Installer required!<br />
Installer!<br />
Describes installation works that may only be<br />
carried out by an installer.<br />
Electrician required!<br />
Electrician!<br />
Describes installation works that may only be<br />
carried out by an electrician.<br />
Avvertenza:<br />
Italiano<br />
(cartello di avvertenza, ad esempio "i")<br />
Indica suggerimenti ed altre azioni particolarmente<br />
utili per le quali non si presentano<br />
situazioni dannose o pericolose.<br />
Necessità di un installatore!<br />
Installatore!<br />
Descrive lavori di montaggio che devono essere<br />
svolti solo da un installatore auto-rizzato.<br />
Necessità di un elettricista!<br />
Elettricista!<br />
Descrive lavori di montaggio che devono essere<br />
svolti solo da un elettricista auto-rizzato.
Deutsch<br />
Technische Daten :<br />
Mindestfließdruck: 2 bar<br />
Betriebsdruck: max. 10 bar<br />
Empfohlener Betriebsdruck: 2 – 5 bar<br />
Prüfdruck: 16 bar<br />
Heißwassertemperatur: max. 70 °C<br />
Empfohlene Heißwasser-<br />
Temperatur: 60 °C<br />
Temperaturskala: 20 – 60 °C<br />
Sicherheitssperre: 38 °C<br />
Durchflussleistung bei 3 bar:<br />
Handbrause: 15,3 l/min<br />
Hand- und Kopfbrause: 20,5 l/min<br />
Hand- und Rückenbrause: 21,4 l/min<br />
Seitenbrausen: 22,1 l/min<br />
Kopfbrause: 16,9 l/min<br />
Kopf- und Seitenbrause: 22,5 l/min<br />
Nackenbrause: 13,6 l/min<br />
Rückenbrause: 18,8 l/min<br />
Rücken- und Nackenbrause: 21,4 l/min<br />
Dampferzeuger: 2,0l/30min<br />
Funktionstüchtig ab 2 bar. Es dürfen maximal<br />
2 Verbraucher zusammengeschaltet<br />
werden. Anschluss für Wasserzulauf und<br />
Wasserablauf sind nach den derzeit gültigen<br />
DIN 1988/EN1717 und den örtlichen Vorschriften<br />
zu installieren.<br />
Hinweis:<br />
Durchlauferhitzer:<br />
Die Dampfdusche kann nicht in Verbindung<br />
mit hydraulisch, elektronisch und thermisch<br />
gesteuerten Durchlauferhitzern eingesetzt<br />
werden.<br />
Druckunterschiede:<br />
Die Drücke zwischen den Kalt- und Warmwasseranschlüssen<br />
müssen ausgeglichen<br />
werden.<br />
Werkstoff:<br />
Sanitäracryl mit ABS als Verbundwerkstoff.<br />
English<br />
Technical information:<br />
Minimum flow pressure: 2 bar<br />
Operating pressure: max. 10 bar<br />
Recommended operating<br />
pressure: 2 – 5 bar<br />
Test pressure: 16 bar<br />
Hot water temperature: max. 70 °C<br />
Recommended hot water<br />
temperature: 60 °C<br />
Temperature scale: 20 – 60 °C<br />
Safety barrier: 38 °C<br />
Flow rate at 3 bar:<br />
Hand shower: 15.3 l/min<br />
Hand and head shower: 20.5 l/min<br />
Hand and back shower: 21.4 l/min<br />
Side showers: 22.1 l/min<br />
Head shower: 16.9 l/min<br />
Head + side shower: 22.5 l/min<br />
Neck shower: 13.6 l/min<br />
Back shower: 18.8 l/min<br />
Back and neck shower: 21.4 l/min<br />
Steam generator: 2.0l/30min<br />
Operable as of 2 bar. A maximum of two<br />
loads may be interconnected. The connections<br />
for water intake and water drainage<br />
must be installed in accordance with the<br />
currently valid DIN 1988/EN1717 standard<br />
and the local regulations.<br />
Note:<br />
Flow-type water heater:<br />
The steam shower cannot be applied in connection<br />
with hydraulically, electronically or<br />
thermally controlled flow-type water heaters.<br />
Pressure differentials:<br />
The pressure values between the cold and<br />
warm water connections must be compensated.<br />
Material:<br />
Sanitary acrylic with ABS as compound material.<br />
Technische Daten<br />
Technical Information<br />
Dati tecnici<br />
Italiano<br />
Dati tecnici:<br />
Pressione dinamica minima: 2 bar<br />
Pressione di esercizio: max. 10 bar<br />
Pressione di esercizio<br />
consigliata: 2 – 5 bar<br />
Pressione di prova: 16 bar<br />
Temperatura dell'acqua calda: max. 70 °C<br />
Temperatura consigliata<br />
dell'acqua calda: 60 °C<br />
Scala della temperatura: 20 – 60 °C<br />
Blocco di sicurezza: 38 °C<br />
Portata a 3 bar:<br />
Doccia manuale: 15,3 l/min<br />
Doccia manuale e soffione: 20,5 l/min<br />
Doccia manuale e posteriore: 21,4 l/min<br />
Docce laterali: 22,1 l/min<br />
Doccia di testa: 16,9 l/min<br />
Doccia manuale e laterale: 22,5 l/min<br />
Doccia della nuca: 13,6 l/min<br />
Doccia posteriore: 18,8 l/min<br />
Doccia posteriore e della nuca: 21,4 l/min<br />
Generatore di vapore: 4,0 l/h<br />
Funzionalità a partire da 2 bar. Si possono<br />
collegare insieme massimo 2 utenze. I raccordi<br />
di mandata e di scarico dell'acqua vanno<br />
installati conformemente alle DIN 1988/<br />
EN1717 ed alle norme locali.<br />
Avvertenza:<br />
Scaldaacqua istantaneo:<br />
La doccia a vapore non può essere impiagata<br />
in combinazione con uno scaldaacqua<br />
istantaneo controllato idraulicamente, elettronicamente<br />
o termicamente.<br />
Differenze di pressione:<br />
Le pressioni tra i raccordi dell'acqua fredda e<br />
calda devono essere compensate.<br />
Materiale:<br />
Acrilico per articoli igienico-sanitari con ABS<br />
come materiale composito.<br />
13<br />
Deutsch<br />
English<br />
Italiano
Checkliste<br />
Check list<br />
Elenco di controllo<br />
14<br />
Deutsch<br />
A. Duschwanne/Dach/Schürze/<br />
Montagezubehör<br />
Duschwanne<br />
Wannenschürze<br />
Brauseschlauch<br />
Handbrause<br />
Türgriffe<br />
Schrauben-Set<br />
Montage-Set (Befestigungswinkel)<br />
B. Dach<br />
Obere Abdeckung (Dach)<br />
Deckel<br />
C. Rückwand<br />
Rückwand<br />
Ausgleichsprofil<br />
Wandausgleichsprofil<br />
Seitenverkleidung<br />
D. Tür, Türrahmen<br />
Schiebetür<br />
Trägerrahmen<br />
English<br />
A. Shower tray/cover/skirt/<br />
installation accessories<br />
Shower tray<br />
Tray skirt<br />
Shower tube<br />
Hand shower<br />
Door handles<br />
Screw set<br />
Installation set (angle brackets)<br />
B. Roof<br />
Top cover (roof)<br />
Cover<br />
C. Rear panel<br />
Rear panel<br />
Compensation profile<br />
Wall compensation profile<br />
Side casing<br />
D. Door, Door Frame<br />
Slide door<br />
Support frame<br />
Italiano<br />
A. Piatto doccia / cappello /<br />
con troccappelo / accessori di<br />
montaggio<br />
Vasca della doccia<br />
Fascia di copertura del piatto doccia<br />
Tubo flessibile della doccia<br />
Doccia manuale<br />
Maniglie della porta<br />
Kit di viti<br />
Kit di montaggio (angolari di fissaggio)<br />
B. Tetto<br />
Copertura superiore (tetto)<br />
Coperchio<br />
C. Parete<br />
Parete<br />
Profilato di compensazione<br />
Profilato di compensazione a parete<br />
Pannello laterale<br />
D. Chiusura<br />
Porta scorrevole<br />
Anta fissa
Duschwanne/Schürze/Montagezubehör Dach<br />
Shower tray/roof/skirt/installation accessories Roof<br />
Piatto doccia / pannello del piato doccia / accessori di montaggio Cappello<br />
A<br />
Rückwand Tür/Türrahmen<br />
Rear panel<br />
Parette<br />
Door/Door Frame<br />
C D<br />
B<br />
Chiusura fissa e scorrevole<br />
Verpackungsinhalt<br />
Packaging Contents<br />
Contenuto della confezione<br />
15<br />
Deutsch<br />
English<br />
Italiano
Benötigte Werkzeuge<br />
Required Tools<br />
Attrezzi necessari<br />
16<br />
Deutsch<br />
Folgend aufgeführtes Werkzeug und Zubehör<br />
ist für die Montage notwendig:<br />
- Wasserwaage<br />
- Meterstab<br />
- Zeichenstift und Körner<br />
- Wasserpumpenzange<br />
- Maulschlüssel-Set (SW 8, 10, 15, 22, 24)<br />
- Inbusschlüssel (SW 2, 4)<br />
- Vielzahnschraubendreher (4 mm)<br />
- Kreuzschlitzschraubendreher (6, 8 mm)<br />
- (Flach-) Schraubendreher (6, 8, 10 mm)<br />
- Hammer (kleiner Schlosserhammer)<br />
- Armaturenfett<br />
- Silikon (essigsäurefrei)<br />
- Bohrer (2, 6 mm)<br />
- Messer<br />
- Bohrmaschine<br />
- Akkuschrauber<br />
- 4 Montageböcke<br />
- Leiter<br />
English<br />
The following tools and accessories are<br />
required for installation:<br />
- Spirit level<br />
- Pocket rule<br />
- Pencil and punch<br />
- Water pump pliers<br />
- Wrench set (SW 8, 10,15, 22, 24)<br />
- Socket wrench (SW 2, 4)<br />
- Multi-tooth screwdriver (4 mm)<br />
- Crosstip screwdriver ( 6, 8 mm)<br />
- (Flat) screwdriver (6, 8, 10 mm)<br />
- Hammer (small fitter's hammer)<br />
- Fittings grease<br />
- Silicone (free of acetic acid)<br />
- Drill (2, 6 mm)<br />
- Knife<br />
- Drilling machine<br />
- Electric screwdriver<br />
- 4 installation blocks<br />
- Step ladder<br />
Italiano<br />
Per il montaggio sono necessari i seguenti<br />
attrezzi ed accessori:<br />
- Livella a bolla d'aria<br />
- Metro<br />
- Matita e punzone (per piastrelle)<br />
- Chiave stringitubo<br />
- Set di chiavi fisse (da 8, 10,15, 22, 24)<br />
- Chiave a brugola (da 2, 4)<br />
- Cacciavite dentato (4 mm)<br />
- Cacciavite a stella (6, 8 mm)<br />
- Cacciavite (piatto) (6, 8, 10 mm)<br />
- Martello (non da fabbro)<br />
- Grasso per rubinetteria<br />
- Silicone (privo di acido acetico)<br />
- Punta (2, 6 mm)<br />
- Coltello<br />
- Trapano<br />
- Avvitatore<br />
- 4 cavalletti di montaggio<br />
- Scala
Armaturenfett =<br />
Silikon =<br />
Fittings grease<br />
Grasso per rubinetteria<br />
Silicone<br />
Silicone<br />
Benötigte Werkzeuge<br />
Required Tools<br />
Attrezzi necessari<br />
17<br />
Deutsch<br />
English<br />
Italiano
Einstellung Wannenfüße/Ausrichtung Duschwanne<br />
Shower Tray Feet Setting/Shower Tray Alignment<br />
Regolazione dei piedi del piatto doccia/posizionamento del piatto doccia<br />
18<br />
Deutsch<br />
Voreinstellung (Abbildung A und B):<br />
• Die Wannenfüße (3) am Duschwannengestell<br />
so einstellen, dass der Abstand von<br />
Unterkante Duschwanne (5) zum Fußboden<br />
195 mm beträgt.<br />
Achtung!<br />
• Die Duschwanne zu zweit sehr vorsichtig in<br />
die Einbauposition bringen.<br />
• Einbauposition Wannenschürze (6) prüfen.<br />
• Hinterer Wannenfuß (2) nach der Feinjus-<br />
tierung mit dem Maulschlüssel SW 15 durch<br />
die Kontermutter sichern!<br />
Feineinstellung (Abbildung C):<br />
• Duschwanne (1) mit Wasserwaage (4)<br />
ausrichten. Feinjustierung durch Ein- oder<br />
Ausdrehen der Wannenfüße (3). Kontermutter<br />
der Wannenfüße mit dem Maulschlüssel<br />
SW 15 sichern.<br />
Hinweis:<br />
Die Vorderkante der Duschwanne (Abb. C)<br />
muss mit der Wasserwaage (4) geprüft und<br />
an den Wannenfüßen (3) feinjustiert werden!<br />
Zum leichteren Aufbauen der Kabine, die<br />
Duschwanne zu zweit wieder ein Stück aus<br />
dem Eck heraussetzen.<br />
English<br />
Pre-adjustment (Fig. A and B):<br />
• Adjust the tray feet (3) at the shower tray<br />
framing in a way which ensures that the<br />
clearance between the shower tray's lower<br />
edge (5) and the floor amounts to 195 mm.<br />
Attention!<br />
• Two persons must very carefully place the<br />
shower tray in its installation position.<br />
• Check the tray skirt's (6) installation position.<br />
• After fine adjustment, the rear tray foot's (2)<br />
counter nut must be secured using an SW 15<br />
wrench!<br />
Fine adjustment (Fig. C):<br />
• Position the shower tray (1) with the help<br />
of a spirit level (4). Carry out the fine adjustment<br />
by screwing the tray feet (3) in or out.<br />
Secure the tray feet's counter nut using an<br />
SW 15 wrench.<br />
Note:<br />
The position of the shower tray's front edge<br />
(Fig. C) must be measured with the spirit level<br />
(4) and finely adjusted at the tray feet (3)!<br />
The shower tray should be slightly repositioned<br />
away from the corner by two persons<br />
in order to facilitate the cabin’s assembly.<br />
Italiano<br />
Operazioni preliminari (figg. A e B):<br />
• Regolare i piedi (3) del telaio del piatto<br />
doccia in modo che la distanza dal bordo<br />
inferiore del piatto doccia (5) al pavimento<br />
sia di 195 mm.<br />
Attenzione!<br />
• Collocare il piatto doccia in posizione<br />
di montaggio (in due persone) con estrema<br />
cautela.<br />
• Controllare la posizione di montaggio della<br />
pannello piatto doccia (6).<br />
• Dopo la regolazione di precisione bloccare<br />
il piede posteriore (2) con il controdado<br />
mediante la chiave fissa da 15!<br />
Regolazione di precisione (fig. C):<br />
• Livellare il piatto doccia (1) con la livella<br />
a bolla d'aria (4). Regolazione di<br />
precisione avvitando o svitando i piedi (3).<br />
Bloccare il controdado con la chiave fissa<br />
da 15.<br />
Avvertenza:<br />
Il bordo anteriore del piatto doccia (fig. C)<br />
deve essere controllato con la livella a bolla<br />
d'aria (4) e regolato agendo sui piedi (3)!<br />
Per facilitare il montaggio della cabina, allontanare<br />
in due il piatto doccia di un tratto<br />
dall‘angolo.
A B<br />
1<br />
6<br />
C<br />
3<br />
Einstellung Wannenfüße/Ausrichtung Duschwanne<br />
Shower Tray Feet Setting/Shower Tray Alignment<br />
Regolazione dei piedi del piatto doccia/posizionamento del piatto doccia<br />
SW 15<br />
5<br />
4<br />
1<br />
3<br />
2<br />
19<br />
Deutsch<br />
English<br />
Italiano
Seitenverkleidung abnehmen<br />
Removing the Side Casing<br />
Smontaggio del pannello laterale<br />
20<br />
Deutsch<br />
• Seitenverkleidung (2) und Wandausgleichsprofil<br />
(1) von der Rückwand entfernen.<br />
• Mit Schraubendreher (5) Schrauben (3)<br />
lösen und mit den Unterlegscheiben (4) entfernen<br />
(Abb. B).<br />
• Seitenverkleidung und Wandausgleichsprofil<br />
abnehmen.<br />
Hinweis:<br />
Das Wandausgleichsprofil (1) ist mit einer<br />
Klemmleiste versehen und kann so zur Wand<br />
hin verschoben werden (Abb. A).<br />
English<br />
• Remove the side casing (2) and the wall<br />
compensation profile (1) from the rear panel.<br />
• Loosen the screws (3) with the screwdriver<br />
(5) and remove them together with the washers<br />
(4) (Fig. B).<br />
• Remove the side casing and the wall compensation<br />
profile.<br />
Note:<br />
The wall compensation profile (1) is equipped<br />
with a terminal block and can therefore be<br />
moved towards the wall (Fig. A).<br />
Italiano<br />
• Togliere il pannello laterale (2) e il profilo<br />
di compensazione a parete (1) dal pannello<br />
posteriore.<br />
• Con il cacciavite (5) allentare e svitare le<br />
viti (3) insieme alle rondelle (4) (fig. B).<br />
• Togliere il pannello laterale ed il profilo di<br />
compensazione a parete.<br />
Avvertenza:<br />
Il profilo di compensazione a parete (1) possiede<br />
un morsetto per poterlo spostare verso<br />
la parete (fig. A).
A<br />
2<br />
1<br />
3<br />
Seitenverkleidung abnehmen<br />
Removing the Side Casing<br />
Smontaggio del pannello laterale<br />
4<br />
B<br />
5<br />
21<br />
Deutsch<br />
English<br />
Italiano
Montage Rückwand<br />
Installing the Rear Panel<br />
Montaggio della parete<br />
22<br />
Deutsch<br />
• Die Rückwand an den Einbauort bringen.<br />
Hinweis:<br />
Die Kontaktflächen der Rückwand und Duschwanne<br />
mit einem staubfreien Tuch reinigen<br />
(Abb. A)!<br />
• Silikonraupen (essigsäurefrei) auf der<br />
Gesamtlänge der Kontaktfläche der Rückwand<br />
durchgehend auftragen (Abb. A).<br />
Achtung!<br />
• Die Rückwand zu zweit und sehr vorsichtig<br />
auf die Duschwanne aufsetzen (Abb. B), so<br />
dass die 4 Gewindebolzen der Duschwanne<br />
mit den 4 Bohrungen am Gestell der Rückwand<br />
übereinstimmen.<br />
• Die 4 Unterlegscheiben 6,4 x 18 (2) einsetzen<br />
und mit dem 10 mm Maulschlüssel die 4<br />
Muttern M6 (1) mit den 4 Schrauben an der<br />
Duschwanne verschrauben (Abb. C).<br />
Hinweis:<br />
Befestigungsschrauben der Rückwand nicht<br />
zu stark festdrehen, um Beschädigungen zu<br />
vermeiden!<br />
English<br />
• Bring the rear panel to the installation site.<br />
Note:<br />
Clean the contact surfaces of the rear panel<br />
and the shower tray using a dust-free cloth<br />
(Fig. A)!<br />
• Consistently apply silicone beads (free of<br />
acetic acid) to the entire length of the contact<br />
surface and the rear panel (Fig. A).<br />
Attention!<br />
• The rear panel must be very carefully<br />
placed on the shower tray (Fig. B) by two<br />
persons in a way which ensures that the 4<br />
threaded bolts of the shower tray correspond<br />
with the 4 drill holes of the rear panel's framing.<br />
• Insert the 4 6.4 x 18 washers (2) and<br />
screw the 4 M6 nuts (1) to the shower tray<br />
using the four screws (Fig. C).<br />
Note:<br />
To avoid any damage, the rear panel's fixation<br />
screws must not be secured too tightly!<br />
Italiano<br />
• Portare la parete sul luogo di montaggio.<br />
Avvertenza:<br />
Pulire le superfici di contatto della parete e<br />
del piatto doccia con un panno pulito (fig.<br />
A)!<br />
• Applicare un tratto continuo di silicone<br />
(privo di acido acetico) sull'intera lunghezza<br />
della superficie di contatto della<br />
parete (fig. A).<br />
Attenzione!<br />
• Collocare in due persone la parete sul<br />
piatto doccia con la massima cautela (fig. B),<br />
facendo corrispondere i 4 bulloni del piatto<br />
doccia con i 4 fori del telaio della parete.<br />
• Applicare le 4 rondelle 6,4 x 18 (2) e con<br />
la chiave fissa da 10 mm avvitare i 4 dadi<br />
M6 (1) alle 4 viti del piatto doccia (fig. C).<br />
Avvertenza:<br />
Per evitare danni, non serrare eccessivamente<br />
le viti di fissaggio!
C<br />
A<br />
1<br />
2<br />
B<br />
Montage Rückwand<br />
Installing the Rear Panel<br />
Montaggio del pannello posteriore<br />
23<br />
Deutsch<br />
English<br />
Italiano
Vorbereitung Montage Türrahmen<br />
Preparing the Door frame Installation<br />
Preparativi per la chiusura<br />
24<br />
Deutsch<br />
• Mit einem Schraubendreher oder Akkuschrauber<br />
die 4 Befestigungsschrauben herausdrehen<br />
(Abb. B).<br />
• Ausgleichsprofile abnehmen (Abb. A).<br />
Achtung!<br />
Das Herausnehmen der Glaselemente aus der<br />
Verpackung muß von zwei Personen durchgeführt<br />
werden!<br />
• Die 8 Mutterneinsätze (1) in der Nut des Trägerrahmens<br />
entsprechend der Lochabstände<br />
der jeweiligen Profile ausrichten (Abb. C + D).<br />
English<br />
• Unscrew the 4 fixation screws using a<br />
screwdriver or an electric screwdriver (Fig. B).<br />
• Remove the compensation profiles (Fig. A).<br />
Attention!<br />
Two persons are required to remove the glass<br />
elements from the packaging.<br />
• The 8 nut inserts (1) must be adjusted in the<br />
support frame’s groove in accordance with<br />
the respective profiles’ hole clearances (Fig.<br />
C + D).<br />
Italiano<br />
• Con un cacciavite o un'avvitatore svitare le<br />
4 viti di fissaggio (fig. B).<br />
• Togliere i profilati di compensazione (fig. A).<br />
Attenzione!<br />
Gli elementi di vetro devono essere prelevati<br />
dall‘imballaggio da due persone!<br />
• Posizionare gli 8 dadi (1) nella scanalatura<br />
del telaio secondo le distanze tra i fori dei<br />
rispettivi profilati (fig. C + D).
A<br />
1 1<br />
C<br />
B<br />
Vorbereitung Montage Türrahmen<br />
Preparing the Door Frame Installation<br />
Preparativi per la chiusura<br />
D<br />
25<br />
Deutsch<br />
English<br />
Italiano
Vorbereitung Montage Türrahmen<br />
Preparing the Door Frame Installation<br />
Preparativi per la chiusura<br />
26<br />
Deutsch<br />
Abdichten:<br />
• Dichtung in Ausgleichsprofile einziehen<br />
und kürzen (Abb. A).<br />
• Silikonraupe (2) entlang der Dichtung auftragen.<br />
• Die Ausgleichsprofile (1) links und rechts<br />
auf den Trägerrahmen aufsetzen und unter<br />
Verwendung der Schrauben M4 x12 (3)<br />
festschrauben.<br />
Hinweis:<br />
Die Schiebetüre kann auf der linken oder auf<br />
der rechten Seite eingebaut werden.<br />
• Trägerrahmen nach Montage der Ausgleichsprofile<br />
auf Montageböcke vorsichtig<br />
ablegen, um Beschädigungen zu vermeiden<br />
(Abb. C).<br />
• Silikonraupe an der Unterseite des Trägerrahmens<br />
auf der gesamten Länge auftragen.<br />
(Abb. D (4)).<br />
• Silikonraupe am Übergang Kunstoffabdeckung<br />
/ Trägerrahmen auftragen. (Abb. D<br />
(5)) .<br />
English<br />
Sealing:<br />
• Insert the sealing in the compensation<br />
profiles and shorten them (Fig. A).<br />
• Apply a silicone bead (2) to the compensation<br />
profiles.<br />
• Attach the compensation profiles (1) to the<br />
right and left of the support frame and secure<br />
them using the M4 x12 screws (3).<br />
Note:<br />
The slide door can be installed on the left or<br />
right side.<br />
• Carefully deposit the support frame on<br />
mounting blocks after the compensation<br />
profiles' installation to avoid any damage<br />
(Fig. C).<br />
• Apply a silicone bead to the lower side of<br />
the support frame on the whole length (Fig.<br />
D (4)).<br />
• Apply a silicone bead between plastic<br />
cover and support frame (Fig. D (5)).<br />
Italiano<br />
Ermetizzazione:<br />
• Inserire la guarnizione nei profilati di<br />
compensazione ed accorciarla (fig. A)<br />
• Applicare un cordone di silicone (2)nel<br />
profilo compensatore.<br />
• Collocare i profilati di compensazione (1)<br />
a sinistra ed a destra sul telaio e serrare a<br />
fondo le viti M4 x12 (3).<br />
Avvertenza:<br />
La porta scorrevole può essere montata a<br />
sinistra o a destra.<br />
• Dopo il montaggio dei profilati di<br />
compensazione collocare il telaio con cautela<br />
sui cavalletti per evitare di danneggiarlo (fig.<br />
C).<br />
• Applicare un cordone di silicone nella<br />
parte inferiore della chiusura (Fig D (4)).<br />
• Applicare un cordone di silicone nella<br />
parte tra l‘angolare ed il montante della<br />
chiusura (Fig D (5)).
A<br />
B<br />
C<br />
2<br />
3<br />
1<br />
3<br />
2<br />
D<br />
Vorbereitung Montage Türrahmen<br />
Preparing the Door Frame Installation<br />
Preparativi per la chiusura<br />
5<br />
4<br />
27<br />
Deutsch<br />
English<br />
Italiano
Vorbereitung Montage Türrahmen<br />
Preparing the Door Frame Installation<br />
Preparativi per la chiusura<br />
Abbildung A<br />
28<br />
Deutsch<br />
• An der Rückwand entlang der Bohrlöcher<br />
und im Randbereich der Duschwanne eine<br />
Silikonraupe auftragen!<br />
Abbildung B<br />
Achtung!<br />
Trägerrahmen beim Einbau leicht zusammen-<br />
drücken (2) und um circa 15 mm nach oben<br />
versetzt an der Rückwand ansetzen und ab-<br />
senken (Abb. B)!<br />
Hinweis:<br />
Trägerrahmen ohne Verschmieren der Silikon-<br />
raupe aufsetzen! Zum Verschrauben Kunst-<br />
stoffdichtscheiben (3) und Abschlussdeckel<br />
(4) verwenden!<br />
• Trägerrahmen (2) mit der Rückwand an<br />
den Ausgleichsprofilen fest verschrauben<br />
(Abb. C)(Schraube 8 Stk. 16 x 4,2 V2A).<br />
Figure A<br />
English<br />
• Apply a silicone bead along the drilling<br />
holes of rear panel and on the border area<br />
of the shower tray!<br />
Figure B<br />
Attention!<br />
Slightly press the support frame together du-<br />
ring the installation (2), attach it to the rear<br />
panel with an offset of approx. 15 mm and<br />
then lower it (Fig. B)!<br />
Note:<br />
The support frame must be attached without<br />
smearing the silicone bead! For screwing,<br />
use plastic sealing washers (3) ans sealing<br />
covers (4)!<br />
• Tightly screw the support frame (2) to the<br />
compensation profiles together with the rear<br />
panel (Fig. C) (8 V2A 16 x 4.2 screws).<br />
Figura A<br />
Italiano<br />
• Applicare un cordone di silicone su tutta<br />
l‘altezza della parete in direzione dei fori<br />
presenti e tra la parete e il piatto doccia.<br />
Figura B<br />
Attenzione!<br />
Durante il montaggio comprimere<br />
leggermente il telaio (2) e collocarlo ed<br />
abbassarlo sul pannello posteriore dopo<br />
averlo spostato di circa 15 mm verso l'alto<br />
(fig. B)!<br />
Avvertenza:<br />
Collocare il telaio senza danneggiare il tratto<br />
di silicone! Per avvitare impiegare le rosette<br />
di tenuta di plastica (3) ed il tappo terminale<br />
(4)!<br />
• Avvitare il telaio (2) con il pannello<br />
posteriore ai profilati di compensazione (fig.<br />
C) (8 viti 16 x 4,2 V2A).
A<br />
B<br />
2<br />
1<br />
3<br />
Vorbereitung Montage Türrahmen<br />
Preparing the Door Frame Installation<br />
Preparativi per la chiusura<br />
C<br />
4<br />
29<br />
Deutsch<br />
English<br />
Italiano
Schiebetür einbauen/einstellen<br />
Installing/Adjusting the Slide Door<br />
Montaggio/regolazione della porta scorrevole<br />
30<br />
Deutsch<br />
Befestigung:<br />
• Die Befestigungswinkel (2) an das<br />
Profil (3) der Rückwand montieren, dazu die<br />
Unterlegscheibe 6,5x18 und die Muttern M6<br />
(1) verwenden.<br />
• Die 5 Schrauben M5 x 50 (4) für die Dachbefestigung<br />
im oberen Profil des Türrahmens<br />
einsetzen.<br />
Schiebetür auspacken:<br />
Hinweis:<br />
Die Schiebetüren (9) nicht auf den Rollen<br />
aufstützen. Die Rollen können beschädigt<br />
werden!<br />
Schiebetür einsetzen:<br />
Rollen der Schiebetür (9) in das obere Profil<br />
(7) des Rahmenträgers einsetzen (Abb. B).<br />
Schiebetür grob einstellen:<br />
• Mit dem Inbusschlüssel (6) SW2 die 4<br />
Gewindestifte in den Exzenterelementen (5)<br />
lösen.<br />
• Mit dem Schraubendreher die Exzenter-Elemente<br />
(5) verdrehen, bis die unteren Rollen<br />
in das Profil des Rahmenträgers eingefahren<br />
sind. Die beiden oberen Exzenterelemente<br />
mit dem Inbusschlüssel (6) arretieren.<br />
Hinweis:<br />
Führungsschiene fetten (Abb. B).<br />
Türgriff montieren:<br />
Die Türgriffe (8) montieren, dazu die 4<br />
O-Ringe in die Nut einlegen, die Schrauben<br />
einsetzen und die Griffe festschrauben.<br />
2 x Abschlussdeckel einsetzen.<br />
Hinweis:<br />
Türgriff außen: Befestigungsschraube unten<br />
einsetzen!<br />
Türgriff innen: Befestigungsschraube oben<br />
einsetzen!<br />
English<br />
Installation:<br />
• Install the angle brackets (2) to the rear<br />
panel's profile (3) using the 6,5x18 washers<br />
and M6 nuts (1).<br />
• Insert the 5 M5 x 50 screws (4) for top cover<br />
installing into the profil of the door frame.<br />
Unpacking the slide door:<br />
Note:<br />
The slide doors (9) must not be propped on<br />
the rollers. Otherwise, the rollers might be<br />
damaged!<br />
Inserting the slide door:<br />
Insert the slide door's rollers (9) into the support<br />
frame's upper profile (7) (Fig. B).<br />
Roughly adjusting the slide door:<br />
• Use the SW 2 socket wrench (6) to loosen<br />
the 4 threaded pins within the eccentric elements<br />
(5).<br />
• Wrench the eccentric elements (5) with the<br />
screwdriver until the lower rollers are inserted<br />
into the support frame's profile. Lock the 2<br />
upper eccentric elements with the socket<br />
wrench (6).<br />
Note:<br />
Apply some floating medium to the guide bar<br />
(Fig. B).<br />
Installing the door handles:<br />
Mount the door handles (8) by placing the 4<br />
o-rings into the groove, inserting the screws<br />
and tightening the handles. Insert 2 end covers.<br />
Note:<br />
Outside door handle: Insert the fixation screw<br />
at the bottom!<br />
Inside door handle: Insert the fixation screw<br />
at the top!<br />
Italiano<br />
Fissaggio:<br />
• Montare la staffa ad angolo (2) al profilo<br />
posteriore della parete (3) con una rondella<br />
M 6,5x18 ed un dado M6 (1).<br />
• Inserire le 5 viti M5x50 (4) nel profilosuperiore<br />
della chiusura.<br />
Disimballare la porta scorrevole:<br />
Avvertenza:<br />
Non poggiare le porte scorrevoli (9) sulle rotelle.<br />
Le rotelle possono danneggiarsi!<br />
Applicazione della porta scorrevole:<br />
Introdurre le rotelle della porta scorrevole (9)<br />
nel profilato superiore (7) del telaio (fig. B).<br />
Regolazione approssimativa della<br />
porta scorrevole:<br />
• Con la brugola (6) da 2 allentare i 4 perni<br />
filettati negli elementi eccentrici (5).<br />
• Con il cacciavite ruotare gli elementi<br />
eccentrici (5) fino ad introdurre le rotelle<br />
inferiori nel profilato del telaio. Bloccare<br />
entrambi gli elementi eccentrici superiori con<br />
la brugola (6).<br />
Avvertenza:<br />
Applicare del grasso sulle guide della<br />
chiusura (fig B).<br />
Montaggio della maniglia della porta:<br />
Montare le maniglie della porta (8) inserendo<br />
le 4 guarnizioni toroidali nella scanalatura,<br />
applicando le viti ed avvitando le maniglie.<br />
Applicare 2 tappi terminali.<br />
Avvertenza:<br />
Maniglia esterna: applicare la vite di fissaggio<br />
in basso!<br />
Maniglia interna: applicare la vite di fissaggio<br />
in alto!
1<br />
B<br />
3<br />
A<br />
2<br />
9<br />
Schiebetür einbauen/einstellen<br />
Installing/Adjusting the Slide Door<br />
Montaggio/regolazione della porta scorrevole<br />
6<br />
6<br />
4<br />
8<br />
7<br />
5<br />
5<br />
31<br />
Deutsch<br />
English<br />
Italiano
Montage obere Abdeckung (Dach)<br />
Installing the Top Cover<br />
Montaggio della copertura superiore<br />
32<br />
Deutsch<br />
• Silikon (4) oben an der Rückwand auf<br />
gesamte Länge der Dichtfläche auftragen<br />
(Abb. A).<br />
Achtung!<br />
Die obere Abdeckung muss von zwei Personen<br />
aufgesetzt werden!<br />
• Die obere Abdeckung (1) über der Kabine<br />
positionieren. Die Schrauben in der Schiene<br />
des Türrahmens passend zu den Löchern in<br />
der Abdeckung verschieben und Abdeckung<br />
vorsichtig absenken. Die obere Abdeckung<br />
muss sauber aufliegen und parallel ausgerichtet<br />
sein(Abb. A).<br />
• Die 5 Unterlegscheiben 6,4 x 18 (3) einsetzen<br />
und mit dem 8 mm Maulschlüssel und<br />
den 5 Muttern M5 (2) die obere Abdeckung<br />
verschrauben (Abb. B).<br />
• Die obere Abdeckung (1) durch leichtes Andrücken<br />
fixieren und an den vorgegebenen 7<br />
Punkten (5) mit einem 2 mm Bohrer von unten<br />
Löcher durch Rückwand (7) und obere Abdeckung<br />
(1) bohren. Von oben mit selbstbohrenden<br />
Schrauben (6) obere Abdeckung (1) mit<br />
der Rückwand (7) verschrauben.<br />
• Transparente Gummidichtung an der Türrahmenunter-<br />
und Oberseite einsetzen. Überstand<br />
mit dem Messer abschneiden (Abb. A).<br />
• Die Kabine ist am unteren Querprofil<br />
rechts und links des Trägergestells von außen<br />
und innen mit Silikon abzudichten! Es muss<br />
mindestens bis auf die Höhe des Wannenrandes<br />
mit Silikon (8) abgedichtet werden<br />
(Abb. D).<br />
• Der Zwischenraum hinter dem Nutprofil, in<br />
der die Seitenverkleidung eingesteckt wird,<br />
ist bis auf die Höhe von 100 mm mit Silikon<br />
zu verfüllen.<br />
Hinweis:<br />
Zwischen der ersten Nut und dem Querträger<br />
ist der gesamte Bereich mit Silikon ca. 40 mm<br />
hoch abzudichten (Abb. D).<br />
• Stopfen an Türrahmen montieren (Abb. E).<br />
English<br />
• Apply silicone (4) to the rear panel's top<br />
over the sealing surface's entire length (Fig.<br />
A).<br />
Attention!<br />
The top cover must be placed by two persons!<br />
• Position the top cover (1) over the cabin.<br />
Position the screws in the rail of the door<br />
frame under the holes of the top cover and<br />
bring it down. The top cover must be aligned<br />
and parallel to the other elements of the cabin<br />
(Fig. A).<br />
• Insert the 5 6.4 x 18 washers (3) and<br />
screw the top cover to the other panels using<br />
the 5 M5 nuts (2) and 8 mm wrench (Fig B).<br />
• Fix the top cover (1) by slightly pressing<br />
it down and use a 2 mm drill to drill holes<br />
through the rear panel (7) and the top cover<br />
(1) from beneath at the 10 specified points<br />
(4). Use self-drilling screws (6) to screw the<br />
top cover (1) to the rear panel (7).<br />
• Insert the transparent rubber sealing at the<br />
door frame's bottom side and top side. Remove<br />
any overhang with a knife (Fig. A).<br />
• The cabin must be sealed with silicone<br />
at the support framing's right and left<br />
bottom cross bar from the outside and<br />
inside! The silicone sealing must at least<br />
be drawn to the tray edge's height (8)<br />
(Fig. D).<br />
• The clearance behind the groove profile in<br />
which the side casing is plugged into must be<br />
filled with silicone up to a height of 100 mm.<br />
Note:<br />
The entire area between the first groove and<br />
the crossbar must be sealed with silicone up<br />
to a height of approx. 40 mm (Fig. D).<br />
• Install covers at door panel (Abb. E).<br />
Italiano<br />
• Applicare silicone (4) in alto sull'intera lunghezza<br />
della superficie di tenuta (fig. A).<br />
Attenzione!<br />
Il cappello deve essere installato da due persone!<br />
• Posizionare il cappello (1) sopra la cabina.<br />
Posizionare le viti nel profilo in corrispondenzadei<br />
fori presenti sul cappello.Il cappello<br />
deve essere allineato e parallelo aglielementi<br />
della cabina (Fig. A).<br />
• Inserire le 5 rondelle 6,4x18 (3) e fissare<br />
le5 dadi con una chiave da 8 mm (Fig. B).<br />
• Fissare la copertura superiore (1) premendola<br />
leggermente e con una punta da 2 mm<br />
praticare dal basso fori attraverso il pannello<br />
posteriore (7) e la copertura superiore (1) in<br />
corrispondenza dei 10 punti previsti (5). Con<br />
le viti autofilettanti (6) avvitare dall‘alto la copertura<br />
superiore (1) al pannello posteriore (7).<br />
• Inserire la guarnizione trasparente nella<br />
parteinferiore dell‘anta fissa e rimuovere con<br />
un co-tello la parte eccedente (Fig. A).<br />
• Il profilato trasversale inferiore del<br />
telaio della cabina deve essere ermetizzato<br />
dall'esterno con silicone! Si deve<br />
ermetizzare con silicone (8) almeno fino<br />
all'altezza del bordo del piatto doccia<br />
(figg. D).<br />
• L'intercapedine dietro il profilato scanalato<br />
in cui si inserisce il pannello laterale va riempita<br />
con silicone fino all'altezza di 100 mm.<br />
Avvertenza:<br />
Tra la prima scanalatura e la traversa, l'intera<br />
area va ermetizzata con silicone per un'altezza<br />
di circa 40 mm (fig. D).<br />
• Installare il tappo nell‘anta fissa (Fig. E).
D<br />
8<br />
A<br />
1<br />
1<br />
4<br />
C<br />
5<br />
Montage obere Abdeckung (Dach)<br />
Installing the Top Cover<br />
Montaggio della copertura superiore<br />
B<br />
7<br />
1<br />
E<br />
2<br />
3<br />
6<br />
33<br />
Deutsch<br />
English<br />
Italiano
Erdungsmaßnahme/Stromversorgung<br />
Earthing Measure/Power Supply<br />
Messa a terra/alimentazione elettrica<br />
Elektriker!<br />
34<br />
Deutsch<br />
Die elektrischen Anschlüsse dürfen ausschließlich<br />
von einem Fachmann (Elektroinstallateur)<br />
ausgeführt werden!<br />
Hinweis:<br />
Die Erdungsmaßnahme ist nach VDE 0100<br />
Teil 410 und Teil 540 durchzuführen.<br />
Potentialausgleich (Abb. A):<br />
• Den Anschluss des Potentialausgleichs (1)<br />
am Rahmen der Rückwand (5) anschließen.<br />
Dazu das Kabelendstück unter die Klemmscheibe<br />
(4) schieben. Sicherungsscheibe (3)<br />
und Sechskantmutter (2) aufsetzen und mit einem<br />
Maulschlüssel 8 mm die Sechskantmutter<br />
M5 (2) festdrehen.<br />
Anschluss Stromversorgung (Abb. B):<br />
• Den Deckel (6) der Steuerung abnehmen<br />
und die Phase (7), den Nullleiter (8) und den<br />
Erdungsanschluss (9) (Abb. B) anschließen.<br />
Die Steuerung wieder schließen und den Kabelhalter<br />
an der Steuerung anschrauben.<br />
Electrician!<br />
English<br />
The electric connections may only be carried<br />
out by an expert (electrical installer)!<br />
Note:<br />
The earthing measure must be carried out in<br />
accordance with VDE 0100 Part 410 and<br />
Part 540.<br />
Potential compensation (Fig. A):<br />
• Connect the earthing cable to terminal (1)<br />
to the rear panel's frame (5). For this purpose,<br />
place the cable end piece beneath the<br />
clamping washer (4). Attach the lock washer<br />
(3) and the hexagon nut (2) and secure the<br />
M5 hexagon nut (2) with an 8 mm wrench.<br />
Power supply connection (Fig. B):<br />
• Remove the control's cover (6) and connect<br />
the phase (7), the zero conductor (8) and the<br />
earthing connection (9) (Fig. B). Close the<br />
control and screw the cable support to the<br />
control.<br />
Elettricista!<br />
Italiano<br />
Il collegamento elettrico deve essere eseguito<br />
solo da un tecnico (elettricista)!<br />
Avvertenza:<br />
La messa a terra va eseguita secondo le norme<br />
vigenti.<br />
Compensazione del potenziale (fig. A):<br />
• Collegare il cavo di compensazione del<br />
potenziale (1) al telaio dela parete posteriore<br />
(5). Allo scopo infilare il capocorda sotto la<br />
vite di bloccaggio (4). Applicare la rondella<br />
(3) ed il dado esagonale (2) e serrare a fondo<br />
il dado esagonale M5 (2) con una chiave<br />
fissa da 8 mm.<br />
Allacciamento elettrico (fig. B):<br />
• Togliere il coperchio della centralina (6) e<br />
collegare il conduttore i fase (7), il neutro (8)<br />
e la terra (9) (fig. B). Richiudere la centralina<br />
ed avvitare il passacavo.
A<br />
B<br />
3<br />
2<br />
5<br />
4<br />
6<br />
SW 8<br />
1<br />
7<br />
8<br />
9<br />
Erdungsmaßnahme/Stromversorgung<br />
Earthing Measure/Power Supply<br />
Messa a terra/alimentazione elettrica<br />
35<br />
Deutsch<br />
English<br />
Italiano
Anschluss Beleuchtung/Lautsprecher<br />
Connecting the Illumination/Loudspeaker<br />
Collegamento dell‘illuminazione/altoparlante<br />
Elektriker!<br />
36<br />
Deutsch<br />
Anschluss Beleuchtung (1):<br />
(nur Variante Deluxe)<br />
Den Stecker von der Beleuchtung mit dem<br />
Dosenstecker verbinden.<br />
Anschluss Lautsprecher (2):<br />
(nur Variante Deluxe)<br />
Stecker des Lautsprechers mit Lautsprecher<br />
verbinden.<br />
Electrician!<br />
English<br />
Connecting the illumination (1):<br />
(only Deluxe version)<br />
Connect the illumination plug with the socket<br />
plug.<br />
Connecting the loudspeaker (2):<br />
(only Deluxe version)<br />
Connect the loudspeaker plug with the loudspeaker.<br />
Elettricista!<br />
Italiano<br />
Collegamento dell'illuminazione (1):<br />
(solo versione Deluxe)<br />
Collegare la spina dell‘illuminazione alla presa.<br />
Collegamento dell'altoparlante (2):<br />
(solo versione Deluxe)<br />
Collegare la spina dell‘altoparlante all‘ altoparlante.
1<br />
Anschluss Beleuchtung/Lautsprecher<br />
Connecting the Illumination/Loudspeaker<br />
Collegamento dell‘illuminazione/altoparlante<br />
2<br />
37<br />
Deutsch<br />
English<br />
Italiano
Montage Verbindungsschläuche/Kopfbrause<br />
Installing the Connection Tubes/Head Shower<br />
Montaggio dei tubi flessibili di raccordo/soffione doccia<br />
38<br />
Deutsch<br />
A. Anschluss Dampfdusche:<br />
• Verbindungsschlauch zwischen Ablauf (4)<br />
und Dampfgerät (2) aufstecken und mit den<br />
Schlauchschellen sichern.<br />
• Verbindungsschlauch zwischen Ablauf (4)<br />
und Dampfdüse (3) aufstecken und mit den<br />
Schlauchschellen sichern.<br />
A. + B. Anschluss Kopfbrause:<br />
• Erdungsanschluß (8) am Gewindestück (7)<br />
der Kopfbrause verschrauben.<br />
• Verbindungsschlauch von Mischer (1) zur<br />
oberen Abdeckung (5) verlegen (mit Kabelbinder<br />
fixieren).<br />
• Anschlußstück (6) des Verbindungsschlauches<br />
mit dem Gewindestück (7) der Kopfbrause<br />
verschrauben.<br />
English<br />
A. Connecting the steam shower:<br />
• Connect the connection tube between the<br />
drain (4) and the steam device (2) and secure<br />
it using tube clips.<br />
• Connect the connection tube<br />
between the drain (4) and the<br />
steam nozzle (3) and secure it<br />
using tube clips.<br />
A. + B. Connecting the head shower:<br />
• Screw the earthing connection (8) at the<br />
head shower’s threaded piece (7).<br />
• Run the connection tube from the mixer (1)<br />
to the top cover (5) (secure with cable ties).<br />
• Screw the connection tube's fitting piece<br />
(6) to the head threaded part (7).<br />
Italiano<br />
A. Collegamento del generatore di<br />
vapore:<br />
• Collegare il tubo flessibile di raccordo tra<br />
lo scarico (4) e il generato del vapore (2) e<br />
bloccarlo con le fascette stringitubo.<br />
• Collegare il tubo flessibile di raccordo tra<br />
lo scarico (4) e il diffusore del vapore (3) e<br />
bloccarlo con le fascette stringitubo.<br />
A. + B. Collegamento del soffione<br />
doccia:<br />
• Avvitare il cavo di terra (8) all’elemento<br />
filettato (7) del soffione doccia.<br />
• Posare il tubo flessibile di raccordo dal<br />
miscelatore (1) alla copertura superiore (5)<br />
(fissare con serracavo).<br />
• Avvitare il raccordo (6) del tubo flessibile<br />
di raccordo all'elemento filettato (7) della<br />
doccia di testa.
B<br />
8<br />
Montage Verbindungsschläuche/Kopfbrause<br />
Installing the Connection Tubes/Head Shower<br />
Montaggio dei tubi flessibili di raccordo/soffione doccia<br />
5<br />
A<br />
3<br />
7<br />
4<br />
1<br />
2<br />
6<br />
39<br />
Deutsch<br />
English<br />
Italiano
Montage Verbindungsschläuche/Kopfbrause<br />
Installing the Connection Tubes/Head Shower<br />
Montaggio dei tubi flessibili di raccordo/soffione doccia<br />
40<br />
Deutsch<br />
• Hauptwasserzufuhr schließen.<br />
• Anschlusswinkel (1) abdichten und mit Maul-<br />
schlüssel SW 19 eindrehen.<br />
• Hauptwasserzufuhr öffnen und Anschluß-<br />
winkel auf Dichtheit prüfen.<br />
• Wasserschläuche an die Abschlusswinkel<br />
(1) anschrauben und mit Maulschlüssel SW 24<br />
festdrehen.<br />
Hinweis:<br />
Nur absperrbare Abschlusswinkel (1) einset-<br />
zen (Bestandteil der Lieferung)!<br />
English<br />
• Close the main water supply.<br />
• Seal the angled elbows (1) and screw it in<br />
using an SW 19 wrench.<br />
• Open the main water supply and check the<br />
angle elbows for tightness.<br />
• Screw the water tubes to the angle cleats<br />
(1) and secure them with an SW 24 wrench.<br />
Note:<br />
Only lockable angle cleats (1) may be used<br />
(included in delivery)!<br />
Italiano<br />
• Collegare il tubo di mandata principale<br />
dell'acqua.<br />
• Rendere stagna la curva di raccordo (1) ed<br />
avvitarla con la chiave fissa da 19.<br />
• Aprire la mandata d'acqua e controllare la<br />
tenuta della curva.<br />
• Avvitare i tubi flessibili dell'acqua alle<br />
curve di raccordo (1) e serrare a fondo con la<br />
chiave fissa da 24.<br />
Avvertenza:<br />
Impiegare solo curve chiudibili (1) (fornite<br />
in dotazione)!
Montage Verbindungsschläuche/Kopfbrause<br />
Installing the Connection Tubes/Head Shower<br />
Montaggio dei tubi flessibili di raccordo/soffione doccia<br />
1<br />
41<br />
Deutsch<br />
English<br />
Italiano
Montage Dampfdusche/Dachabdeckung/Seitenverkleidung<br />
Installing the Steam Shower/Roof Cover/Side Casing<br />
Montaggio della doccia a vapore/copertura del tetto/pannello laterale<br />
Hinweis:<br />
42<br />
Deutsch<br />
Vor dem Einbau der Dampfdusche muss eine<br />
Druckprüfung durchgeführt werden!<br />
Druckprüfung:<br />
• Sämtliche Schlauch- und Rohrverbindungen<br />
auf korrekten Sitz prüfen.<br />
• Kalt- und Warmwasserzulauf öffnen.<br />
• Schlauch- und Rohrverbindungen optisch<br />
auf Undichtigkeit prüfen.<br />
• Undichte Anschlüsse oder Verbindungen<br />
abdichten.<br />
Befestigung:<br />
Vorsicht!<br />
Stromschlag oder Wasseraustritt. Beim Bohren<br />
auf Strom- und Wasserleitungen achten!<br />
• Dampfdusche in die Einbauposition bringen<br />
und Abwasserleitung anschliessen.<br />
Hinweis:<br />
Beim Bohren: Absaugung verwenden!<br />
Ausrichtung der Dampfdusche in die senkrechte<br />
(Wasserwaage: senkrechter Stand)!<br />
• Befestigungsbohrungen mit Ø 6 mm ausführen<br />
(1) und Dübel mit Ø 6 mm einsetzen.<br />
• Mit Befestigungsschrauben (3) 4 x 40 mm<br />
die endgültige Position fixieren. Unterlegscheiben<br />
(2) 4,3 x 16 mm verwenden.<br />
• Folie von Seitenblenden und Wannenschürze<br />
entfernen<br />
• Seitenverkleidung mit selbstbohrenden<br />
Schrauben (4) 4 x 24 mm und Kunststoffdichtscheiben<br />
(6) befestigen.<br />
• 3 teilige Wannenschürze mit selbstbohrenden<br />
Schrauben (4) 4 x 24 mm und Kunststoffdichtscheiben<br />
(6) befestigen. Zunächst<br />
die beiden seitlichen Schürzenteile (8) und<br />
anschließend die Frontschürze (9) anbringen.<br />
• Abdeckkappen (5) aufsetzen. Deckel (7)<br />
auf obere Abdeckung aufsetzen.<br />
Note:<br />
English<br />
A pressure test must be carried out before<br />
installing the steam shower!<br />
Pressure test:<br />
• Check all tube and pipe connections for<br />
proper fit.<br />
• Open the cold and warm water intake.<br />
• Optically inspect the tube and pipe connections<br />
for water leaks.<br />
• Seal any untight connections.<br />
Fixation:<br />
Caution!<br />
Electric shock or water emergence. Observe<br />
all current and water lines when drilling!<br />
• Place the steam shower in its mounting position<br />
and connect the drains.<br />
Note:<br />
When drilling: Use extraction!<br />
Position the steam shower vertically (spirit<br />
level: vertical application)!<br />
• Drill fixation holes of Ø 6 mm (1) and insert<br />
Ø 6 mm plugs.<br />
• Fix the final position using 4 x 40 fixation<br />
screws (3). Use 4.3 x 16 mm washers (2).<br />
• Replace the foil from the side panes and the<br />
tray skirt.<br />
• Fix the side casing using 4 x 24 mm selfdrilling<br />
screws (4) and plastic sealing washers<br />
(6).<br />
• Fix the three tray skirt parts using 4 x 24<br />
mm self-drilling screws (4) and plastic sealing<br />
washers (6). Fix at first the two side skirts (8)<br />
and second the skirt in front (9).<br />
• Attach the cover caps (5). Attach the cover<br />
(7) to the upper casing.<br />
Avvertenza:<br />
Italiano<br />
Prima di montare la doccia a vapore è necessario<br />
eseguire la prova in pressione!<br />
Prova in pressione:<br />
• Controllare la stabilità dei raccordi dei tubi<br />
rigidi e flessibili.<br />
• Aprire la mandata dell'acqua fredda e<br />
calda.<br />
• Controllare visivamente la tenuta dei raccordi<br />
dei tubi rigidi e flessibili.<br />
• Ermetizzare i raccordi che perdono.<br />
Fissaggio:<br />
Cautela!<br />
Folgorazione o perdite d'acqua. Nel praticare<br />
i fori attenzione a non danneggiare linee<br />
elettriche ed idriche!<br />
• Portare la doccia a vapore in posizione di<br />
montaggio e collegare il tubo di scarico.<br />
Avvertenza:<br />
Per praticare i fori impiegare un sistema di<br />
aspirazione!<br />
Posizionare verticalmente la doccia a vapore<br />
(livella a bolla d'aria verticale)!<br />
• Praticare i fori di fissaggio con una punta<br />
Ø 6 mm (1) e applicare tasselli Ø 6 mm.<br />
• Fissare i pannelli ispezionabili con viti autoforanti<br />
4x24 mm (4) ed i sottocappucci (6).<br />
• Fissare i 3 pannelli del piatto con viti autoforanti<br />
4x24 mm (4) ed i sottocappucci (6).<br />
Fissare per primi i pannelli laterali (8) e poi il<br />
pannello frontale (9).<br />
• Fissare i Cappucci (5) ed adagiare ilsovracappello<br />
sul cappello.
A<br />
4<br />
Montage Dampfdusche/Dachabdeckung/Seitenverkleidung<br />
Installing the Steam Shower/Roof Cover/Side Casing<br />
Montaggio della doccia a vapore/copertura del tetto/pannello laterale<br />
5<br />
1<br />
Ø 6 mm<br />
6<br />
3<br />
9<br />
8<br />
B<br />
2<br />
8<br />
7<br />
43<br />
Deutsch<br />
English<br />
Italiano
Schiebetür einstellen<br />
Adjusting the Slide Door<br />
Regolazione della porta scorrevole<br />
44<br />
Deutsch<br />
Schiebetür einstellen:<br />
• Mit dem Inbusschlüssel SW 2 die 2 Gewindestifte<br />
in den oberen Exzenterelementen<br />
lösen.<br />
• Türanschlag mit einem Schraubendreher<br />
über die Exzenterbolzen (1) oben und unten<br />
einstellen.<br />
Hinweis:<br />
Einstellung von innen bei geschlossener Schiebetür<br />
durchführen.<br />
• Mit dem Inbusschlüssel SW 2 (3) die 4 Stifte<br />
in den Exzenterelementen (2) fixieren.<br />
Hinweis:<br />
Die Schiebetür muss an der Anschlagseite auf<br />
der gesamten Länge exakt schließen!<br />
• Die Schrägstellung der Schiebetür kann<br />
durch die Verstellung des Exzenterbolzens<br />
(2) mit dem Inbusschlüssel SW 2 eingestellt<br />
werden!<br />
• Mit dem Inbusschlüssel SW 2 die 4 Gewindestifte<br />
in den Exzenterelementen wieder<br />
fixieren.<br />
• Mit einem stumpfen Gegenstand die Dichtlippe<br />
(4) auf die Innenseite der Duschkabine<br />
bringen (Abb. C).<br />
Hinweis:<br />
Die Dichtlippen müssen korrekt anliegen!<br />
English<br />
Adjusting the slide door:<br />
• Loosen the two threaded pins in the upper<br />
eccentric elements using the SW 2 socket<br />
wrench.<br />
• Adjust the top and bottom door hinge via<br />
the eccentric bolts (1) using a screwdriver.<br />
Note:<br />
The inside adjustment must be carried out<br />
with the slide door closed.<br />
• Fix the four pins in the eccentric elements (2)<br />
using the SW 2 socket wrench (3).<br />
Note:<br />
The slide door must accurately close over the<br />
entire length of its hinge side!<br />
• The tilted position of the slide door can be<br />
adjusted by adjusting the eccentric bolt (2)<br />
with the SW 2 socket wrench!<br />
• Re-fix the four threaded pins in the eccentric<br />
elements using the SW 2 socket wrench.<br />
• Install the sealing lip (4) to the shower<br />
cabin’s inside using a blunt object (Fig. C).<br />
Note:<br />
The sealing lips must be correctly applied!<br />
Italiano<br />
Regolazione della porta scorrevole:<br />
• Con la brugola da 2 allentare i 2 perni<br />
filettati degli elementi eccentrici superiori.<br />
• Con un cacciavite regolare in alto ed in<br />
basso la battuta della porta agendo sui perni<br />
eccentrici (1).<br />
Avvertenza:<br />
Eseguire la regolazione dall'interno solo a<br />
porta scorrevole chiusa.<br />
• Con la brugola da 2 (3) fissare i 4 perni<br />
degli elementi eccentrici (2).<br />
Avvertenza:<br />
Sul lato di battuta, la porta scorrevole deve<br />
chiudere esattamente per l'intera lunghezza!<br />
• L'inclinazione della porta scorrevole può<br />
essere regolata agendo sl perno eccentrico<br />
(2) con la brugola da 2!<br />
• Con la brugola da 2 rifissare i 4 perni<br />
filettati negli elementi eccentrici.<br />
• Con un oggetto smussato portare il labbro<br />
di tenuta (4) sul lato interno della cabina<br />
doccia (fig. C).<br />
Avvertenza:<br />
I labbri di tenuta devono essere correttamente<br />
a contatto!
A<br />
B<br />
2<br />
2<br />
3<br />
3<br />
1<br />
1<br />
2<br />
2<br />
Schiebetür einstellen<br />
Adjusting the Slide Door<br />
Regolazione della porta scorrevole<br />
C<br />
4<br />
45<br />
Deutsch<br />
English<br />
Italiano
Montage Schlauch/Handbrause<br />
Installing the Tube/Hand Shower<br />
Montaggio del tubo flessibile/doccia manuale<br />
Abbildung A:<br />
46<br />
Deutsch<br />
1. Dichtring in den Brauseschlauch zum<br />
Wandanschluss einsetzen.<br />
2. Brauseschlauch an den Wandanschluss<br />
anschließen.<br />
3. Dichtring in den Brauseschlauch zur Handbrause<br />
einsetzen.<br />
4. Brauseschlauch an die Handbrause anschließen.<br />
Abbildung B:<br />
Das Schiebeelement (Wandstange) kann<br />
durch Drehen der Einstellschraube schwer-<br />
oder leichtgängiger eingestellt werden.<br />
Figure A:<br />
English<br />
1. Insert the sealing ring into the hose facing<br />
the wall connection.<br />
2. Connect the hose to the wall connection.<br />
3. Insert the sealing ring into the hose for the<br />
hand shower.<br />
4. Connect the hose to the hand shower.<br />
Figure B:<br />
The slide element (wall bar) can be regulated<br />
to be either hard or easily adjustable by turning<br />
the adjusting screw.<br />
Figura A:<br />
Italiano<br />
1. Applicare la guarnizione di tenuta nel tubo<br />
flessibile della doccia verso il raccordo a parete.<br />
2. Collegare il tubo flessibile della doccia al<br />
raccordo a parete.<br />
3. Applicare la guarnizione di tenuta nel tubo<br />
flessibile verso la doccia.<br />
4. Collegare il tubo flessibile alla doccia<br />
manuale.<br />
Figura B:<br />
La scorrevolezza dell'elemento scorrevole<br />
sull‘asta doccia può essere regolato agendo<br />
sulla vite di registro.
B<br />
A<br />
Montage Schlauch/Handbrause<br />
Installing the Tube/Hand Shower<br />
Montaggio del tubo flessibile/doccia manuale<br />
47<br />
Deutsch<br />
English<br />
Italiano
Thermostat einstellen/warten<br />
Thermostat Adjusting/Servicing<br />
Regolazione/manutenzione del termostatico<br />
48<br />
Deutsch<br />
Thermostat einstellen:<br />
• Umstellgriff (1) aufstecken, Schraube festdrehen<br />
(Inbus SW 4).<br />
• Umstellgriff in Stellung "Handbrause" (2)<br />
stellen und öffnen.<br />
• Thermostat auf 38 °C (3) justieren.<br />
• Befestigungsschraube (5) Thermostatgriff<br />
lösen.<br />
• Thermostatgriff abnehmen.<br />
• Thermostatgriff senkrecht ausrichten und<br />
aufstecken (roter Knopf (4) zeigt nach oben).<br />
• Thermostatgriff festschrauben (5).<br />
Hinweis:<br />
Bei Frostgefahr und Entleerung der<br />
Rohrleitung: Regeleinheit ausbauen,<br />
Umstellgriff öffnen und die Installations-einheit<br />
durch Ausblasen mit Pressluft trocknen (wasserfrei).<br />
English<br />
Adjusting the thermostat:<br />
• Push on the selection knob (1) and tighten<br />
the screw (SW 4 socket wrench).<br />
• Set the selection knob to the "Handbrause"<br />
(hand shower) position (2) and open it.<br />
• Adjust the thermostat to 38 °C (3).<br />
• Loosen the fixation screw (5) at the thermostat's<br />
knob.<br />
• Remove the thermostat knob.<br />
• Vertically position the thermostat knob and<br />
plug it on (red button (4) points upwards).<br />
• Tighten the thermostat knob (5).<br />
Note:<br />
In cases of frost danger and for pipeline<br />
drain: Uninstall the regulation unit, open the<br />
selection knob and dry the installation unit<br />
by blowing compressed air through it (waterless).<br />
Italiano<br />
Regolazione del termostato:<br />
• Applicare l'impugnatura (1) e serrare a<br />
fondo la vite (brugola da 4).<br />
• Posizionare l'impugnatura su "Doccia manuale"<br />
(2) ed aprirla.<br />
• Regolare il termostatico su 38 °C (3).<br />
• Allentare la vite di fissaggio (5) dell'impugnatura<br />
del termostatico.<br />
• Togliere l'impugnatura del termostatico.<br />
• Posizionare verticalmente l'impugnatura<br />
del termostatico ed applicarla (pulsante rosso<br />
(4) verso l'alto).<br />
• Avvitare l'impugnatura del termostatico (5).<br />
Avvertenza:<br />
In caso di pericolo di congelamento ed evacuazione<br />
della tubazione: smontare il regolatore,<br />
aprire l'impugnatura ed asciugare il<br />
gruppo di installazione con aria compressa<br />
(priva di acqua).
Thermostat einstellen/warten<br />
Thermostat Adjusting/Servicing<br />
Regolazione/manutenzione del termostatico<br />
5<br />
1<br />
2<br />
4<br />
3<br />
49<br />
Deutsch<br />
English<br />
Italiano
Brausenfunktionen<br />
Shower Functions Setting<br />
Funzioni della doccia<br />
50<br />
Deutsch<br />
Handbrause Mistral 3 (Abb. A):<br />
1. Softstrahl<br />
2. Normalstrahl<br />
3. Massagestrahl<br />
Kopfbrause Raindance (Abb. B):<br />
1. Rainstrahl<br />
2. Mix 1<br />
3. Balance<br />
4. Mix 2<br />
5. Whirlstrahl<br />
English<br />
Mistral 3 hand shower (Fig. A):<br />
1. Soft jet<br />
2. Normal jet<br />
3. Massaging jet<br />
Raindance head shower (Fig. B):<br />
1. Rain jet<br />
2. Mix 1<br />
3. Balance<br />
4. Mix 2<br />
5. Whirl jet<br />
Italiano<br />
Doccia manuale Mistral 3 (fig. A):<br />
1. Getto delicato<br />
2. Getto normale<br />
3. Getto di massaggio<br />
Soffione doccia Raindance (fig. B):<br />
1. Getto a pioggia<br />
2. Mix 1<br />
3. Bilanciamento<br />
4. Mix 2<br />
5. Getto massaggio
A<br />
B<br />
3 2<br />
1 2 3 4 5<br />
1<br />
Brausenfunktionen<br />
Shower Functions Setting<br />
Funzioni della doccia<br />
51<br />
Deutsch<br />
English<br />
Italiano
Brausenfunktionen<br />
Shower Functions Setting<br />
Funzioni della doccia<br />
52<br />
Deutsch<br />
Kombination der Brausen:<br />
Die Variothermschaltung ermöglicht es, die<br />
Brausen zu aktivieren und zu kombinieren:<br />
Einzelschaltung:<br />
Durchgezogene Linie<br />
(siehe Abbildung)<br />
Kombinationsschaltung:<br />
Gestrichelte Linie<br />
(siehe Abbildung)<br />
A. Handbrause<br />
Einzelschaltung und Kombination mit Rückenbrause<br />
oder Kopfbrause.<br />
B. Kopfbrause<br />
Einzelschaltung und Kombination mit Handbrause<br />
oder 8 Seitenbrausen.<br />
C. 8 Seitenbrausen (Düsen)<br />
Einzelschaltung und Kombination mit Kopfbrause.<br />
D. 6 Rückenbrausen (Düsen)<br />
Einzelschaltung und Kombination mit Handbrause<br />
oder Nackenjets.<br />
E. 4 Nackenbrausen (-jets)<br />
Einzelschaltung und Kombination mit den 6<br />
Rückenbrausen.<br />
F. Variotherm<br />
Einzelschaltung und Kombination der verschiedenen<br />
Brausen.<br />
English<br />
Shower combination:<br />
The vario thermal setting circuitry enables the<br />
activation and combination of the showers:<br />
Single operation:<br />
Normal line<br />
(see Figure)<br />
Combined operation:<br />
Dashed line<br />
(see Figure)<br />
A. Hand shower<br />
Single operation and combination with back<br />
shower or head shower.<br />
B. Head shower<br />
Single operation and combination with hand<br />
shower or eight side showers.<br />
C. 8 side showers (nozzles)<br />
Single operation and combination with head<br />
shower.<br />
D. 6 back showers (nozzles)<br />
Single operation and combination with hand<br />
shower or neck jets.<br />
E. 4 neck jets<br />
Single operation and combination with six<br />
back showers.<br />
F. Vario thermal operation<br />
Single operation and combination of the various<br />
showers.<br />
Italiano<br />
Combinazione delle docce:<br />
Il sistema Variotherm consente di attivare e di<br />
combinare le docce:<br />
Comando singolo:<br />
Linea continua<br />
(vedi figura)<br />
Comando combinato:<br />
Linea tratteggiata<br />
(vedi figura)<br />
A. Doccia manuale<br />
Comando singolo e combinato con getti dorsali<br />
o soffione doccia.<br />
B. Soffione doccia<br />
Comando singolo e combinato con doccia<br />
manuale o 8 getti laterali.<br />
C. 8 docce laterali (ugelli)<br />
Comando singolo e combinato con soffione<br />
doccia.<br />
D. 6 doccia dorsale (ugelli)<br />
Comando singolo e combinato con doccia<br />
manuale o getti cervicali<br />
E. 4 docce (cervicali<br />
Comando singolo e combinato con i 6 getti<br />
dorsali.<br />
F. Deviatore<br />
Comando singolo e combinato con le diverse<br />
docce.
D<br />
E<br />
F<br />
Brausenfunktionen<br />
Shower Functions Setting<br />
Funzioni della doccia<br />
A<br />
B<br />
C<br />
53<br />
Deutsch<br />
English<br />
Italiano
Elektronisches Bedienelement (Comfort)<br />
Electronic Operating Element (Comfort)<br />
Elemento di comando elettronico (Comfort)<br />
54<br />
Deutsch<br />
A. Grundfunktionen:<br />
1. Display<br />
2. Reduziertaste<br />
3. Steigerungstaste<br />
4. ON-/OFF-Taste<br />
5. Pfeil-Taste rechts (Cursor nach rechts)<br />
6. Pfeil-Taste links (Cursor nach links)<br />
7. Programmierungstaste<br />
8. Alarmtaste<br />
B. Alle hier beschriebenen Symbole<br />
sind auf dem Display sichtbar:<br />
Cursor-Anzeige<br />
(blinkt bei Auswahl und leuchtet im<br />
Betriebszustand/aktivem Programm!)<br />
OFF (Display ausgeschaltet)<br />
ON (Display eingeschaltet)<br />
< "Pfeil"-Taste nach links<br />
> "Pfeil"-Taste nach rechts<br />
Funktionen:<br />
Tastensperre (Kindersicherung)<br />
Alarm-Taste<br />
"Back Rain" (8 x Seitenbrausen)<br />
(Intervallschaltung möglich)<br />
4 x Rückenbrausen<br />
(Intervallschaltung möglich)<br />
"Nackenjet" (4 x Nackendüsen)<br />
(Intervallschaltung möglich)<br />
Dampfbad<br />
Weißlicht<br />
A. Basic functions:<br />
1. Display<br />
2. Reduction key<br />
3. Progression key<br />
4. ON/OFF key<br />
English<br />
5. Right arrow key (cursor to the right)<br />
6. Left arrow key (cursor to the left)<br />
7. Programming key<br />
8. Alarm key<br />
B. All symbols described here are vi-<br />
sible on the display:<br />
Cursor indication<br />
(flashes during selection and is illumi-<br />
nated when in operating mode/active<br />
program!)<br />
OFF (display switched off)<br />
ON (display switched on)<br />
< "Arrow" key to the left<br />
> "Arrow" key to the right<br />
Functions:<br />
Key lock (child lock)<br />
Alarm key<br />
"Back rain" (8 x side showers)<br />
(interval operation option)<br />
4 x back showers<br />
(interval operation option)<br />
"Neck jet" (4 x neck nozzles)<br />
(interval operation option)<br />
Steam bath<br />
light<br />
Italiano<br />
A. Funzioni di base:<br />
1. Display<br />
2. Tasto di riduzione<br />
3. Tasto di aumento<br />
4. Tasto ON/OFF<br />
5. Tasto a freccia verso destra<br />
(cursore verso destra)<br />
6. Tasto a freccia verso sinistra<br />
(cursore verso sinistra)<br />
7. Tasto di programmazione<br />
8. Tasto di allarme<br />
B. Tutti i simboli qui descritti sono<br />
visibili sul display:<br />
Cursore<br />
(lampeggia durante la selezione ed<br />
è acceso durante il funzionamento /<br />
programma attivo!)<br />
OFF (display spento)<br />
ON (display acceso)<br />
< Tasto a freccia verso sinistra<br />
> Tasto a freccia verso destra<br />
Funzioni:<br />
Blocco tastiera (sicura bambini)<br />
Tasto di allarme<br />
"Pioggia" (8 docce laterali)<br />
(intermittenza possibile)<br />
4 docce posteriori<br />
(intermittenza possibile)<br />
"Getto sulla nuca" (4 ugelli della nuca)<br />
(intermittenza possibile)<br />
Bagno a vapore<br />
luce bianca
A<br />
B<br />
1<br />
2<br />
4<br />
3<br />
Elektronisches Bedienelement (Comfort)<br />
Electronic Operating Element (Comfort)<br />
Elemento di comando elettronico (Comfort)<br />
5<br />
6<br />
7<br />
8<br />
55<br />
Deutsch<br />
English<br />
Italiano
Elektronisches Bedienelement (Deluxe)<br />
Electronic Operating Element (Deluxe)<br />
Elemento di comando elettronico (Deluxe)<br />
56<br />
Deutsch<br />
A. Grundfunktionen:<br />
1. Display<br />
2. Reduziertaste<br />
3. Steigerungstaste<br />
4. ON-/OFF-Taste<br />
5. Pfeil-Taste rechts (Cursor nach rechts)<br />
6. Pfeil-Taste links (Cursor nach links)<br />
7. Programmierungstaste<br />
8. Alarmtaste<br />
B. Alle hier beschriebenen Symbole<br />
sind auf dem Display sichtbar:<br />
Cursor-Anzeige<br />
(blinkt bei Auswahl und leuchtet im<br />
Betriebszustand/aktivem Programm!)<br />
OFF (Display ausgeschaltet)<br />
ON (Display eingeschaltet)<br />
< "Pfeil"-Taste nach links<br />
> "Pfeil"-Taste nach rechts<br />
Funktionen:<br />
Tastensperre (Kindersicherung)<br />
Alarm-Taste<br />
"Back Rain" (8 x Seitenbrausen)<br />
(Intervallschaltung möglich)<br />
6 x Rückenbrausen<br />
(Intervallschaltung möglich)<br />
"Nackenjet" (4 x Nackendüsen)<br />
(Intervallschaltung möglich)<br />
"Schottische Dusche"<br />
(Kaltwasserbeimischung)<br />
Dampfbad<br />
"Radio"<br />
Chromotherapie<br />
English<br />
A. Basic functions:<br />
1. Display<br />
2. Reduction key<br />
3. Progression key<br />
4. ON/OFF key<br />
5. Right arrow key (cursor to the right)<br />
6. Left arrow key (cursor to the left)<br />
7. Programming key<br />
8. Alarm key<br />
B. All symbols described here are visible<br />
on the display:<br />
Cursor indication<br />
(flashes during selection and is illuminated<br />
when in operating mode/active program!)<br />
OFF (display switched off)<br />
ON (display switched on)<br />
< "Arrow" key to the left<br />
> "Arrow" key to the right<br />
Functions:<br />
Key lock (child lock)<br />
Alarm key<br />
"Back rain" (8 x side showers)<br />
(interval operation option)<br />
6 x back showers<br />
(interval operation option)<br />
"Neck jet" (4 x neck nozzles)<br />
(interval operation option)<br />
"Scotch shower"<br />
(cold water addition)<br />
Steam bath<br />
"Radio"<br />
Chromo therapy<br />
Italiano<br />
A. Funzioni di base:<br />
1. Display<br />
2. Tasto di riduzione<br />
3. Tasto di aumento<br />
4. Tasto ON/OFF<br />
5. Tasto a freccia verso destra<br />
(cursore verso destra)<br />
6. Tasto a freccia verso sinistra<br />
(cursore verso sinistra)<br />
7. Tasto di programmazione<br />
8. Tasto di allarme<br />
B. Tutti i simboli qui descritti sono visibili<br />
sul display:<br />
Cursore<br />
(lampeggia durante la selezione ed è acceso<br />
durante il funzionamento / programma attivo!)<br />
OFF (display spento)<br />
ON (display acceso)<br />
< Tasto a freccia verso sinistra<br />
> Tasto a freccia verso destra<br />
Funzioni:<br />
Blocco tastiera (sicurezza bambini)<br />
Tasto di allarme<br />
"Back rain" (8 docce laterali)<br />
(intermittenza possibile)<br />
6 docce dorsali<br />
(intermittenza possibile)<br />
"doccia cervicalea" (4 getti cervicali)<br />
(intermittenza possibile)<br />
"Doccia scozzese"<br />
(aggiunta di acqua fredda)<br />
Bagno di vapore<br />
"Radio"<br />
Cromoterapia
A<br />
B<br />
1<br />
2<br />
4<br />
3<br />
Elektronisches Bedienelement (Deluxe)<br />
Electronic Operating Element (Deluxe)<br />
Elemento di comando elettronico (Deluxe)<br />
5<br />
6<br />
7<br />
8<br />
57<br />
Deutsch<br />
English<br />
Italiano
Elektronisches Bedienelement<br />
Electronic Operating Element<br />
Elemento di comando elettronico<br />
Tastensperre<br />
(Kinderschutzanzeige)<br />
58<br />
Deutsch<br />
Aktivierung und Deaktivierung durch<br />
gleichzeitiges Drücken beider "Pfeil-<br />
Tasten"<br />
( < / > )<br />
Alarm-Taste<br />
(Notausschaltung)<br />
Durch Betätigen der "Alarm"-Taste werden<br />
sämtliche Betriebs-Funktionen unterbrochen.<br />
Ein Alarmsignal ertönt 3 Minuten lang. Die<br />
Beleuchtung und das Radio bleiben an.<br />
Hinweis:<br />
Mit der "Alarm"-Taste kann die Alarm Funktion<br />
abgebrochen werden!<br />
"Back Rain" Funktion<br />
(Ganzkörpermassage)<br />
Diese Funktion ermöglicht es die 4 Pharo<br />
Seitenbrausenpaare (4 x 2; mit Massagestrahl)<br />
nacheinander von unten nach oben zu<br />
aktivieren.<br />
Programmfunktion:<br />
• Ein- bzw. Ausschalten einzelner Seitenbrausenpaare<br />
• Zeitfunktion: Gesamtdauer der Massage<br />
• Zeitfunktion: Wasserabgabe-/Pausenzeit<br />
Grundeinstellung:<br />
In der Grundeinstellung werden die Pharo<br />
Seitenbrausen von unten nach oben aufeinanderfolgend<br />
aktiviert.<br />
Seitenbrausen ein- oder ausschalten:<br />
1. Mit der Pfeil-Taste (links oder rechts) den<br />
Cursor auf dem "Back Rain"-Symbol positionieren.<br />
Mit der Stern-Taste bestätigen<br />
2. Auf dem Display erscheint die Meldung<br />
"ON" (aktiv) und die Zahl "1" die zu blinken<br />
beginnt. Die "1" steht für das unterste Seitenbrausenpaar.<br />
Die Nummerierung verläuft von<br />
unten nach oben.<br />
3. Seitenbrausenpaare (1,2,3,4) mit Pfeil-<br />
Taste links oder rechts auswählen und mit der<br />
Minus-Taste deaktivieren oder mit der Plus-<br />
Taste aktivieren. Auswahl mit der Stern-Taste<br />
bestätigen.<br />
Key lock<br />
(child lock indication)<br />
English<br />
Activation and deactivation by simultaneous<br />
depression of both "arrow<br />
keys".<br />
( < / > )<br />
Alarm key<br />
(emergency off-switch)<br />
By pressing the "Alarm" key, all operating<br />
functions are interrupted. An alarm signal is<br />
audible for three minutes. The illumination<br />
and the radio remain switched on.<br />
Note:<br />
The alarm function can be interrupted via the<br />
"Alarm" key!<br />
"Back rain" function<br />
(whole-body massage)<br />
This function will enable you to subsequently<br />
activate 4 Pharo side shower pairs (4 x 2;<br />
with massaging jet) from the bottom to the<br />
top.<br />
Program function:<br />
• Switch-on or switch-off of individual side<br />
showers<br />
• Time function: Total massaging duration<br />
• Time function: water output time/break<br />
Basic setting:<br />
In the basic setting, the Pharo side showers<br />
are subsequently activated from the bottom<br />
the top.<br />
Switching the side showers on or off:<br />
1. Position the cursor on the "Back rain"<br />
symbol via the arrow key (left or right). Confirm<br />
your selection with the star key.<br />
2. The display shows the message "ON"<br />
(active) and a flashing figure "1". The "1"<br />
stands for the lower side shower pair. The<br />
numbering's sequence is from the bottom to<br />
the top.<br />
3. Select the side shower pairs (1,2,3,4)<br />
via the left or right arrow key and deactivate<br />
them via the minus key or activate them via<br />
the plus key. Confirm your selection with the<br />
star key.<br />
Blocco tastiera<br />
(sicura bambini)<br />
Italiano<br />
Attivazione e disattivazione<br />
premendo contemporaneamente i<br />
due tasti a freccia<br />
( < / > )<br />
Tasto di allarme<br />
(spegnimento di emergenza)<br />
Premendo il tasto "Allarme" si interrompono<br />
tutte le funzioni del sistema. Per 3 minuti<br />
viene emesso un segnale di allarme.<br />
L'illuminazione e la radio restano accese.<br />
Avvertenza:<br />
Con il tasto "Allarme" si può disattivare la<br />
funzione di allarme!<br />
Funzione "Back Rain"<br />
(massaggio integrale)<br />
Questa funzione consente di attivare le 4<br />
paia di getti laterali Pharo (4 x 2; con getto<br />
per massaggio) in successione dal basso verso<br />
l’alto.<br />
Funzione di programma:<br />
• Accensione oppure spegnimento di<br />
singole paia di getti laterali<br />
• Funzione durata: durata complessiva del<br />
massaggio<br />
• Funzione durata: durata del getto d’acqua<br />
e durata della pausa<br />
Impostazione di base:<br />
Nell'impostazione di base le docce laterali<br />
Pharo si attivano in successione dal basso<br />
verso l'alto.<br />
Attivazione e disattivazione delle<br />
docce laterali:<br />
1. Con il tasto a freccia (verso sinistra o<br />
verso destra) portare il cursore sul simbolo<br />
"Pioggia". Confermare con il tasto<br />
dell'asterisco.<br />
2. Sul display compare il messaggio<br />
"ON" (attivo) ed il numero "1" che inizia<br />
a lampeggiare. Il numero “1” rappresenta<br />
il paio di getti laterali più in basso. La<br />
numerazione va dal basso verso l’alto.<br />
3. Selezionare le paia di getti laterali (1,2,3,4)<br />
con il tasto a freccia verso sinistra o verso<br />
destra e disattivarle con il tasto "-" o attivarle<br />
con il tasto "+". Confermare la selezione con il<br />
tasto dell'asterisco.
Hinweis:<br />
Deutsch<br />
Die Einstellungen werden im System bis zur<br />
nächsten Programmierung abgelegt!<br />
Bei Unterbrechung der Stromversorgung werden<br />
die Einstellungen gelöscht!<br />
4. Den Cursor mit den Pfeiltasten auf das<br />
"Back Rain"-Symbol positionieren.<br />
5. Mit der "ON/OFF"-Taste die Einstellung<br />
aktivieren.<br />
Dauer der Massage:<br />
Die Zeit (zum Beispiel 20 Minuten) mit der<br />
Plus-Taste oder Minus-Taste einstellen. Wird<br />
die Plus- oder Minus-Taste gedrückt gehalten,<br />
wird die Zu- bzw. Abnahme der Minutenangabe<br />
gefolgt von einem "d" angezeigt.<br />
Auswahl mit Stern-Taste bestätigen.<br />
Hinweis:<br />
Mindestdauer: 5 Minuten<br />
Höchstdauer: 60 Minuten<br />
Betrieb:<br />
Während des Betriebs können die Einstellungen<br />
geändert werden.<br />
1. Funktionsdauer ("Back Rain"): Stern-Taste<br />
drücken. Änderung durch Drücken der Plus-<br />
oder Minus-Taste. Auswahl mit der Stern-Taste<br />
bestätigen.<br />
Nach der Bestätigung erscheint der Buchstabe<br />
"A" gefolgt von der Öffnungszeit (Wasserabgabe)<br />
der Seitenbrausen in Sekunden.<br />
2. Öffnungszeit (in Sekunden) Seitenbrausen<br />
durch Plus- oder Minus-Taste einstellen.<br />
Hinweis:<br />
Mindestdauer: 1 Sekunde<br />
Höchstdauer: 9,5 Sekunden<br />
3. Die Öffnungszeit der Wasserabgabe mit<br />
der Stern-Taste bestätigen.<br />
Nach der Bestätigung erscheint der Buchstabe<br />
"S" gefolgt von der Pausenzeit (keine<br />
Wasserabgabe).<br />
4. Mit der Plus- oder Minus-Taste die Pausen<br />
einstellen.<br />
Hinweis:<br />
Mindestdauer: 0 Sekunden<br />
Höchstdauer: 9,5 Sekunden<br />
Note:<br />
English<br />
The settings are stored in the system until the<br />
next programming!<br />
If the power supply is interrupted, the settings<br />
are deleted!<br />
4. Position the cursor on the "Back rain"<br />
symbol via the arrow keys.<br />
5. Activate the setting via the "ON/OFF"<br />
key.<br />
Massaging duration:<br />
Set the time (e.g. 20 minutes) via the plus or<br />
the minus key. If the plus or the minus key is<br />
held depressed, the increase or decrease<br />
of the minute setting, followed by a "d", is<br />
shown. Confirm your selection with the star<br />
key.<br />
Note:<br />
Min. duration: 5 minutes<br />
Max. duration: 60 minutes<br />
Operation:<br />
The settings can be changed during operation.<br />
1. Function duration ("Back rain"): Press<br />
the star key. Press the plus or minus key for<br />
changes. Confirm your selection with the star<br />
key.<br />
After the confirmation, the letter "A", followed<br />
by the side showers' opening duration (water<br />
output) in seconds, is shown.<br />
2. Set the side showers' opening duration (in<br />
seconds) via the plus or minus key.<br />
Note:<br />
Min. duration: 1 second<br />
Max. duration: 9.5 seconds<br />
3. Confirm the water output's duration with<br />
the star key.<br />
After the confirmation, the letter "S", followed<br />
by the break time (no water output), is<br />
shown.<br />
4. Set the breaks via the plus or minus key.<br />
Note:<br />
Min. duration: 0 seconds<br />
Max. duration: 9.5 seconds<br />
Elektronisches Bedienelement<br />
Electronic Operating Element<br />
Elemento di comando elettronico<br />
Avvertenza:<br />
Italiano<br />
Le impostazioni vengono salvate nel sistema<br />
fino alla programmazione successiva!<br />
In caso di black-out le impostazioni vanno<br />
perdute!<br />
4. Con i tasti a freccia portare il cursore sul<br />
simbolo "Back Rain".<br />
5. Attivare l'impostazione con il tasto "ON/<br />
OFF".<br />
Durata del massaggio:<br />
Impostare il tempo (ad esempio 20 minuti)<br />
con il tasto "+" o "-". Tenendo premuto il<br />
tasto "+" o "-", l'aumento o la diminuzione<br />
dei minuti viene visualizzato seguito da una<br />
"d". Confermare la selezione con il tasto<br />
asterisco.<br />
Avvertenza:<br />
Durata minima: 5 minuti.<br />
Durata massima: 60 minuti.<br />
Funzionamento:<br />
Durante il funzionamento si possono<br />
modificare le impostazioni.<br />
1. Durata del funzionamento ("Back Rain"):<br />
premere il tasto asterisco e modificare con il<br />
tasto "+" o "-". Confermare la selezione con<br />
il tasto asterisco.<br />
Dopo la conferma compare la lettera "A"<br />
seguita dal tempo di apertura (mandata<br />
d'acqua) dei getti laterali.<br />
2. Regolare il tempo di apertura (in secondi)<br />
dei getti laterali con il tasto "+" o "-".<br />
Avvertenza:<br />
Durata minima: 1 secondo.<br />
Durata massima: 9,5 secondi.<br />
3. Confermare il tempo di apertura con il<br />
tasto asterisco.<br />
Dopo la conferma compare la lettera "S"<br />
seguita dal tempo di pausa (interruzione<br />
della mandata d'acqua).<br />
4. Impostare le pause con il tasto "+" o "-".<br />
Avvertenza:<br />
Durata minima: 0 secondi.<br />
Durata massima: 9,5 secondi.<br />
59<br />
Deutsch<br />
English<br />
Italiano
Elektronisches Bedienelement<br />
Electronic Operating Element<br />
Elemento di comando elettronico<br />
60<br />
Deutsch<br />
5. Die Pausenzeit mit der Stern-Taste bestätigen.<br />
Zum Beenden des Betriebs den Cursor mit<br />
der Pfeil-Taste auf das "Back Rain"-Symbol<br />
positionieren, dann "ON-/OFF"-Taste drücken.<br />
Nach Ablauf der Betriebszeit oder dem<br />
vorzeitigen Beenden des Betriebs ertönt ein<br />
Signalton (2 Sek.).<br />
Rückenbrausen<br />
(Rückenmassage)<br />
Diese Funktion ermöglicht es, die 6 x Pharo<br />
Rückenbrausen (mit Massagestrahl) eine bestimmte<br />
Zeit zu öffnen (aktivieren).<br />
Programmfunktion:<br />
• Zeitfunktion: Dauer der Massage<br />
Dauer der Massage:<br />
1. Mit der Pfeil-Taste (links oder rechts) den<br />
Cursor auf dem "Rückenbrausen"-Symbol<br />
plazieren. Auswahl mit der Stern-Taste bestätigen.<br />
2. Die Zeit (Voreinstellung zum Beispiel 20<br />
Minuten) mit der Plus-Taste oder Minus-Taste<br />
einstellen. Wird die Plus- oder Minustaste<br />
gedrückt gehalten, wird die Zu- bzw. Abnahme<br />
der Minutenangabe gefolgt von einem<br />
"d" angezeigt. Auswahl mit der Stern-Taste<br />
bestätigen.<br />
Hinweis:<br />
Mindestdauer: 5 Minuten<br />
Höchstdauer: 60 Minuten<br />
Die Einstellungen werden im System bis zur<br />
nächsten Programmierung abgelegt!<br />
Bei Unterbrechung der Stromversorgung werden<br />
die Einstellungen gelöscht!<br />
Zum Beenden des Betriebs den Cursor mit der<br />
Pfeil-Taste auf das "Rückenbrausen"-Symbol<br />
positionieren, dann "ON-/OFF"-Taste<br />
drücken. Nach Ablauf der Betriebszeit oder<br />
dem vorzeitigen Beenden des Betriebs ertönt<br />
ein Signalton (2 Sek.).<br />
English<br />
5. Confirm the break duration with the star<br />
key.<br />
To stop the operation, position the cursor on<br />
the "Back rain" symbol via the arrow key<br />
and press the "ON/OFF" key. After the operating<br />
time has expired or been prematurely<br />
terminated, a signal tone is output (2 sec.).<br />
back showers<br />
(back massage)<br />
This function enables the opening of the 6 x<br />
Pharo back showers (with massaging jet) for<br />
a specified duration (activation).<br />
Program function:<br />
• Time function: Massaging duration<br />
Massaging duration:<br />
1. Position the cursor on the "back showers"<br />
symbol via the arrow key (left or<br />
right). Confirm your selection with the star<br />
key.<br />
2. Set the time (e.g. 20 minutes presetting)<br />
via the plus or the minus key. If the plus or<br />
minus key is held depressed, the increase or<br />
decrease of the minute setting, followed by<br />
a "d", is shown. Confirm your selection with<br />
the star key.<br />
Note:<br />
Min. duration: 5 minutes<br />
Max. duration: 60 minutes<br />
The settings are stored in the system until the<br />
next programming!<br />
If the power supply is interrupted, the settings<br />
are deleted!<br />
To stop the operation, position the cursor on<br />
the "back showers" symbol via the arrow<br />
key and press the "ON/OFF" key. After the<br />
operating time has expired or been prematurely<br />
terminated, a signal tone is output (2<br />
sec.).<br />
Italiano<br />
5. Confermare il tempo di pausa con il tasto<br />
asterisco.<br />
Per disattivare il funzionamento, con i tasti a<br />
freccia portare il cursore sul simbolo "Back<br />
Rain" e quindi premere il tasto "ON/OFF".<br />
Al termine del tempo di funzionamento o<br />
se il funzionamento viene disattivato prima<br />
del tempo programmato viene emesso un<br />
segnale acustico (2 secondi).<br />
Getti dorsali<br />
(massaggio della schiena)<br />
Questa funzione consente di aprire (attivare)<br />
i 6 getti dorsali Pharo (con getto per<br />
massaggio) per un determinato tempo.<br />
Funzione di programma:<br />
• Funzione temporale: durata del<br />
massaggio<br />
Durata del massaggio:<br />
1. Con il tasto a freccia (verso sinistra o<br />
verso destra) portare il cursore sul simbolo<br />
"getti dorsali". Confermare la selezione<br />
con il tasto asterisco.<br />
2. Impostare il tempo (preimpostazione ad<br />
esempio 20 minuti) con il tasto "+" o "-".<br />
Tenendo premuto il tasto "+" o "-", l'aumento<br />
o la diminuzione dei minuti viene visualizzato<br />
seguito da una "d". Confermare la selezione<br />
con il tasto asterisco.<br />
Avvertenza:<br />
Durata minima: 5 minuti.<br />
Durata massima: 60 minuti.<br />
Le impostazioni vengono salvate nel sistema<br />
fino alla programmazione successiva!<br />
In caso di black-out le impostazioni vanno<br />
perdute!<br />
Per disattivare il funzionamento, con i tasti a<br />
freccia portare il cursore sul simbolo "Getti<br />
dorsali" e quindi premere il tasto "ON/<br />
OFF". Al termine del tempo di funzionamento<br />
o se il funzionamento viene disattivato prima<br />
del tempo programmato viene emesso un<br />
segnale acustico (2 secondi).
Deutsch<br />
"Nackenjet"-Funktion<br />
(Nacken- und Rückenmassage)<br />
Diese Funktion ermöglicht es, die 4 Nackenjets<br />
eine bestimmte Zeit zu öffnen (aktivieren).<br />
Programmfunktion:<br />
• Zeitfunktion: Dauer der Massage<br />
Dauer der Massage:<br />
1. Mit der Pfeil-Taste (links oder rechts)<br />
den Cursor auf dem "Nackenjet"-Symbol<br />
positionieren. Auswahl mit der Stern-Taste<br />
bestätigen.<br />
2. Die Zeit (Vorgabe 20 Minuten) mit der<br />
Plus-Taste oder Minus-Taste einstellen. Wird<br />
die Plus- oder Minustaste gedrückt gehalten,<br />
wird die Zu- bzw. Abnahme der Minutenangabe<br />
gefolgt von einem "d" angezeigt. Auswahl<br />
mit der Stern-Taste bestätigen.<br />
Hinweis:<br />
Mindestdauer: 5 Minuten<br />
Höchstdauer: 60 Minuten<br />
Die Einstellungen werden im System bis zur<br />
nächsten Programmierung abgelegt!<br />
Bei Unterbrechung der Stromversorgung werden<br />
die Einstellungen gelöscht!<br />
Zum Beenden des Betriebs den Cursor mit<br />
der Pfeil-Taste auf das "Nackenjet"-Symbol<br />
positionieren, dann "ON/OFF"-Taste drücken.<br />
Nach Ablauf der Betriebszeit oder dem<br />
vorzeitigen Beenden des Betriebs ertönt ein<br />
Signalton (2 Sek.).<br />
English<br />
"Neck jet" function<br />
(neck and back massage)<br />
This function enables an opening of the 4 x<br />
neck jets for a specified duration (activation).<br />
Program function:<br />
• Time function: Massaging duration<br />
Massaging duration:<br />
1. Position the cursor on the "Neck jet"<br />
symbol via the arrow key (left or right). Confirm<br />
your selection with the star key.<br />
2. Set the time (20 minutes presetting) via the<br />
plus or the minus key.If the plus or minus key<br />
is held depressed, the increase or decrease<br />
of the minute setting, followed by a "d", is<br />
shown.Confirm your selection with the star<br />
key.<br />
Note:<br />
Min. duration: 5 minutes<br />
Max. duration: 60 minutes<br />
The settings are stored in the system until the<br />
next programming!<br />
If the power supply is interrupted, the settings<br />
are deleted!<br />
To stop the operation, position the cursor on<br />
the "Neck jet" symbol via the arrow key<br />
and press the "ON/OFF" key. After the operating<br />
time has expired or been prematurely<br />
terminated, a signal tone is output (2 sec.).<br />
Elektronisches Bedienelement<br />
Electronic Operating Element<br />
Elemento di comando elettronico<br />
Italiano<br />
Funzione "Getti cervicali"<br />
(massaggio della nuca e della schiena)<br />
Questa funzione consente di aprire (attivare)<br />
i 4 getti cervicali per un determinato tempo.<br />
Funzione di programma:<br />
• Funzione temporale: durata del massaggio.<br />
Durata del massaggio:<br />
1. Con il tasto a freccia (verso sinistra o<br />
verso destra) portare il cursore sul simbolo<br />
"Getto sulla nuca". Confermare la selezione<br />
con il tasto dell'asterisco.<br />
2. Impostare il tempo (preimpostazione: 20<br />
minuti) con il tasto "+" o "-".Tenendo premuto<br />
il tasto "+" o "-", l'aumento o la diminuzione<br />
dei minuti viene visualizzato seguito da una<br />
"d".Confermare la selezione con il tasto<br />
dell'asterisco.<br />
Avvertenza:<br />
Durata minima: 5 minuti.<br />
Durata massima: 60 minuti.<br />
Le impostazioni vengono salvate nel sistema<br />
fino alla programmazione successiva!<br />
In caso di black-out le impostazioni vanno<br />
perdute!<br />
Per disattivare il funzionamento, con i tasti a<br />
freccia portare il cursore sul simbolo "Getto<br />
sulla nuca" e quindi premere il tasto "ON/<br />
OFF". Al termine del tempo di funzionamento<br />
o se il funzionamento viene disattivato prima<br />
del tempo programmato viene emesso un<br />
segnale acustico (2 secondi).<br />
61<br />
Deutsch<br />
English<br />
Italiano
Elektronisches Bedienelement<br />
Electronic Operating Element<br />
Elemento di comando elettronico<br />
62<br />
Deutsch<br />
Dampfbad (falls vorhanden!)<br />
Diese Funktion ermöglicht es ein<br />
Dampfbad bei einer Temperatur von<br />
35 bis 50 °C zu nehmen.<br />
Programmfunktion:<br />
• Zeitfunktion: Dauer des Dampfbades<br />
• Temperatureinstellung<br />
Warnung!<br />
Gefahr der Verbrühung<br />
Vor dem Einschalten der Dampffunktion<br />
muss der Deckel der Düse so positioniert<br />
werden, dass der Dampf in die dem<br />
Benutzer entgegengesetzte Richtung<br />
entweicht.!<br />
In den Siebeinsatz des Aromadispenser<br />
kann fester Duftstoff eingefüllt werden, z. B.<br />
getrocknete Blätter oder auch ein mit Duftstoff<br />
getränkter Wattebausch.<br />
Dampfbad einschalten (aktivieren)<br />
1. Türe schließen, damit kein Dampf entweichen<br />
kann.<br />
2. Mit der "Pfeil"-Taste (links oder rechts) den<br />
Cursor auf dem "Dampfbad"-Symbol positionieren.<br />
Auswahl mit der „ON/OFF“-Taste<br />
bestätigen.<br />
3. Die Zeit (Voreinstellung zum Beispiel 20<br />
Minuten) mit der Plus-Taste oder Minus-Taste<br />
einstellen. Wird die Plus- oder Minustaste gedrückt<br />
gehalten, wird die Zu- bzw. Abnahme<br />
der Minutenangabe gefolgt von einem "d"<br />
angezeigt. Auswahl mit Stern-Taste bestätigen.<br />
English<br />
Steam bath (if available!<br />
This function enables shower baths at<br />
a temperature of 35 to 50 C°.<br />
Program function:<br />
• Time function: duration of the shower bath<br />
• Temperature setting<br />
Warning!<br />
Danger of scald<br />
Before activating the steam function, position<br />
the head cover so that the steam will<br />
go in the direction opposite the user.<br />
Solid fragrances can be filled into sieve insert<br />
of the aroma dispenser, e.g. dried leaves or<br />
also cotton wool soaked in essential oils.<br />
Switching on the steam bath (activation)<br />
1. Close the door.<br />
2. Position the cursor on the "Steam bath"<br />
symbol via the arrow key (left or right). Confirm<br />
your selection with the „ON/OFF“ key.<br />
3. Set the time (e.g. 20 minutes presetting)<br />
via the plus or the minus key. If the plus or<br />
minus key is held depressed, the increase or<br />
decrease of the minute setting, followed by<br />
a "d", is shown. Confirm your selection with<br />
the star key.<br />
Italiano<br />
Bagno a vapore (se presente)<br />
Questa funzione consente di fare un<br />
bagno a vapore ad una temperatura<br />
di 35 - 50 C°.<br />
Funzione di programma:<br />
• Funzione temporale: durata del bagno di<br />
vapore<br />
• Impostazione della temperatura<br />
Avvertimento!<br />
Pericolo di ustioni<br />
Prima di attivare la funzione posizionare<br />
il coperchio del diffu-sore in<br />
modo che il va-pore vada in direzione<br />
opposta all’utente.<br />
Nell‘inserto filtro dell’Aromadispenser è<br />
possibile inserire anche essenza aromatica di<br />
tipo solido come, p. es. foglie secche oppure<br />
anche un tampone di ovatta impregnato di<br />
essenza aromatica.<br />
Attivazione del bagno di vapore<br />
1. Chiudere la porta in modo che il vapore<br />
non esca all'esterno.<br />
2. Con il tasto a freccia (verso sinistra o<br />
verso destra) portare il cursore sul simbolo<br />
"Bagno di vapore". Confermare la<br />
selezione con il tasto „ON/OFF“.<br />
3. Impostare il tempo (preimpostazione ad<br />
esempio 20 minuti) con il tasto "+" o "-".<br />
Tenendo premuto il tasto "+" o "-", l'aumento<br />
o la diminuzione dei minuti viene visualizzato<br />
seguito da una "d". Confermare la selezione<br />
con il tasto asterisco.
Hinweis:<br />
Deutsch<br />
Mindestdauer: 20 Minuten<br />
Höchstdauer: 60 Minuten<br />
4. Die Leistung mit der Plus-Taste oder Minus-<br />
Taste einstellen. Wird die Plus- oder Minustaste<br />
gedrückt, wird die Zu- bzw. Abnahme<br />
der Temperaturangabe gefolgt von einem<br />
"P" angezeigt. Auswahl mit der Stern-Taste<br />
bestätigen.<br />
Hinweis:<br />
Mindestdampfleistung: 65 %<br />
Höchstdampfleistung: 99 %<br />
5. Mit der Pfeil-Taste (links oder rechts) auf<br />
das Symbol "Dampfbad" wechseln und<br />
mit "ON-/OFF"-Taste bestätigen. Die Kabine<br />
kann jetzt verlassen werden.<br />
Hinweis:<br />
Circa 3 Minuten nach der Aktivierung tritt der<br />
Dampf aus. Die Leistung steigt bis zum eingestellten<br />
Wert.<br />
6. Die gewünschte Zeit mit der Stern-Taste<br />
bestätigen.<br />
7. Die Zeit- und Temperatureinstellung kann<br />
während des Betriebs durch Betätigen der<br />
Stern-Taste geändert werden. Neuen Wert mit<br />
der Stern-Taste bestätigen.<br />
Hinweis:<br />
Nach Ablauf der Zeit wird der Dampfaustritt<br />
unterbrochen, und das System kehrt in seine<br />
Ruhestellung zurück.<br />
Die Erwärmungsphase kann maximal 60<br />
Minuten dauern. Wird die eingestellte Temperatur<br />
in dieser Zeit nicht erreicht, kehrt das<br />
System in seine Ruhestellung zurück.<br />
Zum Beenden des Betriebs den Cursor mit<br />
der Pfeil-Taste auf das "Dampfbad"-Symbol<br />
positionieren, dann "ON-/OFF"-Taste<br />
drücken. Nach Ablauf der Betriebszeit oder<br />
dem vorzeitigen Beenden des Betriebs ertönt<br />
ein Signalton (2 Sek.).<br />
Hinweis:<br />
Die Unterbrechung findet nur statt, wenn die<br />
verbleibende Zeit auf dem Display erscheint!<br />
Note:<br />
English<br />
Min. duration: 20 minutes<br />
Max. duration: 60 minutes<br />
4. Adjust the output via the plus or minus key.<br />
If the plus or minus key is held depressed,<br />
the increase or decrease of the temperature<br />
setting, followed by a "P" is shown. Confirm<br />
your selection with the star key.<br />
Note:<br />
Min. steam output: 65 %<br />
Max. steam output: 99 %<br />
5. Select the "Steam bath" symbol via<br />
the arrow key (left or right) and confirm your<br />
selection with the "ON/OFF" key. The cabin<br />
can now be exited.<br />
Note:<br />
The steam is output approx. 3 minutes after<br />
activation. The output increases up to the set<br />
value.<br />
6. Confirm the desired duration with the star<br />
key.<br />
7. The time and temperature settings can be<br />
changed during operation by operating the<br />
star key. Confirm the new values with the<br />
star key.<br />
Note:<br />
After the set duration has expired, the steam<br />
output is interrupted and the system returns to<br />
its idle position.<br />
The heating-up phase may take up to 60<br />
minutes. If the set temperature is not attained<br />
within this time, the system returns to its idle<br />
position.<br />
To stop the operation, position the cursor on<br />
the "Steam bath" symbol via the arrow key<br />
and press the "ON/OFF" key. After the operating<br />
time has expired or been prematurely<br />
terminated, a signal tone is output (2 sec.).<br />
Note:<br />
The interruption is only realized if the remaining<br />
time is shown on the display!<br />
Elektronisches Bedienelement<br />
Electronic Operating Element<br />
Elemento di comando elettronico<br />
Avvertenza:<br />
Italiano<br />
Durata minima: 20 minuti.<br />
Durata massima: 60 minuti.<br />
4. Regolare la potenza con il tasto "+" o<br />
"-". Tenendo premuto il tasto "+" o "-", viene<br />
visualizzato l'aumento o la diminuzione della<br />
temperatura seguito da una "P".Confermare<br />
la selezione con il tasto asterisco.<br />
Avvertenza:<br />
Potenza minima di vapore: 65 %<br />
Potenza massima di vapore: 99 %<br />
5. Con i tasti a freccia (verso sinistra o<br />
verso destra) passare al simbolo "Bagno a<br />
vapore" e confermare con il tasto "ON/<br />
OFF". Ora si può uscire dalla cabina.<br />
Avvertenza:<br />
Dopo circa 3 minuti dall'attivazione inizia a<br />
fuoriuscire vapore. La potenza aumenta fino<br />
al valore impostato.<br />
6. Confermare il tempo desiderato con il<br />
tasto asterisco.<br />
7. L'impostazione del tempo e della<br />
temperatura può essere modificata durante<br />
il funzionamento premendo il tasto asterisco.<br />
Il nuovo valore si conferma con il tasto<br />
asterisco.<br />
Avvertenza:<br />
Al termine del tempo, la fuoriuscita di vapore<br />
si interrompe ed il sistema ritorna nello stato<br />
di riposo.<br />
La durata massima della fase di<br />
riscaldamento è di 60 minuti. Se la<br />
temperatura impostata non viene raggiunta<br />
entro questo tempo, il sistema ritorna nello<br />
stato di riposo.<br />
Per disattivare il funzionamento, con i tasti a<br />
freccia portare il cursore sul simbolo "Bagno<br />
di vapore" e quindi premere il tasto "ON/<br />
OFF". Al termine del tempo di funzionamento<br />
o se il funzionamento viene disattivato prima<br />
del tempo programmato viene emesso un<br />
segnale acustico (2 secondi).#<br />
Avvertenza:<br />
L'interruzione avviene solo se sul display<br />
compare il tempo restante!<br />
63<br />
Deutsch<br />
English<br />
Italiano
Elektronisches Bedienelement<br />
Electronic Operating Element<br />
Elemento di comando elettronico<br />
64<br />
Deutsch<br />
"Schottische Dusche"<br />
(Nacken- und Rückenmassage)<br />
Die "Schottische Dusche" aktiviert das<br />
abwechselnde Austreten von warmem und<br />
kaltem Wasser. Dies ist eine wirksame Me-<br />
thode, um "Form" und "Wohlbefinden" zu<br />
verbessern.<br />
Die "Schottische Dusche" kann während<br />
des Betriebs der "Back Rain"-Funktion,<br />
"Rückenbrausen"-Funktion und "Na-<br />
ckenjet"-Funktion betrieben werden.<br />
Programmfunktion:<br />
• Zeitfunktion: Dauer der Kaltwasserbeimi-<br />
schung<br />
• Persönliche Einstellungen:<br />
- Wechselduschen<br />
Mögliche Programme in Verbindung<br />
mit "Black Rain":<br />
Programm 1<br />
Jedes Brausenpaar gibt über 70% der Zeit<br />
warmes Wasser und 30% der Zeit kaltes<br />
Wasser ab.<br />
Programm 2<br />
Während des zyklischen Umschaltens tritt<br />
nacheinander aus einem Brausenpaar kaltes<br />
und aus einem anderen warmes Wasser aus.<br />
Programm 3<br />
Nach drei zyklischen Umschaltungen des Systems<br />
tritt bei zwei Zyklen nur warmes Wasser<br />
und beim dritten Zyklus kaltes Wasser aus<br />
den Brausen aus.<br />
1. Mit der Pfeil-Taste (links oder rechts) den<br />
Cursor auf dem "Schottische Dusche"-<br />
Symbol positionieren. Auswahl mit der Stern-<br />
Taste bestätigen.<br />
2. Auf dem Display erscheint die Meldung<br />
"Pr 1" (für Programm 1)<br />
3. Programm 1, 2 oder 3 mit der Plus-Taste<br />
oder Minus-Taste auswählen. Auswahl mit der<br />
Stern-Taste bestätigen.<br />
English<br />
"Scotch shower"<br />
(neck and back massage)<br />
The "Scotch Shower" activates an alternating<br />
output of warm and cold water. This is<br />
an effective method to improve your "form"<br />
and "wellbeing".<br />
The "Scotch shower" is available when<br />
the "Back rain", "back showers" and<br />
"Neck jet" functions are in operation.<br />
Program function:<br />
• Time function: massaging duration<br />
• Personal settings:<br />
- alternating hot and cold showers<br />
Possible programs in connection with<br />
"Back rain":<br />
Program 1<br />
Each shower pair outputs warm water throughout<br />
70 % and cold water throughout 30 %<br />
of the shower duration.<br />
Program 2<br />
During the cyclical switch-over, cold and<br />
warm water is subsequently output by two<br />
separate shower pairs.<br />
Program 3<br />
After three cyclical system switch-overs, the<br />
showers only output warm water during two<br />
cycles and cold water during the third cycle.<br />
1. Position the cursor on the "Scotch shower"<br />
symbol via the arrow key (left or right).<br />
Confirm your selection with the star key.<br />
2. The display shows the message "Pr 1"<br />
(for program 1).<br />
3. Select program 1, 2 or 3 via the plus or<br />
minus key. Confirm your selection with the<br />
star key.<br />
Italiano<br />
"Doccia scozzese"<br />
(massaggio della nuca e della schiena)<br />
La "Doccia scozzese" attiva la fuoriuscita<br />
intermittente di acqua calda e fredda, un<br />
metodo efficace per migliorare la forma ed<br />
il benessere.<br />
La "Doccia scozzese" può essere attivata<br />
durante il funzionamento a "Pioggia",<br />
"Docce posteriori" e "Getto sulla<br />
nuca".<br />
Funzione di programma:<br />
• Funzione temporale: durata dell'aggiunta<br />
di acqua fredda<br />
• Impostazioni personalizzate:<br />
- Doccia alterna<br />
Programmi possibili in combinazione<br />
con "Pioggia":<br />
Programma 1<br />
Ogni coppia di docce manda acqua calda<br />
per il 70% ed acqua fredda per il 30% del<br />
tempo.<br />
Programma 2<br />
Durante la commutazione ciclica, da una<br />
coppia di docce fuoriesce acqua fredda ed,<br />
in successione, da un'altra coppia acqua<br />
calda.<br />
Programma 3<br />
Dopo tre commutazioni cicliche del sistema,<br />
per due cicli dalle docce fuoriesce solo<br />
acqua calda e durante il terzo ciclo solo<br />
acqua fredda.<br />
1. Con il tasto a freccia (verso sinistra o<br />
verso destra) portare il cursore sul simbolo<br />
"Doccia scozzese". Confermare la<br />
selezione con il tasto dell'asterisco.<br />
2. Sul display compare il messaggio "Pr 1"<br />
(programma 1)<br />
3. Con il tasto "+" o "-" selezionare il<br />
programma 1, 2 o 3. Confermare la<br />
selezione con il tasto dell'asterisco.
Zu Programm 1:<br />
Deutsch<br />
1. Auf dem Display erscheint die Meldung<br />
"pc" gefolgt von der Prozentzahl zur Zeit<br />
(Dauer) der Kaltwasserabgabe.<br />
2. Mit der Plus-Taste oder Minus-Taste einen<br />
Wert einstellen der zwischen 10% und 70%<br />
liegt. Wird die Plus- oder Minustaste gedrückt<br />
gehalten, wird die Zu- bzw. Abnahme der<br />
Prozentangabe angezeigt. Auswahl mit der<br />
Stern-Taste bestätigen.<br />
Die Einstellungen werden im System bis zur<br />
nächsten Programmierung abgelegt!<br />
Bei Unterbrechung der Stromversorgung wer-<br />
den die Einstellungen gelöscht!<br />
Beispiel:<br />
• Programmauswahl: "Pr 1"<br />
• Dauer des "ON-Zyklus": 5 Sekunden<br />
(Voreinstellung 5 Sek. / Brause geöffnet)<br />
• Kaltwasserabgabe (Dauer): "pc" 40%<br />
• Zyklische Umschaltung:<br />
Brause 1 + 2 + 3 + 4:<br />
2 Sekunden kaltes Wasser (40% der Gesamtzeit)<br />
3 Sekunden warmes Wasser (60% der<br />
Gesamtzeit).<br />
Zu Programm 2:<br />
1. Programm auswählen<br />
Hinweis:<br />
Bei Programm 2 ist eine persönliche Einstel-<br />
lung nicht notwendig. Das Programm startet<br />
automatisch mit dem Austritt von kaltem<br />
Wasser aus einem Brausenpaar und warmen<br />
Wasser aus den anderen drei Brausenpaaren.<br />
Umlaufend tritt aus allen Strahlerpaaren einen<br />
Zyklus lang kaltes Wasser aus, während aus<br />
den anderen warmes Wasser austritt.<br />
2. Auswahl mit der Stern-Taste bestätigen.<br />
Programmierungsbeispiele<br />
(individuelle Einstellungen)<br />
1. Gewünschtes Programm: "Pr2"<br />
2. Zyklusumschaltung wie folgt:<br />
Ref. to program 1:<br />
English<br />
1. The display shows the message "pc",<br />
followed by a percentage of the cold water<br />
output's time (duration).<br />
2. Use the plus or minus key to set a value<br />
between 10% and 70%. If the plus or minus<br />
key is held depressed, the increase or decre-<br />
ase of the percentage indication is shown.<br />
Confirm your selection with the star key.<br />
The settings are stored in the system until the<br />
next programming!<br />
If the power supply is interrupted, the settings<br />
are deleted!<br />
Example:<br />
• Program selection: "Pr 1"<br />
• Duration of the "ON cycle": 5 seconds<br />
(presetting 5 sec. / shower open)<br />
• Cold water output (duration): "pc" 40%<br />
• Cyclical switchover:<br />
Shower 1 + 2 + 3 + 4:<br />
Cold water for 2 seconds (40% of the total<br />
time), warm water for 3 seconds (60% of the<br />
total time).<br />
Ref. to program 2:<br />
1. Select the program.<br />
Note:<br />
With program 2, a personal setting need not<br />
be made. The program automatically starts<br />
with outputting cold water via one shower<br />
pair and warm water via the other three sho-<br />
wer pairs. Rotatingly, all shower pairs output<br />
cold water during one cycle and warm water<br />
during another cycle.<br />
2. Confirm your selection with the star key.<br />
Programming examples<br />
(individual settings)<br />
1. Desired program: "Pr2"<br />
2. Cycle switchover as follows:<br />
Elektronisches Bedienelement<br />
Electronic Operating Element<br />
Elemento di comando elettronico<br />
Programma 1:<br />
Italiano<br />
1. Sul display compare il messaggio "pc"<br />
seguito dalla percentuale del tempo (durata)<br />
della mandata di acqua fredda.<br />
2. Con il tasto "+" o "-" impostare un valore<br />
compreso tra 10% e 70%. Temendo premuto<br />
il tasto "+" o "-" viene visualizzato l'aumento<br />
o la riduzione del valore percentuale.<br />
Confermare la selezione con il tasto<br />
dell'asterisco.<br />
Le impostazioni vengono salvate nel sistema<br />
fino alla programmazione successiva!<br />
In caso di black-out le impostazioni vanno<br />
perdute!<br />
Esempio:<br />
• Selezione del programma: "Pr 1"<br />
• Durata del "ciclo ON": 5 secondi<br />
(preimpostazione 5 secondi / doccia aperta)<br />
• Mandata di acqua fredda (durata):<br />
"pc" 40%<br />
• Commutazione ciclica:<br />
Docce 1 + 2 + 3 + 4:<br />
2 secondi acqua fredda (40% del tempo<br />
totale) e 3 secondi di acqua calda (60% del<br />
tempo totale).<br />
Programma 2:<br />
1. Selezionare il programma<br />
Avvertenza:<br />
Per il programma 2 non è necessaria<br />
un'impostazione personalizzata. Il programma<br />
si avvia automaticamente con la fuoriu-<br />
scita di acqua fredda da una coppia di<br />
docce e di acqua calda dalle altre tre coppie<br />
di docce. Da tutte le coppie di ugelli fuoriesce<br />
un ciclo lungo di acqua fredda, mentre dalle<br />
altre fuoriesce acqua calda.<br />
2. Confermare la selezione con il tasto<br />
dell'asterisco.<br />
Esempi di programmazione<br />
(impostazioni personalizzate)<br />
1. Programma desiderato: "Pr2"<br />
2. Commutazione del ciclo nel modo<br />
seguente:<br />
65<br />
Deutsch<br />
English<br />
Italiano
Elektronisches Bedienelement<br />
Electronic Operating Element<br />
Elemento di comando elettronico<br />
Zyklus 1:<br />
66<br />
Deutsch<br />
Brause 1: kaltes Wasser<br />
Brause 2: warmes Wasser<br />
Brause 3: warmes Wasser<br />
Brause 4: warmes Wasser<br />
Zyklus 2:<br />
Brause 1: warmes Wasser<br />
Brause 2: kaltes Wasser<br />
Brause 3: warmes Wasser<br />
Brause 4: warmes Wasser<br />
Zyklus 3:<br />
Brause 1: warmes Wasser<br />
Brause 2: warmes Wasser<br />
Brause 3: kaltes Wasser<br />
Brause 4: warmes Wasser<br />
Zyklus 4:<br />
Brause 1: warmes Wasser<br />
Brause 2: warmes Wasser<br />
Brause 3: warmes Wasser<br />
Brause 4: kaltes Wasser<br />
Zu Programm 3:<br />
1. Auf dem Display erscheint die Meldung<br />
"ci" gefolgt von der Anzahl der Warmwas-<br />
ser-Zyklen (2 bis 9).<br />
2. Mit der Plus-Taste oder Minus-Taste einen<br />
Wert einstellen und mit der Stern-Taste bestä-<br />
tigen.<br />
Hinweis:<br />
Ein Warmwasserzyklus wird immer gefolgt<br />
von einem Kaltwasserzyklus.<br />
Die Einstellungen werden im System bis zur<br />
nächsten Programmierung abgelegt!<br />
Bei Unterbrechung der Stromversorgung wer-<br />
den die Einstellungen gelöscht!<br />
Programmierungsbeispiele<br />
(individuelle Einstellungen)<br />
1. Gewünschtes Programm: "Pr3"<br />
2. Anzahl der Zyklen mit Warmwasseraustritt<br />
3. Zyklusumschaltung wie folgt:<br />
Cycle 1:<br />
Shower 1: cold water<br />
English<br />
Shower 2: warm water<br />
Shower 3: warm water<br />
Shower 4: warm water<br />
Cycle 2:<br />
Shower 1: warm water<br />
Shower 2: cold water<br />
Shower 3: warm water<br />
Shower 4: warm water<br />
Cycle 3:<br />
Shower 1: warm water<br />
Shower 2: warm water<br />
Shower 3: cold water<br />
Shower 4: warm water<br />
Cycle 4:<br />
Shower 1: warm water<br />
Shower 2: warm water<br />
Shower 3: warm water<br />
Shower 4: cold water<br />
Ref. to program 3:<br />
1. The display shows the message "ci", fol-<br />
lowed by the number of warm water cycles<br />
(2 to 9).<br />
2. Use the plus or minus key to set a value<br />
and confirm your selection with the star key.<br />
Note:<br />
A warm water cycle is always followed by a<br />
cold water cycle.<br />
The settings are stored in the system until the<br />
next programming!<br />
If the power supply is interrupted, the settings<br />
are deleted!<br />
Programming examples<br />
(individual settings)<br />
1. Desired program: "Pr3"<br />
2. Number of cycles with warm water output<br />
3. Cycle switchover as follows:<br />
Ciclo 1:<br />
Italiano<br />
Doccia 1: acqua fredda<br />
Doccia 2: acqua calda<br />
Doccia 3: acqua calda<br />
Doccia 4: acqua calda<br />
Ciclo 2:<br />
Doccia 1: acqua calda<br />
Doccia 2: acqua fredda<br />
Doccia 3: acqua calda<br />
Doccia 4: acqua calda<br />
Ciclo 3:<br />
Doccia 1: acqua calda<br />
Doccia 2: acqua calda<br />
Doccia 3: acqua fredda<br />
Doccia 4: acqua calda<br />
Ciclo 4:<br />
Doccia 1: acqua calda<br />
Doccia 2: acqua calda<br />
Doccia 3: acqua calda<br />
Doccia 4: acqua fredda<br />
Programma 3:<br />
1. Sul display compare il messaggio "ci" seguito<br />
dal numero di cicli con acqua calda (da 2 a 9).<br />
2. Con il tasto "+" o "-" impostare un valore<br />
e confermare con il tasto dell'asterisco.<br />
Avvertenza:<br />
Un ciclo con acqua calda è sempre seguito<br />
da un ciclo con acqua fredda.<br />
Le impostazioni vengono salvate nel sistema<br />
fino alla programmazione successiva!<br />
In caso di black-out le impostazioni vanno<br />
perdute!<br />
Esempi di programmazione<br />
(impostazioni personalizzate)<br />
1. Programma desiderato: "Pr3"<br />
2. Numero di cicli con fuoriuscita di acqua<br />
calda<br />
3. Commutazione del ciclo nel modo<br />
seguente:
Zyklus 1:<br />
Deutsch<br />
Brause 1: warmes Wasser<br />
Brause 2: warmes Wasser<br />
Brause 3: warmes Wasser<br />
Brause 4: warmes Wasser<br />
Zyklus 2:<br />
Brause 1: warmes Wasser<br />
Brause 2: warmes Wasser<br />
Brause 3: warmes Wasser<br />
Brause 4: warmes Wasser<br />
Zyklus 3:<br />
Brause 1: warmes Wasser<br />
Brause 2: warmes Wasser<br />
Brause 3: warmes Wasser<br />
Brause 4: warmes Wasser<br />
Zyklus 4:<br />
Brause 1: kaltes Wasser<br />
Brause 2: kaltes Wasser<br />
Brause 3: kaltes Wasser<br />
Brause 4: kaltes Wasser<br />
Hinweis:<br />
Zusätzlich muss eine der Funktionen aktiviert<br />
werden:<br />
"Back Rain" Funktion<br />
(Ganzkörpermassage)<br />
"Rückenbrausen" Funktion<br />
(Rückenmassage)<br />
"Nackenjet" Funktion<br />
(Nacken- und Rückenmassage)<br />
3. Mit der Pfeil-Taste (links oder rechts) auf das<br />
Symbol "Schottische-Dusche" wechseln und mit<br />
"ON-/OFF"-Taste bestätigen.<br />
Nach Ablauf der Betriebszeit oder dem<br />
vorzeitigen Beenden des Betriebs ertönt ein<br />
Signalton (2 Sek.).<br />
Cycle 1:<br />
English<br />
Shower 1: warm water<br />
Shower 2: warm water<br />
Shower 3: warm water<br />
Shower 4: warm water<br />
Cycle 2:<br />
Shower 1: warm water<br />
Shower 2: warm water<br />
Shower 3: warm water<br />
Shower 4: warm water<br />
Cycle 3:<br />
Shower 1: warm water<br />
Shower 2: warm water<br />
Shower 3: warm water<br />
Shower 4: warm water<br />
Cycle 4:<br />
Shower 1: cold water<br />
Shower 2: cold water<br />
Shower 3: cold water<br />
Shower 4: cold water<br />
Note:<br />
In addition, one of the following functions<br />
must be activated:<br />
"Back rain" function<br />
(whole-body massage)<br />
"back showers" function<br />
(back massage)<br />
"Neck jet" function<br />
(neck and back massage)<br />
3. Select the "Scotch shower" symbol via the ar-<br />
row key (left or right) and confirm your selection<br />
with the "ON/OFF" key.<br />
After the operating time has expired or been<br />
prematurely terminated, a signal tone is out-<br />
put (2 sec.).<br />
Elektronisches Bedienelement<br />
Electronic Operating Element<br />
Elemento di comando elettronico<br />
Ciclo 1:<br />
Italiano<br />
Doccia 1: acqua calda<br />
Doccia 2: acqua calda<br />
Doccia 3: acqua calda<br />
Doccia 4: acqua calda<br />
Ciclo 2:<br />
Doccia 1: acqua calda<br />
Doccia 2: acqua calda<br />
Doccia 3: acqua calda<br />
Doccia 4: acqua calda<br />
Ciclo 3:<br />
Doccia 1: acqua calda<br />
Doccia 2: acqua calda<br />
Doccia 3: acqua calda<br />
Doccia 4: acqua calda<br />
Ciclo 4:<br />
Doccia 1: acqua fredda<br />
Doccia 2: acqua fredda<br />
Doccia 3: acqua fredda<br />
Doccia 4: acqua fredda<br />
Avvertenza:<br />
È necessario attivare anche una delle<br />
funzioni:<br />
Funzione "Pioggia"<br />
(massaggio integrale)<br />
Funzione "docce posteriori"<br />
(massaggio della schiena)<br />
Funzione "Getto sulla nuca"<br />
(massaggio della nuca e della schiena)<br />
3. Con i tasti a freccia (verso sinistra o verso<br />
destra) passare al simbolo "Doccia scozzese" e<br />
confermare con il tasto "ON/OFF".<br />
Al termine del tempo di funzionamento o<br />
se il funzionamento viene disattivato prima<br />
del tempo programmato viene emesso un<br />
segnale acustico (2 secondi).<br />
67<br />
Deutsch<br />
English<br />
Italiano
Elektronisches Bedienelement<br />
Electronic Operating Element<br />
Elemento di comando elettronico<br />
68<br />
Deutsch<br />
"Radio" (falls vorhanden!)<br />
(Ausgabe über Deckenlautsprecher)<br />
1. Mit der Pfeil-Taste (links oder rechts) den<br />
Cursor auf dem "Radio"-Symbol positionieren.<br />
Mit der "ON-/OFF"-Taste bestätigen.<br />
Die Funktion ist jetzt aktiv. Im Display erscheint<br />
die Meldung "On".<br />
2. Die Lautstärke (1 - 20) mit der Plus-Taste<br />
oder der Minus-Taste einstellen.<br />
Hinweis:<br />
Stern-Taste drücken. Die Frequenz und die<br />
Speicherplätze (1-8) werden angezeigt.<br />
3. Mit der Pfeil-Taste (links oder rechts) den<br />
gewünschten Speicherplatz auswählen (1-8).<br />
4. Mit der Plus-Taste oder Minus-Taste die<br />
gewünschte Radio-Frequenz auswählen. Auswahl<br />
mit der Stern-Taste bestätigen.<br />
Hinweis:<br />
7 x Speicherplätze noch frei!<br />
Weitere Belegung: gleiche Vorgehensweise!<br />
Radio-Sender (Programme) aufrufen:<br />
1. Mit der Pfeil-Taste (links oder rechts) den<br />
Cursor auf dem "Radio"-Symbol positionieren.<br />
Mit der "ON-/OFF"-Taste bestätigen.<br />
2. Stern-Taste drücken und mit der Pfeil-Taste<br />
(links oder rechts) das gewünschte Programm<br />
(Radiosender 1-8) auswählen. Mit der "ON-<br />
/OFF"-Taste bestätigen.<br />
Zum Beenden des Betriebs den Cursor mit<br />
der Pfeil-Taste auf dem "Radio"-Symbol positionieren,<br />
dann "ON-/OFF"-Taste drücken.<br />
Nach dem Beenden des Betriebs ertönt ein<br />
Signalton (2 Sek.). Im Display erscheint die<br />
Meldung "Off".<br />
English<br />
"Radio" (if available!)<br />
(output via roof loudspeaker)<br />
1. Position the cursor on the "Radio" symbol<br />
via the arrow key (left or right). Confirm your<br />
selection with the "ON/OFF" key.<br />
The function is now active. The message "On"<br />
is shown on the display.<br />
2. Set the sound volume (1 - 20) via the plus<br />
or minus key.<br />
Note:<br />
Press the star key. The frequency and the memory<br />
locations (1-8) are shown.<br />
3. Select the desired memory location (1-8)<br />
via the arrow key (left or right).<br />
4. Select the desired radio frequency via the<br />
plus or minus key. Confirm your selection with<br />
the star key.<br />
Note:<br />
7 x memory locations unassigned!<br />
Further assignment: same procedure!<br />
Calling up radio stations (programs):<br />
1. Position the cursor on the "Radio" symbol<br />
via the arrow key (left or right). Confirm your<br />
selection with the "ON/OFF" key.<br />
2. Press the star key and select the desired<br />
program (radio station 1-8) via the arrow key<br />
(left or right). Confirm your selection with the<br />
"ON/OFF" key.<br />
To stop the operation, position the cursor on<br />
the "Radio" symbol via the arrow key and<br />
press the "ON/OFF" key. After termination<br />
of the operation, a signal tone is output (2<br />
sec.). The message "Off" is shown on the<br />
display.<br />
Italiano<br />
"Radio" (se presente)<br />
(audio tramite l'altoparlante in alto)<br />
1. Con il tasto a freccia (verso sinistra o verso<br />
destra) portare il cursore sul simbolo "Radio".<br />
Confermare con il tasto "ON/OFF".<br />
Ora la funzione è attiva. Sul display compare<br />
il messaggio "On".<br />
2. Regolare il volume (1 - 20) con i tasti "+"<br />
e "-".<br />
Avvertenza:<br />
Premere il tasto asterisco. Vengono visualizzate<br />
la frequenza e le locazioni di memoria<br />
(1-8).<br />
3. Con il tasto a freccia (verso sinistra o<br />
verso destra) selezionare una locazione di<br />
memoria (1-8).<br />
4. Con il tasto "+" o "-" selezionare la<br />
frequenza radio desiderata. Confermare la<br />
selezione con il tasto asterisco.<br />
Avvertenza:<br />
7 locazioni di memoria ancora libere!<br />
Programmazione delle altre locazioni di memoria:<br />
stesso procedimento!<br />
Sintonizzazione sull'emittente radio (programma):<br />
1. Con il tasto a freccia (verso sinistra o verso<br />
destra) portare il cursore sul simbolo "Radio".<br />
Confermare con il tasto "ON/OFF".<br />
2. Premere il tasto asterisco e con i tasti a<br />
freccia (verso sinistra o verso destra) selezionare<br />
il programma desiderato (emittenti 1-8).<br />
Confermare con il tasto "ON/OFF".<br />
Per disattivare il funzionamento, con i tasti<br />
a freccia portare il cursore sul simbolo "Radio"<br />
e quindi premere il tasto "ON/OFF".<br />
Al termine del funzionamento viene emesso<br />
un segnale acustico (2 secondi). Sul display<br />
compare il messaggio "Off".
Deutsch<br />
"Chromotherapie"<br />
(Lichttherapie für das Wohlbefinden)<br />
Vorsicht!<br />
Gefahr der Augenentzündung<br />
Nicht längere Zeit in das Beleuchtungselement<br />
schauen!<br />
1. Mit der Pfeil-Taste (links oder rechts) den<br />
Cursor auf dem "Chromotherapie"-Symbol<br />
positionieren. Mit der "ON-/OFF"-Taste bestätigen.<br />
2. Die Funktion ist jetzt aktiv. Im Display<br />
erscheint die Meldung "C7" ("C7" steht für<br />
Weißlicht).<br />
Auswahl folgender Zyklen möglich:<br />
C1: Vorführ Zyklus<br />
C2: Entspannender Zyklus<br />
C3: Anregender Zyklus<br />
C4: Regenerierender Zyklus<br />
C5: Erfrischender Zyklus<br />
C6: Aufheiternder Zyklus<br />
C7: Weißlicht<br />
Mit der Plus-Taste oder Minus-Taste gewünschtes<br />
Licht auswählen.<br />
Zum Beenden der Funktion den Cursor mit<br />
der "Pfeil"-Taste auf das "Chromotherapie"-Symbol<br />
positionieren, dann "ON-<br />
/OFF"-Taste drücken.<br />
Der Vorführ-Zyklus (gedacht für Messen und<br />
Ausstellung) läuft nach dem Einschalten kontinuierlich,<br />
bis er wieder manuell ausgeschaltet<br />
wird.<br />
Die Zyklen C2 bis C6 dauern 60 Minuten,<br />
der Zyklus C7 30 Minuten. Danach schaltet<br />
das Licht automatisch aus.<br />
English<br />
"Chromo therapy"<br />
(light therapy for wellbeing)<br />
Caution!<br />
Danger of eye soreness<br />
Do not look into the illumination element for a<br />
longer period of time!<br />
1. Position the cursor on the "Chromo therapy"<br />
symbol via the arrow key (left or right).<br />
Confirm your selection with the "ON/OFF"<br />
key.<br />
2. The function is now active. The message<br />
"C7" is shown on the display ("C7" stands<br />
for white light).<br />
The following cycles can be selected:<br />
C1: Presentation cycle<br />
C2: Relaxing cycle<br />
C3: Stimulating cycle<br />
C4: Regenerating cycle<br />
C5: Refreshing cycle<br />
C6: Exhilaratory cycle<br />
C7: White light<br />
Select the desired light via the plus or minus<br />
key.<br />
To stop the function, position the cursor on<br />
the "Chromo therapy" symbol via the<br />
"Arrow" key and press the "ON/OFF" key.<br />
The presentation cycle (intended for trade<br />
fairs and exhibitions) continuously runs after<br />
switch-on until it is manually switched back<br />
off.<br />
Cycles C2 to C6 run for 60 minutes, cycle<br />
C7 runs for 30 minutes. After expiration of<br />
this time, the light automatically extinguishes.<br />
Elektronisches Bedienelement<br />
Electronic Operating Element<br />
Elemento di comando elettronico<br />
Cromoterapia<br />
Italiano<br />
(luce terapia per il benessere)<br />
Attenzione!<br />
Pericolo di infiammazione agli occhi<br />
Non guardare a lungo l'elemento di illuminazione!<br />
1. Con il tasto a freccia (verso sinistra o<br />
verso destra) portare il cursore sul simbolo<br />
"Cromoterapia". Confermare con il tasto<br />
"ON/OFF".<br />
2. Ora la funzione è attiva. Sul display compare<br />
il messaggio "C7" ("C7" indica luce<br />
bianca).<br />
È possibile selezionare i seguenti cicli:<br />
C1: Ciclo di presentazione<br />
C2: ciclo rilassante<br />
C3: ciclo eccitante<br />
C4: ciclo rigenerante<br />
C5: ciclo rinfrescante<br />
C6: ciclo rasserenante<br />
C7: luce bianca<br />
Selezionare la luce desiderata con il tasto<br />
"+" o "-".<br />
Per disattivare la funzione, con il tasto<br />
a freccia portare il cursore sul simbolo<br />
"Cromoterapia" e quindi premere il tasto<br />
"ON/OFF".<br />
In seguito alla sua attivazione, il ciclo di presentazione<br />
(previsto per fiere ed esposizioni)<br />
continua automaticamente fino alla sua disattivazione<br />
manuale.<br />
I cicli da C2 a C6 durano 60 minuti, il ciclo<br />
C7 invece 30 minuti. Al termine, la luce si<br />
spegne automaticamente.<br />
69<br />
Deutsch<br />
English<br />
Italiano
Störungen und Abhilfen<br />
Failures and Rectifications<br />
Anomalie e rimedi<br />
70<br />
Deutsch<br />
Reinigung der Hand- und Kopfbrause<br />
(Abb. A)<br />
Mit "rubit ® ", der manuellen Reinigungsfunktion,<br />
können die Strahlformer durch einfaches<br />
Rubbeln vom Kalk befreit werden.<br />
Reinigung der Handbrause (Abb. A)<br />
Mistral 3 Handbrause mit "Quiclean", der Reinigungsfunktion<br />
gegen Kalk. Beim Umstellen der<br />
Strahlarten entfernen kleine Reinigungsstifte die<br />
Kalkablagerungen.<br />
Entkalken des Dampfgenerators (Abb. B)<br />
Vorsicht!<br />
Um die Entkalkungsintervalle zu verlängern,<br />
bzw. Ihre Hausinstallation vor Schäden zu bewahren,<br />
muss ab 14° dH (~2,5 mmol/l) eine<br />
zentrale Enthärtungsanlage eingebaut werden.<br />
Wann sollte entkalkt werden:<br />
• die Dampfleistung lässt nach<br />
• das Erreichen der ausgewhälten Kabinentemperatur<br />
dauert länger wie bisher<br />
• während des Dampfbetriebs kommt heißes<br />
Wasser aus der Düse<br />
Entkalken (Abb. B):<br />
• elecktrische Energiezufuhr abschalten<br />
• Linke Seitenverkleidung demontieren<br />
• Wasserstandsensor aus dem Gehäuse des<br />
Dampfgenerators ziehen und ca. 2 l <strong>Hansgrohe</strong><br />
Schnellentkalker (Art. Nr. 90901000) einfüllen.<br />
Wasserstandsensor wieder einführen.<br />
Den Entkalker ca. 1 Stunde einwirken lassen.<br />
Bedienelement Deluxe:<br />
• Energiezufuhr anschalten, mit der „Pfeil“-<br />
Taste den Curser auf dem „Dampfbad“-<br />
Symbol positionieren und Auswahl mit der<br />
„ON/OFF“-Taste bestätigen. Nach ca. 5 sec.<br />
Dampffunktion wieder beenden. Der Dampfgenerator<br />
entleert sich. (Die Bedienung des Bedienelements<br />
kann in dieser Montageanleitung<br />
nachgelesen werden.)<br />
Vorsicht!<br />
Zum kompletten ausspühlen des Schnellentkalkers<br />
Dampfgenerator mehrmals aktivieren und<br />
entleeren.<br />
• Seitenverkleidung wieder anbringen.<br />
English<br />
Cleaning the hand and head shower<br />
(Fig. A)<br />
With the manual cleaning function "rubit ® ",<br />
jet former calcinations can be removed by<br />
simple rubbing.<br />
Cleaning the hand shower (Fig. A)<br />
Mistral 3 hand shower with "Quiclean", the<br />
cleaning function against calcinations. When<br />
the jet types are changed, small cleaning pins<br />
remove the calcinations.<br />
Decalcifying of steam generator (Fig. B)<br />
Caution!<br />
If your water has a hardness degree of 14<br />
(~2,5 mmol/l) or higher, a water softening<br />
system must be integrated in the water supply<br />
to extend the decalcifying intervals resp. to<br />
save your domestic installation!<br />
Decalcifying the steam generator:<br />
• if the steam power gets low<br />
• if it takes longer to achieve the chosen cabin<br />
temperature like until now<br />
• if hot water comes out of the steam nozzle<br />
during the operating time<br />
Decalcifying (Abb. B):<br />
• turn off the elekrical supply<br />
• disassemble the lefte side<br />
• Pull out the water level sensor from the box<br />
of steam generator, pour in <strong>Hansgrohe</strong>‘s Decalcyfiying<br />
Agent (90901000) (approx. 2 l)<br />
and wait circa 1 hour.<br />
Operating Element Deluxe:<br />
• To drain the steam generator, turn on electrical<br />
supply, position the cursor on the "Steam<br />
bath" symbol, confirm your selection with<br />
the „ON/OFF“ ke. Stop the operation after<br />
5 sec. (How to use the operating element is<br />
described in this installation instruction.)<br />
Caution!<br />
Activate the steam operating sevarals times to<br />
drain out the completely decalcyfiying agent.<br />
• Installing the side casing.<br />
Italiano<br />
Pulizia della doccia manuale e soffione<br />
(fig. A)<br />
Con "rubit ® " e la funzione di pulizia manuale,<br />
basta strofinare per eliminare il calcare dagli<br />
elementi di acciaio).<br />
Pulizia della doccia manuale (fig. A)<br />
Doccia manuale Mistral 3 con "Quiclean", la funzione<br />
di pulizia contro il calcare. Nel passaggio<br />
ad un altro tipo di getto, piccole punte di pulizia<br />
rimuovono il calcare.<br />
Togliere il calcare dal generatore di vapore<br />
(fig. B)<br />
Cautela!<br />
In caso di acqua dura (14° o più), è necessario<br />
dotarsi di un apparecchio di dolcificazione<br />
dell‘acqua, da inserire in prossimità delle condutture<br />
idrauliche, per evitare danni alle installazioni.<br />
Togliere il calcare dal generatore di vapore:<br />
• se l‘intensità del diffusore di vapore è ridotta al<br />
minimo.<br />
• se per raggiungere una determinata temperatura<br />
all‘interno della cabina si deve attendere a<br />
lungo.<br />
• se dal diffusore di vapore esce acqua calda<br />
durante la funzione del bagno di vapore.<br />
Per togliere il calcare (Abb. B):<br />
• togliere corrente elettrica all‘idrocabina.<br />
• Togliere la parete ispezionabile sinistra<br />
• Estrarre il sensore di livello dell‘acqua dalla<br />
scatola del generatore di vapore e immergerlo<br />
nel liquido anticalcare <strong>Hansgrohe</strong> (Art. Nr.<br />
90901000). Aspettare circa un‘ora.<br />
Elementi di comando Deluxe:<br />
•Per svuotare il generatore di vapore, attivare la<br />
corrente elettrica, posizionare il cursore sul simbolo<br />
„Bagno di vapore“ e confermare la selezione<br />
con il tasto „ON/OFF“. La funzione si arresta<br />
dopo 5 secondi. (Per l‘uso dei sistemi di comando<br />
consultare le istruzioni per l‘installazione).<br />
Cautela!<br />
Attivare i comandi del bagno di vapore molte<br />
volte per drenare completamente gli agenti anti<br />
calcare.<br />
• Riassemblare il pannello ispezionabile.
A<br />
90901000<br />
1 2<br />
3<br />
4<br />
B<br />
1<br />
2 3<br />
Störungen und Abhilfen<br />
Failures and Rectifications<br />
Anomalie e rimedi<br />
4<br />
71<br />
Deutsch<br />
English<br />
Italiano
Störungen und Abhilfen<br />
Failures and Rectifications<br />
Anomalie e rimedi<br />
72<br />
Deutsch<br />
Prüfung der Elektrik<br />
Sollten Störungen in der Stromversorgung auf-<br />
treten, bitte folgende Prüfabläufe durchführen:<br />
Elektriker!<br />
Arbeiten an der elektrischen Anlage dürfen<br />
nur von Fachpersonal durchgeführt werden.<br />
1. Schalter eingeschaltet (funktionstüchtig).<br />
2. Stromversorgung vorhanden. Anschluss an<br />
das Stromnetz prüfen.<br />
Gefahr!<br />
Vor dem Öffnen der Steuerung Strom abschal-<br />
ten (Dampfdusche vom Stromnetz trennen)!<br />
English<br />
Inspecting the electrics<br />
In case of any power supply failures, please<br />
carry out the following inspection procedures:<br />
Electrician!<br />
Work at the electrical system may only be<br />
carried out by expert personnel.<br />
1. Make sure the power supply is switched<br />
on (operable).<br />
2. Power supply available. Check the power<br />
supply connection.<br />
Danger!<br />
Disconnect the power supply before opening<br />
the control box (disconnect the steam shower<br />
from the power supply)!<br />
Italiano<br />
Controllo dell'impianto elettrico<br />
Se si presentano anomalie dell'alimentazione<br />
elettrica, eseguire i seguenti controlli:<br />
Elettricista!<br />
Gli interventi sull'impianto elettrico devono<br />
essere eseguiti solo da un tecnico qualificato.<br />
1. Interruttore inserito (funzionante).<br />
2. Tensione elettrica applicata. Controllare il<br />
collegamento alla rete elettrica.<br />
Pericolo!<br />
Prima di aprire la centralina staccare la ten-<br />
sione (staccare la doccia a vapore dalla rete<br />
elettrica)!
73<br />
Deutsch<br />
English<br />
Italiano
Adressen<br />
Addresses<br />
Indirizzi<br />
74<br />
<strong>Hansgrohe</strong> · Postfach 1145 · D-77761 Schiltach · Telefon +49 (0) 78 36/51-1282 · Telefax +49 (0) 7836/511440<br />
E-Mail: info@hansgrohe.com · Internet: www.hansgrohe.com<br />
03/06 Form-Nr. 9.05036.03