SE DK NO FI UK DE PL RU
SE DK NO FI UK DE PL RU
SE DK NO FI UK DE PL RU

Create successful ePaper yourself
Turn your PDF publications into a flip-book with our unique Google optimized e-Paper software.
ev_Breadmaker_IM 31/10/05 13:09 Side 34<br />
INTRODUCTION<br />
To get the best out of your new breadmaker, please read through<br />
these instructions carefully before using it for the first time. Pay<br />
particular attention to the safety measures. We also recommend<br />
that you keep the instructions for future reference, so that you can<br />
remind yourself of the functions of the breadmaker.<br />
IMPORTANT SAFETY MEASURES<br />
• The breadmaker may only be used for its original purpose.<br />
• This breadmaker is not suitable for commercial or outdoor use.<br />
• Do not use the breadmaker if the cord or plug is damaged, if it<br />
is not functioning properly, or if it has been damaged by a<br />
heavy impact or similar.<br />
• The breadmaker may only be connected to 230 V, 50 Hz.<br />
• Do not block or cover the ventilation openings on the<br />
breadmaker.<br />
• Do not switch the breadmaker on when it is empty.<br />
• The breadmaker or cord must not be submerged in water or<br />
any other liquid. Do not use the appliance if your hands are<br />
wet or damp.<br />
• The breadmaker and cord must not be exposed to strong<br />
heat, direct sunlight, humidity, sharp edges or similar.<br />
• Do not allow the cord to hang over the edge of the counter,<br />
and keep it away from hot objects and naked flames.<br />
• Only use accessories recommended by the manufacturer.<br />
• Never leave the breadmaker unattended when in use and keep<br />
an eye on children.<br />
• The baking pan, heating element and baking chamber become<br />
very hot during baking. Do not touch them before they have<br />
cooled down completely!<br />
• Remove the plug from the socket after use, when cleaning or<br />
replacing accessories or if the breadmaker does not function<br />
normally. Switch the breadmaker off using the START/STOP<br />
button before unplugging it.<br />
• Avoid pulling the cord when removing the plug from the<br />
socket. Instead, hold the plug.<br />
• Never try to repair the breadmaker yourself.<br />
• If the breadmaker, cord or plug needs to be repaired, it should<br />
be taken to an authorised service centre. If the appliance is<br />
subjected to unauthorised repairs, the guarantee will become<br />
void. Contact your retailer if the repairs fall under the terms of<br />
the guarantee.<br />
<strong>UK</strong><br />
34<br />
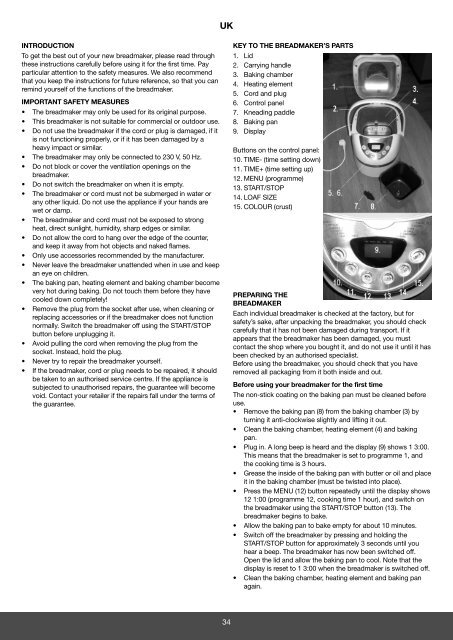
KEY TO THE BREADMAKER’S PARTS<br />
1. Lid<br />
2. Carrying handle<br />
3. Baking chamber<br />
4. Heating element<br />
5. Cord and plug<br />
6. Control panel<br />
7. Kneading paddle<br />
8. Baking pan<br />
9. Display<br />
Buttons on the control panel:<br />
10. TIME- (time setting down)<br />
11. TIME+ (time setting up)<br />
12. MENU (programme)<br />
13. START/STOP<br />
14. LOAF SIZE<br />
15. COLOUR (crust)<br />
PREPARING THE<br />
BREADMAKER<br />
Each individual breadmaker is checked at the factory, but for<br />
safety’s sake, after unpacking the breadmaker, you should check<br />
carefully that it has not been damaged during transport. If it<br />
appears that the breadmaker has been damaged, you must<br />
contact the shop where you bought it, and do not use it until it has<br />
been checked by an authorised specialist.<br />
Before using the breadmaker, you should check that you have<br />
removed all packaging from it both inside and out.<br />
Before using your breadmaker for the first time<br />
The non-stick coating on the baking pan must be cleaned before<br />
use.<br />
• Remove the baking pan (8) from the baking chamber (3) by<br />
turning it anti-clockwise slightly and lifting it out.<br />
• Clean the baking chamber, heating element (4) and baking<br />
pan.<br />
• Plug in. A long beep is heard and the display (9) shows 1 3:00.<br />
This means that the breadmaker is set to programme 1, and<br />
the cooking time is 3 hours.<br />
• Grease the inside of the baking pan with butter or oil and place<br />
it in the baking chamber (must be twisted into place).<br />
• Press the MENU (12) button repeatedly until the display shows<br />
12 1:00 (programme 12, cooking time 1 hour), and switch on<br />
the breadmaker using the START/STOP button (13). The<br />
breadmaker begins to bake.<br />
• Allow the baking pan to bake empty for about 10 minutes.<br />
• Switch off the breadmaker by pressing and holding the<br />
START/STOP button for approximately 3 seconds until you<br />
hear a beep. The breadmaker has now been switched off.<br />
Open the lid and allow the baking pan to cool. Note that the<br />
display is reset to 1 3:00 when the breadmaker is switched off.<br />
• Clean the baking chamber, heating element and baking pan<br />
again.