WellChrom Filter-Photometer K-2001 Filterphotometer K-2001 ...
WellChrom Filter-Photometer K-2001 Filterphotometer K-2001 ...
WellChrom Filter-Photometer K-2001 Filterphotometer K-2001 ...

Erfolgreiche ePaper selbst erstellen
Machen Sie aus Ihren PDF Publikationen ein blätterbares Flipbook mit unserer einzigartigen Google optimierten e-Paper Software.
Simple Maintenance 23<br />
7. Put the lid back on from the top of the instrument and fasten the<br />
screws of the cover.<br />
8. Check the intensity values in the INT-menu.<br />
SOP 6<br />
Cleaning the flow cell<br />
Noisy baselines and low sensitivities may be due to a dirty flow cell.<br />
This may also be indicated by a low value for sig in the signal menu<br />
when flushing the cell with pure solvent. In most cases it is sufficient to<br />
purge the flow cell according to the following SOP.<br />
Purging the Flow Cell<br />
1. Purge the flow cell using one of following solvents: sodium<br />
dodecyle sulfate (SDS), 1m HCl, 1m NaOH, ethanol, or acetone.<br />
2. Run the solvent through the flow cell using a syringe and leave for<br />
approximately 5 minutes..<br />
3. Rinse extensively with water and the blow dry using a gentle<br />
stream of pure nitrogen.<br />
Never dry with compressed air from a „house“ line as this will<br />
contain microdroplets of oil that will coat the cell.<br />
When the optics module is not in use, disconnect the flow cell and clean<br />
out traces of salt and protein with a syringe filled with distilled water.<br />
Before storing the flow cell inject a dilute solution (10-25%) of ethanol or<br />
i-propanol to prevent microbial growth.<br />
In case the flow cell purging do not provide sufficient success, all flow<br />
cells can easily be disassembled for cleaning the lenses.<br />
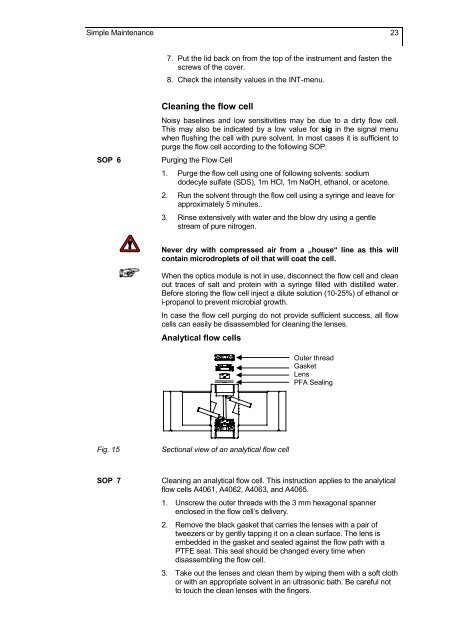
Analytical flow cells<br />
Outer thread<br />
Gasket<br />
Lens<br />
PFA Sealing<br />
Fig. 15<br />
Sectional view of an analytical flow cell<br />
SOP 7<br />
Cleaning an analytical flow cell. This instruction applies to the analytical<br />
flow cells A4061, A4062, A4063, and A4065.<br />
1. Unscrew the outer threads with the 3 mm hexagonal spanner<br />
enclosed in the flow cell’s delivery.<br />
2. Remove the black gasket that carries the lenses with a pair of<br />
tweezers or by gently tapping it on a clean surface. The lens is<br />
embedded in the gasket and sealed against the flow path with a<br />
PTFE seal. This seal should be changed every time when<br />
disassembling the flow cell.<br />
3. Take out the lenses and clean them by wiping them with a soft cloth<br />
or with an appropriate solvent in an ultrasonic bath. Be careful not<br />
to touch the clean lenses with the fingers.