Sie wollen auch ein ePaper? Erhöhen Sie die Reichweite Ihrer Titel.
YUMPU macht aus Druck-PDFs automatisch weboptimierte ePaper, die Google liebt.
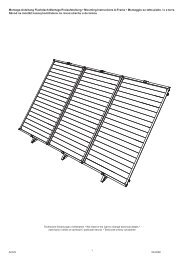
Indach-Montage • In Roof Flash<strong>in</strong>g • <strong>Montaggio</strong> <strong>in</strong> <strong>tetto</strong>DGBIHINWEIS:Um das E<strong>in</strong>dr<strong>in</strong>gen von Feuchtigkeit zu vermeiden, empfehlen wir den E<strong>in</strong>bau e<strong>in</strong>er Unterspannbahn(z.B. Dachpappe) im Bereich der Montage bis runter zur Dachkante wo sie ggf. austreten kann.Wir empfehlen weiterh<strong>in</strong> die Bleischürze (falls vorhanden) ca. alle 20 cm mit Pu-Schaum an den Ziegeln zu fixieren.Dies verh<strong>in</strong>dert, dass W<strong>in</strong>d unter die Bleischürze kommt und diese evtl. hochhebt.Maximale Anzahl der Kollektoren <strong>in</strong> e<strong>in</strong>er Reihe: 8Beim E<strong>in</strong>bau e<strong>in</strong>es Dehnungssatzes vergrössert sich das seitliche Maß um 100 mm!Beim E<strong>in</strong>satzt des Sets "unter 27°" verlängert sich das Höhenmaß um 250 mm.Attention!To prevent moisture penetrat<strong>in</strong>g <strong>in</strong> the roof <strong>in</strong>sulation we recommend to stretcha water proof foil underneath the area where the collectors will be placed down to where it can flow out of the roofarea. We also recomend to use Polyurithan foam every 20 cm to stick the bottom lead flash<strong>in</strong>g to the tiles. Thisprevents strong w<strong>in</strong>d lift<strong>in</strong>g up the lead flasch<strong>in</strong>g.The dimensions <strong>in</strong> length us<strong>in</strong>g an expansion set will be an additional 100mm.The dimensions <strong>in</strong> height will extend to an aditional 250 mm when a set "under 27°" is used.Avviso:per non avere dei problemi con l´umiditá consigliamo di mettere sotto un cartone catramato.FESK4A0066 03.2009
Indach-Montage • In Roof Flash<strong>in</strong>g • <strong>Montaggio</strong> <strong>in</strong> <strong>tetto</strong>123A0066 703.2009
Indach-Montage • In Roof Flash<strong>in</strong>g • <strong>Montaggio</strong> <strong>in</strong> <strong>tetto</strong>DPos Bezeichnung Grundbausatz Erweiterungssatz E<strong>in</strong>zelsatz1 Haltew<strong>in</strong>kel 4 2 32 untere Querhölzer 1125 mm 2 - -3/4/5/6 untere Abdeckbleche 3 1 27 untere Dichtstreifen 20 x 20) [m] 2,5 1,25 1,58 Schneelaststützen 6 2 49 Keilhölzer 1125 mm 2 - -10 Kollektor-Dichtstreifen 11 x 3 [m] 8,2 4,1 4,111 mittlere Abdeckbleche 1 1 -12/13 seitliche Abdeckbleche 2 - 214 oberes Dichtungsband 20 x20 [m] 2,5 1,25 -15 W<strong>in</strong>dsicherungsbleche 2 1 116/17/18/19 obere Abdeckbleche 3 1 220 Blechhafter 15 2 1521 Kehldichtstreifen 60 x 30 [m] 3,5 1,5 222 Spengler-Schrauben (4,5x60) 8 2 723 Spax-Schrauben (4x30) 40 28 3524 Spax-Schrauben (5x110) 6 3 425 untere Querhölzer 1040 mm - 1 -26 Holzwürfel mit Bohrung 31x31x17 3 1 227 untere Querhölzer 1210 mm - - 128 Keilhölzer 1210 mm - - 129 Keilhölzer 1000 mm - 1 -GBPos Item Install Kit Extension Kit S<strong>in</strong>gle Kit1 Angle bracket 4 2 32 lower wooden slat 1120 mm 2 - -3/4/5/6 lower flash<strong>in</strong>gs 3 1 27 lower seal strip 20 x 20 [m] 2,5 1,25 1,58 high load support brackets 6 2 49 wood wedge1125 mm 2 - -10 side seal strip 11 x 3 [m] 8,2 4,1 4,111 center flash<strong>in</strong>g 1 1 -12/13 side flash<strong>in</strong>g 2 - 214 upper seal strip 20x20 [m] 2,5 1,25 -15 w<strong>in</strong>d protection rail 2 1 116/17/18/19 top flash<strong>in</strong>gs 3 1 220 nail straps 15 2 1521 triangular seal [m] 3,5 1,5 222 sealed screws (4,5x35) 8 2 723 wood screws (4x30) 40 28 3524 wood screws (5x110) 6 3 425 lower wooden slat 1040 mm - 1 -26 wood block with hole 31x31x17 3 1 227 lower wooden slat 1210 mm - - 128 wood wedge 1210 mm - - 129 wood wedge 1000 mm - 1 -8A0066 03.2009
Indach-Montage • In Roof Flash<strong>in</strong>g • <strong>Montaggio</strong> <strong>in</strong> <strong>tetto</strong>IPos <strong>in</strong>dicazione Kit di base Kit di ampliamento Kit a pezzo1 squadretta di sostegno 4 2 22 traversa <strong>in</strong>feriore 2 1 13/4/5/6 lamiera di copertura <strong>in</strong>feriore 3 1 27 nastro di tenuta 3 1 18 sostegno contro neve 6 2 49 cuneo di legno 2 1 110 nastro di tenuta per pannello 5 2 211 lamiera di copertura centrale 1 1 -12/13 lamiera di copertura laterale 2 - 214 nastro di tenuta 8,2 1 115 lamiera protezione antivento 2 1 116/17/18/19 lamiera di copertura superiore 3 1 220 premilamiera 12 2 1021 striscia di tenuta a scanalatura 3,5 1 122 viti di carpenteria 4,5x35 6 2 223 viti per legno 4x30 40 12 3524 viti per legno 5x110 6 2 225 viti di carpenteria 4x80 3 1 326 cubo di legno con foratura 2 1 2F9A0066 03.2009
Indach-Montage • In Roof Flash<strong>in</strong>g • <strong>Montaggio</strong> <strong>in</strong> <strong>tetto</strong>2122231615 23249 (28)12292010810881122222622872623231232 (27)7323254Achtung! Die E<strong>in</strong>deckung für Schieferdächer hat diese Bleischütze nicht!Attension! The flash<strong>in</strong>g for slate roofs do not have this lead sheet.10A0066 03.2009
Indach-Montage • In Roof Flash<strong>in</strong>g • <strong>Montaggio</strong> <strong>in</strong> <strong>tetto</strong>2023172115 2323182415 231924229141081381122810268207232262222523611A0066 03.2009
Indach-Montage • In Roof Flash<strong>in</strong>g • <strong>Montaggio</strong> <strong>in</strong> <strong>tetto</strong>1DGBIDachfläche ausdecken.2er Indach: m<strong>in</strong>d. 260 x 260 cm+ 104 cm für jeden weiteren Kollektor <strong>in</strong> der selben Reihe.Achtung! Bei Verwendung e<strong>in</strong>es Erweiterungs-Sätzen (+1 Kollektor <strong>in</strong> e<strong>in</strong>er Reihe) s<strong>in</strong>d diese gemäß den beschriebenenArbeitsschritten h<strong>in</strong>zuzufügen.Untere Hilfslattung anbr<strong>in</strong>genUntere Hilfslattung (bauseits zu stellen!) zwischen ausgedeckter Dachfläche wie gezeigt ausrichten und mit bauseitsgestellten Schrauben (4,5 x 80) am Sparren verschraubenRemove tiles:2 panel flash<strong>in</strong>g set = 260 x 260cm104cm for every further panel <strong>in</strong> the same row and 220cm for every further row.Attention! If an extension set is used, place this between the <strong>in</strong>stall set.Attach the lower support battenScrew the lower support batten to the rafter along where the collectors are go<strong>in</strong>gTo be placed. Use screws (4.5x80).Note: These battens and screws are not <strong>in</strong>cluded.Scoprire il <strong>tetto</strong>.Per 2 pannelli 260x260 cm m<strong>in</strong>.+ 104 cm per ogni altro pannelloAttenzione: facendo uso del kit di ampliamento(+1 pannello <strong>in</strong> una fila), questo è daaggiungere seguendo le istruzioni prescritte.Montare i listelli <strong>in</strong>feriore ausiliariAll<strong>in</strong>eare il listello <strong>in</strong>feriore tra la parte del<strong>tetto</strong> scoperto come <strong>in</strong>dicato e avvitarla condelle viti per legno 4,5x80 (a cura dell´utente)12A0066 03.2009
Indach-Montage • In Roof Flash<strong>in</strong>g • <strong>Montaggio</strong> <strong>in</strong> <strong>tetto</strong>AA = 8,5 - 12 cm[A] bei Schiefer möglichst kle<strong>in</strong>er Abstand[A] with slates use smallest possible distanceA0066 1303.2009
Indach-Montage • In Roof Flash<strong>in</strong>g • <strong>Montaggio</strong> <strong>in</strong> <strong>tetto</strong>2DUntere Halte-W<strong>in</strong>kel (1) anbr<strong>in</strong>genUntere Halte-W<strong>in</strong>kel (1) <strong>in</strong> gleichen Abständen aufteilen und mit je 4 Spax-Schrauben 4 x 30 (23) an der Hilfslattungwie gezeigt verschrauben. Bei mehr als 2 Kollektoren ersten und letzen W<strong>in</strong>kel montieren, Schnur spannen und restlicheW<strong>in</strong>kel nach der Schnur montieren.Untere Querhölzer (2/25/27) anbr<strong>in</strong>genUnteres Querholz (2) mit angefaster Kante nach Oben e<strong>in</strong>legen, ausmitteln und mit 4 Spax-Schrauben 4 x 30 (23)an den Halte-W<strong>in</strong>keln (1) befestigen.GBMount Angle Brackets (1):Mount angle brackets (1) <strong>in</strong> equal distance with each 4 screws 4x30 (23) to the support batten.With more than 2 collectors, mount first and last angle bracket. Now use a str<strong>in</strong>g to level the res brackets by stretch<strong>in</strong>git from Now place the lower wooden slat (2/25/27) with the cut edge show<strong>in</strong>g upward and screw to anglebrackets with each 4 screws 4x30 (23) <strong>in</strong> each bracket.IMontare le squadrette(1) <strong>in</strong>ferioriSuddividere le squadrette(1) <strong>in</strong> distanze uguali e fissarli con 4 vite per legno 4x30(23) sul listello ausiliario come <strong>in</strong>dicato.Nelcaso di montaggio di piú di 2 pannelli , montare la prima e l´ultima squadretta , tirare una cordaa tensione e fissare lungo la corda le rimanenti squadrette.Montare la traversa <strong>in</strong>feriore(2)Appoggiare la traversa <strong>in</strong>feriore (2) con la parte smussata sul lato superiore, centrarla e fissarla tramite 4 viti perlegno 4x30 (23) alle squadrette14A0066 03.2009
Indach-Montage • In Roof Flash<strong>in</strong>g • <strong>Montaggio</strong> <strong>in</strong> <strong>tetto</strong>BB = 0,5 cm2/25/2712/25/2723231A0066 1503.2009
Indach-Montage • In Roof Flash<strong>in</strong>g • <strong>Montaggio</strong> <strong>in</strong> <strong>tetto</strong>3DUntere Abdeckbleche (3/4/5/6) anbr<strong>in</strong>genVon l<strong>in</strong>ks aus beg<strong>in</strong>nend unteres Eck-Abdeckblech (3) am Querholz (2/27) anlegen und mit e<strong>in</strong>er Spax-Schraube4 x 30 (23) verschrauben.Weitere Abdeckbleche (4/5/6) anbrigenVon l<strong>in</strong>ks nach rechts Bleche <strong>in</strong>e<strong>in</strong>ander schieben und jeweils an den Stössen mit e<strong>in</strong>er SpaxSchraube 4 x 30 (23)an den Querhölzern (2/25/27) verschrauben.Anschliessend untere Dichtstreifen (7) über die gesamte Länge aufkleben.GBMount<strong>in</strong>g lower flash<strong>in</strong>g (3/4/5/6):Start<strong>in</strong>g from left side, screw lower left flash<strong>in</strong>g (3) at left end to lower slat (2/27) with screws 4x30 (23).Cont<strong>in</strong>u<strong>in</strong>g from left to right, push flash<strong>in</strong>g together and <strong>in</strong>sert screw (23) to lower wooden slat (2/25/27)where they overlap and on right end.When f<strong>in</strong>ished stick seal strip (7) across the total lengthI<strong>Montaggio</strong> della lamiera di copertura <strong>in</strong>feriore (3/4/5/6)Appoggiare la lamiera di copertura (3) alla traversa <strong>in</strong>iziando da s<strong>in</strong>istra e fissarla con una vite per legno 4x30 (23)<strong>Montaggio</strong> delle lamiere di copertura <strong>in</strong>feriore (4/5/6)Inserire le lamiere (4/5/6) l´una nell´altra da destra a s<strong>in</strong>istra e fissarle ai giunti con una vite 4x30 (23) alla traversa(2)Incollare il nastro di tenuta <strong>in</strong>feriore Incollare il nastro di tenuta <strong>in</strong>feriore (7) sulle lamiere di copertura sututta la lunghezza.16A0066 03.2009
Indach-Montage • In Roof Flash<strong>in</strong>g • <strong>Montaggio</strong> <strong>in</strong> <strong>tetto</strong>423534576A0066 1703.2009
Indach-Montage • In Roof Flash<strong>in</strong>g • <strong>Montaggio</strong> <strong>in</strong> <strong>tetto</strong>4DObere Hilfslattung anbr<strong>in</strong>genObere Hilfslattung muss so angebracht werden, dass der Abstand zwischen unterem Querholz und Ende des oberenKeilholz 1950 mm beträgt und das Keilholz (9) auf m<strong>in</strong>d. 2 Dachlatten aufliegt.GBMount upper support batten:The upper support batten (not <strong>in</strong> set <strong>in</strong>cl.) has to be mounted so that the distance between the lower woodenslat and the top angled timber wedge is 1950 mm. The top angled timber wedge must sit on at least two battens.Mount a second support batten if necessary.I<strong>Montaggio</strong> della traversa superioreLa traversa superiore deve essere montata <strong>in</strong> modo tale, che tra la traversa <strong>in</strong>feriore (2) e quella superiore (9) ci siauna distanza di 1950 mm. Si deve tener cura, che la traversa superiore sia appoggiata almeno su due listelli.18A0066 03.2009
Indach-Montage • In Roof Flash<strong>in</strong>g • <strong>Montaggio</strong> <strong>in</strong> <strong>tetto</strong>9195 cm1950 mmm<strong>in</strong>d. 2m<strong>in</strong>imum 219A0066 03.2009
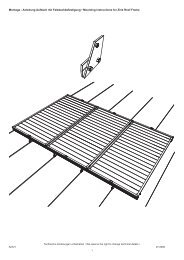
Indach-Montage • In Roof Flash<strong>in</strong>g • <strong>Montaggio</strong> <strong>in</strong> <strong>tetto</strong>5DKollektoren e<strong>in</strong>legen und ausrichtenAbstand A = 10 cm.Schneelaststützen (8) zwischen die Kollektoren e<strong>in</strong>stellen!ggf. Diagonalmass prüfen.Es ist sicherzustellen das der Zwischenabstand der Kollektoren 38mm beträgt.GBPlace and align the collektors:Distance A = 10cmPlace 2 high load support brackets (8) under each collector side.Make cross measurements. A = BEnsure a gap of 38mm is ma<strong>in</strong>ta<strong>in</strong>ed between the panels.IAppoggiare e all<strong>in</strong>eare i pannelliAppoggiare e all<strong>in</strong>eare i pannelliDistanza laterale = 10 cm. Eventualmente verificare la quota diagonale.Centrare i sostegni contro neve (8) <strong>in</strong> mezzo dei pannelli.20A0066 03.2009
Indach-Montage • In Roof Flash<strong>in</strong>g • <strong>Montaggio</strong> <strong>in</strong> <strong>tetto</strong>8AA0066 2103.2009
Indach-Montage • In Roof Flash<strong>in</strong>g • <strong>Montaggio</strong> <strong>in</strong> <strong>tetto</strong>6DKeilhölzer (9) montierenKeilhölzer (9/28/29) unter die Kollektoren schieben, ausrichten und mit Spax-Schrauben 5 x 110 (24) je 2 mal mitden Dachlatten verschrauben. Kollektorverb<strong>in</strong>dungen wie <strong>in</strong> Kollektor-Montageanleitungen beschrieben herstellen.Anlage abdrücken. Um e<strong>in</strong> Hochheben der Bleischürze durch starke W<strong>in</strong>dstöße zu vermeiden kann diese mit PU-Kleber oder PU-Schaum ca. alle 200mm an die Ziegel geklebt werden.GBMount<strong>in</strong>g top angled timber wedge:Place top timber wedge (9/28/29) under each collector, align them and screw on each with 2 screws 5 x 110 (24).Connect collector connections as shown <strong>in</strong> the collector <strong>in</strong>stallationManual. Pressure test the system before you proceed to fit the rema<strong>in</strong><strong>in</strong>g flash<strong>in</strong>gs.To prevent strong w<strong>in</strong>d from blow up the lead sheet you can stick it to the tiles us<strong>in</strong>g polyurithan glue or foam every200mm.I<strong>Montaggio</strong> dei cuneiInserire i cunei di legno (9) sotto i pannelli, all<strong>in</strong>earli e fissarli con delle viti per legno (5x110) (24) con i listellidell´<strong>in</strong>telaiatura del <strong>tetto</strong>. Collegare la tubazione secondo le istruzioni di montaggio del pannello.Eseguire la prova di tenuta.22A0066 03.2009
Indach-Montage • In Roof Flash<strong>in</strong>g • <strong>Montaggio</strong> <strong>in</strong> <strong>tetto</strong>249/28/29A0066 2303.2009
Indach-Montage • In Roof Flash<strong>in</strong>g • <strong>Montaggio</strong> <strong>in</strong> <strong>tetto</strong>7DKollektor-Dichtstreifen (10) aufklebenKollektor-Dichtstreifen (10) auf die Kollektoren aufkleben.Abstand zur Glasscheibe ca. 10 mmGBStick side seal strip to collector:Stick side seal strip to the collector sides as shown.You should herby keep 10mm distance to the glas.IIncollare il nastro di tenutaIIncollare il nastro di tenuta (10) sui pannelli.Distanza dal vetro ca. 1 cm.24A0066 03.2009
Indach-Montage • In Roof Flash<strong>in</strong>g • <strong>Montaggio</strong> <strong>in</strong> <strong>tetto</strong>1010 mmA0066 2503.2009
Indach-Montage • In Roof Flash<strong>in</strong>g • <strong>Montaggio</strong> <strong>in</strong> <strong>tetto</strong>8DMittlere Abdeckbleche (11) anbr<strong>in</strong>gen.Mittleres Abdeckblech (11) an der Kollektorkante anlegen und mit leichtem Druck e<strong>in</strong>rasten.Am unteren Ende zwischen den Kollektoren muss das Holzstück (26) e<strong>in</strong>gelegt werden, das den Zwischenabstandvorgibt. Der Zwischenabstand der Kollektoren muss gleichmäßig nach oben verlaufen.Unten mit Spenglerschraube (22) fixieren. Abdeckbleche dabei NICHT VERFORMEN!GBMount center flash<strong>in</strong>gs:Place center flash<strong>in</strong>g (11) on the lower collector edge and snap <strong>in</strong> start<strong>in</strong>g from the bottom to top.Attention! The wooded block (26) must be placed on the bottom between the collectors.These blocks give the distance of the gap. The gap between the panels must be paralell from bottom to top.Fix flash<strong>in</strong>g with sealed screw (22) on the bottom hole of the center flash<strong>in</strong>g.Be careful! Do not bend the flash<strong>in</strong>g!ILamiera di copertura centraleAppoggiare le lamiere di copertura centrale(11) e con una leggera pressione <strong>in</strong>castrare.Alla f<strong>in</strong>e sotto dei pannelli mettere il cubo di legno con foratura (26). Fissare la lamiera con una vite dicarpentiera (25).Non deformare la lamiera.26A0066 03.2009
Indach-Montage • In Roof Flash<strong>in</strong>g • <strong>Montaggio</strong> <strong>in</strong> <strong>tetto</strong>11221126A0066 2703.2009
Indach-Montage • In Roof Flash<strong>in</strong>g • <strong>Montaggio</strong> <strong>in</strong> <strong>tetto</strong>9DSeitliche Abdeckbleche (12/13) anbr<strong>in</strong>gen.Seitliche Abdeckbleche (12/13) von Aussen überdie Kollektorkante schieben.Mit Spenglerschrauben (22) wie gezeigt je 2 mal fixieren.Abdeckbleche dabei NICHT VERFORMEN!GBMount side flash<strong>in</strong>gs (12/13):Push the side flash<strong>in</strong>g (12/13) from the side over the collector edge.Use seal<strong>in</strong>g screws (22) to fix the flash<strong>in</strong>gs as shown.Be careful! Do not bend the flash<strong>in</strong>gs.ILamiera di copertura lateraleSp<strong>in</strong>gere con una leggera pressione sopra il bordo del pannello. Fissare con delle viti di carpentiera (22/25), come<strong>in</strong>dicato. Non deformare la lamiera.28A0066 03.2009
Indach-Montage • In Roof Flash<strong>in</strong>g • <strong>Montaggio</strong> <strong>in</strong> <strong>tetto</strong>12 131213222213A0066 2903.2009
Indach-Montage • In Roof Flash<strong>in</strong>g • <strong>Montaggio</strong> <strong>in</strong> <strong>tetto</strong>10Doberes Dichtungsband (14) aufklebenOberes Dichtungsband (14) über die gesamt Länge aufkleben.GBPlace top seal strip (14)Stick top seal strip (14) across the total lengthIIncollare il nastro di tenuta superiore (14)IIncollare il nastro di tenuta superiore (14) su tutta la lunghezza.30A0066 03.2009
Indach-Montage • In Roof Flash<strong>in</strong>g • <strong>Montaggio</strong> <strong>in</strong> <strong>tetto</strong>14A0066 3103.2009
Indach-Montage • In Roof Flash<strong>in</strong>g • <strong>Montaggio</strong> <strong>in</strong> <strong>tetto</strong>11DW<strong>in</strong>dsicherungsbleche (15) oben anbr<strong>in</strong>gen.Obere W<strong>in</strong>dsicherungsbleche (15) auflegen und mit Spaxschrauben 4 x 30 (23) je 4 mal verschrauben.Darauf achten, dass der Knick über der Kante des Keilholzes (9) liegt.GBW<strong>in</strong>d protection rail (15):Place w<strong>in</strong>d protection rail (15) and fix with wood screws 4x30 (23) each 4 times.Note that the buckle must be placed direct over the edge of the wooden wedge (9).IFissare le protezioni antivento (15)Appoggiare protezione antivento (15) e fissarle con le viti per legno 4x30 (23). Attenzione, la piega deve esseresopra il bordo del cuneo (9).32A0066 03.2009
Indach-Montage • In Roof Flash<strong>in</strong>g • <strong>Montaggio</strong> <strong>in</strong> <strong>tetto</strong>12DObere Abdeckbleche (16/17/18/19) anbr<strong>in</strong>gen.Von L<strong>in</strong>ks beg<strong>in</strong>nend oberes Eckabdeckblech (16) unter das W<strong>in</strong>dsicherungsblech (15) schieben und jeweils amStoß mit Spax-Schraube 5 x 30 (23) fixieren. An den Seiten mit Spenglerschrauben (22) fixieren.Weitere Abdeckbleche (17/18/19) entsprechend montieren.GBTop flash<strong>in</strong>g (16/17/18/19):Start<strong>in</strong>g from the left side. Push top corner flash<strong>in</strong>g (16) under the w<strong>in</strong>d protection rail (15).Fix with wood screw 5x30 (23) on the right jo<strong>in</strong>t and with seal<strong>in</strong>g screw (22) on the left side as shown.Cont<strong>in</strong>ue with parts (17/18/19).IMontare le lamiere di copertura superiore (16/17/18/19)Iniziando da s<strong>in</strong>istra, montare la lamiera di copertura dall´angolo s<strong>in</strong>istro superiore (16) e agganciare dal sotto laprotezione antivento(15).Fissare ogni copertura con una vite di legno 5x30 (23), come <strong>in</strong>dicato.Ai lati fissare con delle viti di carpentiera (22).34A0066 03.2009
Indach-Montage • In Roof Flash<strong>in</strong>g • <strong>Montaggio</strong> <strong>in</strong> <strong>tetto</strong>16172323182222A0066 3503.2009
Indach-Montage • In Roof Flash<strong>in</strong>g • <strong>Montaggio</strong> <strong>in</strong> <strong>tetto</strong>13DGBIBlechhafter (20) anbr<strong>in</strong>genObere (16/17/18/19) je 2 mal und seitliche Abdeckbleche (12/13) je 4 mal wie gezeigt mit Blechhafter (20) fixieren.Kehldichtstreifen (21) anbr<strong>in</strong>gen.Kehldichtstreifen (21) über die gesamte Länge aufkleben. Dabei ist zu beachten, dass der Streifen nach dem E<strong>in</strong>deckenca. 5 cm unterhalb der Ziegelunterkante verläuft.H<strong>in</strong>weis: Der Dichtstreifen muss an beiden Seiten m<strong>in</strong>d. 10 cm an den seitlichen Abdeckblechen (16/19) aufgeklebtwerden.Nail Straps (20):Fix top flash<strong>in</strong>gs (16/17/18/19) with 2 and side flash<strong>in</strong>g (12/13) with 4 nail strips (20) each.Stick wedge formed seal (21)Stick wedge formed seal (21) across the total length. It must be placed so that after replac<strong>in</strong>gThe tiles that it will be approx. 5cm under the bottom tile edge.Note! Seal (21) must be placed at least 10cm down the side flash<strong>in</strong>gs (16/19)Fissare le lamiere superiori e lateraliFissare le lamiere superiori (16/17/18/19)cadauna con 2 premilamiera (20)e i laterali (12/13) cadauna con 4 premilamiera (20).Incollare la stricia di tenuta a scanalaturaIncollare la striscia di tenuta (21) su tutta la lunghezza. Si deve prestare attenzione, che dopo la copertura con lategola, la striscia si trovi almeno 5cm sotto la tegola. Avviso: La striscia di tenuta deve essere <strong>in</strong>collata <strong>in</strong> modotale, che lateralmente scorri almeno 10 cm sulle lamiere laterali.36A0066 03.2009
Indach-Montage • In Roof Flash<strong>in</strong>g • <strong>Montaggio</strong> <strong>in</strong> <strong>tetto</strong>21m<strong>in</strong>. 10 cm20A0066 3703.2009
Indach-Montage • In Roof Flash<strong>in</strong>g • <strong>Montaggio</strong> <strong>in</strong> <strong>tetto</strong>14DDach e<strong>in</strong>deckenZiegel ggf. nachbearbeiten.Achtung! M<strong>in</strong>dest Ziegelüberdeckung siehe BildWenn möglich sollte bis 10 mm (max. Position) zur Seitenkannte e<strong>in</strong>gedeckt werdenGBPlace tiles:If necessary, cut tiles to make them fit. Attention! M<strong>in</strong>. tile cover see picture.Cover the flash<strong>in</strong>g with tiles (slates) up to the edge (max. position) if possible.IIncollare la stricia di tenuta a scanalaturaIncollare la striscia di tenuta (21) su tutta la lunghezza. Si deve prestare attenzione, che dopo la copertura con lategola, la striscia si trovi almeno 5cm sotto la tegola.Avviso: La striscia di tenuta deve essere <strong>in</strong>collata <strong>in</strong> modo tale , che lateralmente scorri almeno 10 cm sulle lamierelaterali.38A0066 03.2009
Indach-Montage • In Roof Flash<strong>in</strong>g • <strong>Montaggio</strong> <strong>in</strong> <strong>tetto</strong>max. m<strong>in</strong>.A0066 3903.2009
Indach-Montage • In Roof Flash<strong>in</strong>g • <strong>Montaggio</strong> <strong>in</strong> <strong>tetto</strong>Technische Änderungen vorbehalten • We reserve the right to change technical details •riserviamo il diritto di cambiare i particolari tecnici.40A0066 03.2009