Montage - Anleitung Aufdach mit Falzdachbefestigung ⢠Mounting ...
Montage - Anleitung Aufdach mit Falzdachbefestigung ⢠Mounting ...
Montage - Anleitung Aufdach mit Falzdachbefestigung ⢠Mounting ...

Create successful ePaper yourself
Turn your PDF publications into a flip-book with our unique Google optimized e-Paper software.
<strong>Montage</strong> - <strong>Anleitung</strong> <strong>Aufdach</strong> <strong>mit</strong> <strong>Falzdachbefestigung</strong> • <strong>Mounting</strong> instructions for Zink Roof Frame<br />
Technische Änderungen vorbehalten • We reserve the right to change technical details •<br />
A0721 07.2009<br />
1
<strong>Montage</strong> - <strong>Anleitung</strong> <strong>Aufdach</strong> <strong>mit</strong> <strong>Falzdachbefestigung</strong> • <strong>Mounting</strong> instructions for Zink Roof Frame<br />
D<br />
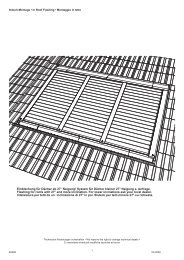
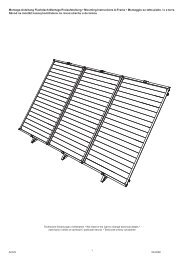
Mögliche Kollektorfelder für vertikal zu montierende Kollektoren<br />
Hinweis: Beachten Sie die geltenden Vorschriften und Normen bei der <strong>Montage</strong>!<br />
Recycling - Nach Ende der Lebensdauer können die Kollektoren dem Hersteller zurückgegeben werden.<br />
Die Werkstoffe werden dann dem umweltverträglichsten Recycling-Verfahren zugeführt.<br />
Bei Verwendung eines Kompensatorensets verlängen sich die Maße um 100mm!<br />
GB<br />
Dimensions for vertical panel array.<br />
Health +Safety regulations must be observes when assembling.<br />
Recycling: The panels are 100o[o recyclable and be recycled at the end of their lifespan.<br />
If compensators are used in the installation these will increase the dimentions by 100mm for each set of<br />
compensator used.<br />
I<br />
Possibili campi di pannelli.<br />
In oltre valgono le norme generali di montaggio e sicurezza applicabile al montaggio degli impianti, nonché le<br />
norme antinfortunistiche e di sicurezza locali.<br />
F<br />
Bien prendre en considération les notices d’installations et de sécurité lors de la pose.<br />
Lors de la dépose, merci de prendre contact avec le fabricant ou un distributeur qui recyclera l’ensemble des<br />
matériaux.<br />
E<br />
SK<br />
Možnosti usporiadania kolektorových polí- vertikálne kolektory.<br />
Pri prácach na strechách budov je nutné dodržiavať platné bezpečnostné predpisy pre prácu vo výškach! Recyklácia<br />
– po skončení životnosti sa môžu kolektory vrátiť výrobcovi. Materiály budú recyklované spôsobom šetrným k<br />
životnému prostrediu.<br />
Pri použití kompenzačného súboru zväčší sa dľžka kolektorového poľa o 100 mm!<br />
A0721 07.2009<br />
2
<strong>Montage</strong> - <strong>Anleitung</strong> <strong>Aufdach</strong> <strong>mit</strong> <strong>Falzdachbefestigung</strong> • <strong>Mounting</strong> instructions for Zink Roof Frame<br />
Maße in mm!<br />
Mesurements in mm!<br />
Miery v mm!<br />
8320<br />
9360<br />
A0721 07.2009<br />
3<br />
10400
<strong>Montage</strong> - <strong>Anleitung</strong> <strong>Aufdach</strong> <strong>mit</strong> <strong>Falzdachbefestigung</strong> • <strong>Mounting</strong> instructions for Zink Roof Frame<br />
D<br />
Mögliche Kollektorfelder für Querkollektoren.<br />
Bei Verwendung eines Kompensatorensets verlängen sich die Maße um 100m!<br />
GB<br />
Dimensions for horizontal panels arrays.<br />
Up to 5 panels can be connected in a row, without the need for compensateors, form 6 panels to a maximum<br />
of 8 panels a set of compensators will be required.<br />
The mesurments will extend 100 mm when a compensator set is used!<br />
I<br />
Possibili campi di pannelli.<br />
F<br />
E<br />
SK<br />
Možnosti usporiadania kolektorových polí- horizontálne kolektory.<br />
A0721 07.2009<br />
4
<strong>Montage</strong> - <strong>Anleitung</strong> <strong>Aufdach</strong> <strong>mit</strong> <strong>Falzdachbefestigung</strong> • <strong>Mounting</strong> instructions for Zink Roof Frame<br />
2040<br />
Maße in mm!<br />
Mesurements in mm!<br />
Miery v mm!<br />
4080<br />
6120<br />
8160<br />
10200<br />
A0721 07.2009<br />
5
<strong>Montage</strong> - <strong>Anleitung</strong> <strong>Aufdach</strong> <strong>mit</strong> <strong>Falzdachbefestigung</strong> • <strong>Mounting</strong> instructions for Zink Roof Frame<br />
D<br />
Hinweis zum Befördern der Kollektoren auf das Dach<br />
Kein Seil o.ä. um die Kollektoranschlüsse legen, da diese ansonsten verbogen werden könnten und die Anschlüsse<br />
undicht werden! Verwenden Sie Spanngurte zum Beförden auf das Dach!<br />
[1] Seil [2] Textilspanngurt [3] Schaumgummi o.ä. unterlegen, da<strong>mit</strong> der Verschluss das Glas nicht beschädigt<br />
GB<br />
Information on how to transport the collector to the roof:<br />
Never tighten a rope or lift the panel from the collector connection, this can cause damaged and could result in<br />
leaks. Use either lifting strops as shown in the picture, or tie a loop in the rope and place this around the perimeter<br />
of the panel between the panel connections and the frame of the glass.<br />
[1] Rope [2] Lifting Stops [3] Protection psd for glass (Foam, cardboard, or simular)<br />
I<br />
Avviso per il trasporto dei pannelli sul tetto.<br />
Attenzione, a non avvolgere la corda o oggetti simili attorno gli attacchi dei pannelli, perchè questi potrebbero causare<br />
dei problemi nella tenuta dei raccordi. Si prega di utilizzare delle cinghie tessili, per trasportare i pannelli sul<br />
tetto.<br />
[1] corda [2] cinghie [3] Per evitare danni al vetro, ponete della gomma o simile sotto le fibbie<br />
F<br />
E<br />
SK<br />
Upozornenie k preprave kolektorov na strechu: v žiadnom prípade neomotávať lano okolo vývodov, pretože tieto sa<br />
môžu ohnúť a spoje budú netesné. Na prepravu kolektorov na strechu používajte upínacie popruhy. [1] - lano [2] -<br />
textilný upínací popruh [3] - podložiť penovú gumu, aby uzáver nepoškodil sklo!<br />
A0721 07.2009<br />
6
<strong>Montage</strong> - <strong>Anleitung</strong> <strong>Aufdach</strong> <strong>mit</strong> <strong>Falzdachbefestigung</strong> • <strong>Mounting</strong> instructions for Zink Roof Frame<br />
1<br />
2<br />
3<br />
7<br />
07.2009
<strong>Montage</strong> - <strong>Anleitung</strong> <strong>Aufdach</strong> <strong>mit</strong> <strong>Falzdachbefestigung</strong> • <strong>Mounting</strong> instructions for Zink Roof Frame<br />
D<br />
Teileliste<br />
Pos Bezeichnung 2 Kollektoren 1 Kollektor Verbindungssatz 1 Querkollektor<br />
1 Falzdachklammer 6 2 4<br />
2 L-Profil 2 1 2<br />
3 Z-Profil lang 2 - 2<br />
4 Z-Profil kurz - 2<br />
5 Verbindungsprofil - - 2<br />
6 Windsicherung 4 2 4<br />
7 Sechskantschrauben M 6 x 16 12 7 13<br />
8 Unterlegscheibe groß 6,4 8 5 9<br />
9 Verlängerungsstütze 2 1 2<br />
GB<br />
Parts<br />
Pos Name 2 panels 1 panel Connection Set 1 horizontal panel<br />
1 Zink roof clamp 6 2 4<br />
2 L-rail 2 1 2<br />
3 Z-rail long 2 - 2<br />
4 Z-rail short - 2<br />
5 Frame connector - - 2<br />
6 Wind clamp 4 2 4<br />
7 Screw M6 x 16 12 7 13<br />
8 Washer big 6,4 8 5 9<br />
9 Extension rail 2 1 2<br />
A0721 07.2009<br />
8
<strong>Montage</strong> - <strong>Anleitung</strong> <strong>Aufdach</strong> <strong>mit</strong> <strong>Falzdachbefestigung</strong> • <strong>Mounting</strong> instructions for Zink Roof Frame<br />
A0721 07.2009<br />
9
<strong>Montage</strong> - <strong>Anleitung</strong> <strong>Aufdach</strong> <strong>mit</strong> <strong>Falzdachbefestigung</strong> • <strong>Mounting</strong> instructions for Zink Roof Frame<br />
7<br />
8<br />
3<br />
2<br />
2<br />
1<br />
6<br />
7<br />
5<br />
7<br />
A0721 07.2009<br />
10
<strong>Montage</strong> - <strong>Anleitung</strong> <strong>Aufdach</strong> <strong>mit</strong> <strong>Falzdachbefestigung</strong> • <strong>Mounting</strong> instructions for Zink Roof Frame<br />
3<br />
4<br />
2<br />
1<br />
2<br />
4<br />
A0721 07.2009<br />
11
<strong>Montage</strong> - <strong>Anleitung</strong> <strong>Aufdach</strong> <strong>mit</strong> <strong>Falzdachbefestigung</strong> • <strong>Mounting</strong> instructions for Zink Roof Frame<br />
D<br />
1 Querkollektor<br />
GB<br />
One horizontal panel<br />
I<br />
F<br />
E<br />
SK<br />
Jeden horizontálny kolektor.<br />
A0721 07.2009<br />
12
<strong>Montage</strong> - <strong>Anleitung</strong> <strong>Aufdach</strong> <strong>mit</strong> <strong>Falzdachbefestigung</strong> • <strong>Mounting</strong> instructions for Zink Roof Frame<br />
7<br />
8<br />
2<br />
3<br />
3<br />
2<br />
6<br />
7<br />
A0721 07.2009<br />
13
<strong>Montage</strong> - <strong>Anleitung</strong> <strong>Aufdach</strong> <strong>mit</strong> <strong>Falzdachbefestigung</strong> • <strong>Mounting</strong> instructions for Zink Roof Frame<br />
1<br />
D<br />
GB<br />
Geeignete Stelle zur <strong>Montage</strong> suchen.<br />
Es muss sichergestellt werden dass die Dachkonstruktion (Falze) die möglich entstehenden<br />
Windkräfte aufnehmen können.<br />
Je nach Anzahl der zu montierenden Kollektoren ergibt sich Maß X aus der Länge des Kollektorfeldes und den zur<br />
Verfügung stehenden Falzdachhaken. Teilen Sie diese nach Möglichkeit in gleiche Abstände auf.<br />
Es kann sein das für eine sicher montage zusätzlich ein Dreieck S7030 und ein Satz Falzklammern<br />
S3333 notwendig sind<br />
Find suitable place to mount panels. Ensure that the roof construction<br />
(upstanding seam) can withstand possible wind power.<br />
Divide measurement X according to the numbers of panels and clamps equally.<br />
I<br />
F<br />
E<br />
SK<br />
A0721 07.2009<br />
14
<strong>Montage</strong> - <strong>Anleitung</strong> <strong>Aufdach</strong> <strong>mit</strong> <strong>Falzdachbefestigung</strong> • <strong>Mounting</strong> instructions for Zink Roof Frame<br />
X X<br />
1460 - 1740 mm<br />
X<br />
15<br />
07.2009
<strong>Montage</strong> - <strong>Anleitung</strong> <strong>Aufdach</strong> <strong>mit</strong> <strong>Falzdachbefestigung</strong> • <strong>Mounting</strong> instructions for Zink Roof Frame<br />
2<br />
D<br />
Untere Falzdachklemmen <strong>mit</strong> Hilfe einer Schnur ausrichten und <strong>mit</strong> dem Stehfalz des Daches verscrhauben.<br />
GB<br />
Mount the lower clamps to the upstanding seam using a string to align them.<br />
I<br />
F<br />
E<br />
SK<br />
A0721 07.2009<br />
16
<strong>Montage</strong> - <strong>Anleitung</strong> <strong>Aufdach</strong> <strong>mit</strong> <strong>Falzdachbefestigung</strong> • <strong>Mounting</strong> instructions for Zink Roof Frame<br />
17<br />
07.2009
<strong>Montage</strong> - <strong>Anleitung</strong> <strong>Aufdach</strong> <strong>mit</strong> <strong>Falzdachbefestigung</strong> • <strong>Mounting</strong> instructions for Zink Roof Frame<br />
3<br />
D<br />
L-Profile unten <strong>mit</strong> den Falzdachklemmen verschrauben. Dadurch ergibt sich automatisch der richtige Abstand für<br />
die oberen Falzdachklemmen.<br />
GB<br />
Mount the L-rail to the lower clamps. Now you automatically will have the distance for the top clamps.<br />
I<br />
F<br />
E<br />
SK<br />
A0721 07.2009<br />
18
<strong>Montage</strong> - <strong>Anleitung</strong> <strong>Aufdach</strong> <strong>mit</strong> <strong>Falzdachbefestigung</strong> • <strong>Mounting</strong> instructions for Zink Roof Frame<br />
2<br />
7<br />
1<br />
19<br />
07.2009
<strong>Montage</strong> - <strong>Anleitung</strong> <strong>Aufdach</strong> <strong>mit</strong> <strong>Falzdachbefestigung</strong> • <strong>Mounting</strong> instructions for Zink Roof Frame<br />
4<br />
D<br />
Obere Falzdachklemmen <strong>mit</strong> den L-Profilen verschrauben und anschließend am Stehfalz des Blechdaches befestigen<br />
GB<br />
Mount the top clamps to the L-rail and then to the upstanding seam.<br />
I<br />
F<br />
E<br />
SK<br />
A0721 07.2009<br />
20
<strong>Montage</strong> - <strong>Anleitung</strong> <strong>Aufdach</strong> <strong>mit</strong> <strong>Falzdachbefestigung</strong> • <strong>Mounting</strong> instructions for Zink Roof Frame<br />
2<br />
7<br />
1<br />
A0721 07.2009<br />
21
<strong>Montage</strong> - <strong>Anleitung</strong> <strong>Aufdach</strong> <strong>mit</strong> <strong>Falzdachbefestigung</strong> • <strong>Mounting</strong> instructions for Zink Roof Frame<br />
5<br />
D<br />
Z-Profile <strong>mit</strong> Schrauben M6 <strong>mit</strong> den L-Profilen je zweimal oben und unten verschrauben.<br />
Maximaler Überstand der Z-Profile über den Dachhaken 500 mm!<br />
Erweiterungssatz: Verbindungsprofil <strong>mit</strong> Z-Profil verschrauben.<br />
Diagonalmaß prüfen! A=B<br />
GB<br />
Screw the Z-Rails to the L-rails using the M6 bolts supplied, the Z-Rail must not exceedbe 500 mm past the outer<br />
clamp fixings (see picture)<br />
If necessary use the extension kit.<br />
Cross measure Z-rail to align. A=B<br />
I<br />
Assemblare le guide a „Z“ con i supporti a „L“ con le viti M6. Sia due volte sopra e due volte sotto.<br />
Massima sporgenza alle estre<strong>mit</strong>à: 500mm<br />
Nel caso di necessità, montare il kit di allungamento ausiliario.<br />
F<br />
Le profil Z doit être monter sur le profil L à l’aide du kit de vis M6<br />
La distance maximum entre un crochet et l’extré<strong>mit</strong>é du profil Z ne doit pas excéder 500 mm. Si nécessaire, Utiliser<br />
un kit d’extension<br />
E<br />
Atornillar el perfil Z usando el Kit M6. Utilizar 2 tornillos en la parte superior y 2 tornillos en la parte inferior.<br />
En caso de ser necesario utilizar el Kit de unión entre estructuras.<br />
SK<br />
Na L-profily priskrutkovať Z-profily súborom skrutiek M6 po dvakrát hore a dole. Maximálny presah Z-profilu 500<br />
mm! SPÁJACÍ SÚBOR: Spojovací profil upevniť na Z-profily pribalenými skrutkami.<br />
Vyrovnať Z-profily do priamky pomocou nastaviteľných uholníkov na antikorových hákoch.<br />
Premerať uhlopriečky! A = B<br />
A0721 07.2009<br />
22
<strong>Montage</strong> - <strong>Anleitung</strong> <strong>Aufdach</strong> <strong>mit</strong> <strong>Falzdachbefestigung</strong> • <strong>Mounting</strong> instructions for Zink Roof Frame<br />
7<br />
8<br />
7<br />
8<br />
max. 500 mm<br />
3<br />
4<br />
A<br />
3<br />
B<br />
4<br />
3<br />
4<br />
5<br />
7<br />
A0721 07.2009<br />
23
<strong>Montage</strong> - <strong>Anleitung</strong> <strong>Aufdach</strong> <strong>mit</strong> <strong>Falzdachbefestigung</strong> • <strong>Mounting</strong> instructions for Zink Roof Frame<br />
6<br />
D<br />
Kollektoren einlegen und ausrichten. Bei größeren Kollektorfeldern von der Mitte aus beginnen. Dichtungen aus Erweiterungsbausatz<br />
für Kollektorverbindung nicht vergessen! Windsicherungen anbringen. Pro Kollektor 2 Stück.<br />
Kollektorverbindungen herstellen.<br />
ACHTUNG! Bei Querkollektoren 4 Windsicherungen pro Kollektor anbringen!<br />
GB<br />
Place the panels in onto the frame, with systems more than two panels mount the panels starting in the<br />
middle, do not forget to insert the o-rings supplied with the extension kit, for panel connections,<br />
connect the panels and mount the wind clamps.<br />
Attention! 4 Windclamps must be used on horizontal panel<br />
I<br />
Appoggiare e allineare i pannelli. In presenza di grossi campi di collettori, si deve iniziare dal centro. Fare<br />
attenzione a non dimenticare il montaggio delle guarnizioni di collegamento dei pannelli, che si trovano<br />
nel kit di montaggio ausiliario.<br />
F<br />
E<br />
Placer les panneaux en position corrects. Dans le cas ou le système est de plus de deux panneaux, commencer<br />
par le milieu.<br />
Ne pas oublier de monter les anneaux en VITON inclus dans le kit de connexion.<br />
Monter les crochets de maintien et connecter les panneaux.<br />
Colocar el colector sobre el perfil y desplazarlo hasta su posición definitiva. En baterías de varios<br />
colectores, comenzar por la zona central.<br />
No olvidar poner las juntas de Vitón en cada uno de los racores de unión.<br />
Colocar las piezas de sujeción del panel a la estructura y conectar los colectores entre sí.<br />
SK<br />
Kolektory položiť a vyrovnať. Pri väčších kolektorových poliach začať od stredu. Nezabudnúť na tesniace krúžky z<br />
rozširovacieho montážneho súboru! Namontovať veterné poistky, 2 kusy na kolektor.<br />
Spojiť vývody kolektorov.<br />
UPOZORNENIE: Na horizontálny kolektor namontovať 4 veterné poistky.<br />
A0721 07.2009<br />
24
<strong>Montage</strong> - <strong>Anleitung</strong> <strong>Aufdach</strong> <strong>mit</strong> <strong>Falzdachbefestigung</strong> • <strong>Mounting</strong> instructions for Zink Roof Frame<br />
6<br />
7<br />
6<br />
7<br />
A0721 07.2009<br />
25
<strong>Montage</strong> - <strong>Anleitung</strong> <strong>Aufdach</strong> <strong>mit</strong> <strong>Falzdachbefestigung</strong> • <strong>Mounting</strong> instructions for Zink Roof Frame<br />
7<br />
D<br />
Option: Aufständerung<br />
ACHTUNG! Bei Querkollektoren 2 Verlängerungsstützen pro Kollektor anbringen!<br />
Verschrauben Sie die Verlängerungsstützen unten <strong>mit</strong> den Falzdachklemmen und oben <strong>mit</strong> den Längsträgern.<br />
Normal-Kollektor: 500 mm = +15° Neigung; 750 mm = +21° Neigung; 1000 mm = +27° Neigung<br />
Horizontal-Kollektor: 500 mm = +25°Neigung; 750 mm = +35° Neigung;<br />
GB<br />
Option extension rail<br />
Attention! 2 extension rails must be used on horizontal panel!<br />
Normal-panel: 500 mm = pitch +15° angle; 750 mm = pitch +21° angle; 1000 mm = pitch +27° angle<br />
Horizontal-panel: 500 mm = pitch +25° angle; 750 mm = pitch +35° angle;<br />
7.1 Top: Mount the extention rails (500mm, 750mm, 1000mm) to the UPPER combiscrew.<br />
7.2 Mount the adjustable brackets to the lower hook.Screw the L-Rail to it using the M6 screws.<br />
Top: Mount the extention rails (500mm, 750mm, 1000mm) to the top L-Rail using the M6 bolt supplied.<br />
Bottom: Mount the other end of the extension rail to the zink clamp using the M6 bolt supplied.<br />
I<br />
OPTIONAL: MONTAGGIO INCLINATO<br />
Avvitare i supporti di prolunga assieme con i ganci per tetto e i supporti a “L”. 500mm ca. 15° d'inclinazione, 750<br />
mm ca. 21° d'inclinazione, 100 mm ca. 27° d'inclinazione<br />
F<br />
E<br />
SK<br />
A0721 07.2009<br />
26
<strong>Montage</strong> - <strong>Anleitung</strong> <strong>Aufdach</strong> <strong>mit</strong> <strong>Falzdachbefestigung</strong> • <strong>Mounting</strong> instructions for Zink Roof Frame<br />
2<br />
7<br />
7<br />
12<br />
12<br />
A0721 07.2009<br />
27
<strong>Montage</strong> - <strong>Anleitung</strong> <strong>Aufdach</strong> <strong>mit</strong> <strong>Falzdachbefestigung</strong> • <strong>Mounting</strong> instructions for Zink Roof Frame<br />
Technische Änderungen vorbehalten • We reserve the right to change technical details •<br />
A0721 07.2009<br />
28