Montaggio tetto piatto
Montaggio tetto piatto
Montaggio tetto piatto
- No tags were found...

You also want an ePaper? Increase the reach of your titles
YUMPU automatically turns print PDFs into web optimized ePapers that Google loves.
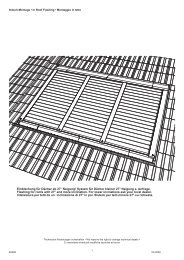
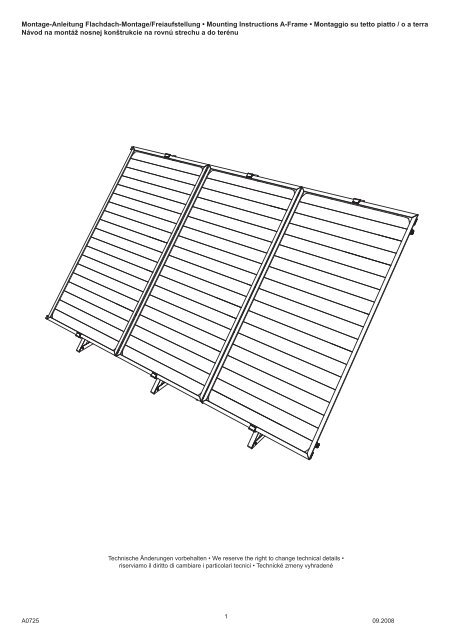
Montage-Anleitung Flachdach-Montage/Freiaufstellung • Mounting Instructions A-Frame • <strong>Montaggio</strong> su <strong>tetto</strong> <strong>piatto</strong> / o a terraNávod na montáž nosnej konštrukcie na rovnú strechu a do terénuDMögliche Kollektorfelder für Querkollektoren.Es können bis zu 10 Stück hintereinander geschaltet werden.Ab 5 Kollektoren ist ein Kompensatoren-Set zu verwenden!Bei Verwendung eines Kompensatorensets verlängen sich die Maße um 100m!GBPossible collector fields for horizontal panels.Up to 10 panels can be connected to a battery. A compansator set has to be installed by more than 5 panels!The mesurments will extend 100 mm when a compensator set is used!IPossibili campi di pannelli.FESKMožnosti usporiadania kolektorových polí- horizontálne kolektory.4A0725 09.2008
Montage-Anleitung Flachdach-Montage/Freiaufstellung • Mounting Instructions A-Frame • <strong>Montaggio</strong> su <strong>tetto</strong> <strong>piatto</strong> / o a terraNávod na montáž nosnej konštrukcie na rovnú strechu a do terénuDTeilelistePos Bezeichnung 2 Kollektoren 1 Kollektor Verbindungssatz 1 Querkollektor1 Winkelprofil A 2 1 22 Winkelprofil B 2 1 23 Winkelprofil C 2 1 24 Z-Profil lang 2 25 Z-Profil kurz 16 Verbindungsprofil 27 Winkelprofil D 1 18 Windsicherung 4 2 4 49 Sechskantschraube M6 x 16 19 10 1910 Unterlegscheibe 6,4 9 5 911 Unterlegscheibe 8,4 2 212 Sechskantschraube M8 x 20 213 Mutter M8 2GBPartsPos Name 2 panels 1 panel Frame connector 1 horz. panel1 Rail A 2 1 22 Rail B 2 1 23 Rail C 2 1 24 Z-rail long 2 25 Z-rail short 16 Frameconnector 27 Rail D 1 18 Wind clamp 4 2 4 49 Screw M6 x 16 19 10 1910 Washer 8,4 9 5 911 Washer 6,4 2 212 Screw M8 x 20 213 Nut M8 2I2 panelli 1 panello 1 pan. horizontal1 Profilo A 2 1 22 Profilo B 2 1 23 Profilo C 2 1 24 Profilo a “Z” 2 25 Profilo a “Z” 16 Kit staffe per raggruppamento 27 Profilo D 1 18 Protezione vento 4 2 4 49 Vite M6 x 16 19 10 1910 Rondelle 8,4 9 5 911 Rondelle 6,4 2 212 Vite M8 x 2013 Dado M88A0725 09.2008
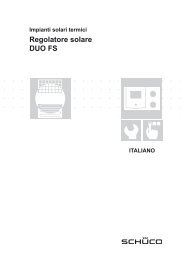
Montage-Anleitung Flachdach-Montage/Freiaufstellung • Mounting Instructions A-Frame • <strong>Montaggio</strong> su <strong>tetto</strong> <strong>piatto</strong> / o a terraNávod na montáž nosnej konštrukcie na rovnú strechu a do terénu65121545 mm3945°1545 mm511A0725 09.2008
Montage-Anleitung Flachdach-Montage/Freiaufstellung • Mounting Instructions A-Frame • <strong>Montaggio</strong> su <strong>tetto</strong> <strong>piatto</strong> / o a terraNávod na montáž nosnej konštrukcie na rovnú strechu a do terénuD1 QuerkollektorGBOne horizontal panelIFESKJeden horizontálny kolektor.12A0725 09.2008
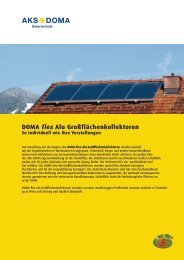
Montage-Anleitung Flachdach-Montage/Freiaufstellung • Mounting Instructions A-Frame • <strong>Montaggio</strong> su <strong>tetto</strong> <strong>piatto</strong> / o a terraNávod na montáž nosnej konštrukcie na rovnú strechu a do terénuDWenn das Kollektorfeld nicht mit der Dach-Unterkonstruktion statisch verschraubt werden soll, muss, um eine Stabilitätgegen auftretende Windkräfte zu gewährleisten, der Kollektorrahmen mit einem Gewicht von 330kg pro Kollektorbeschwert werden, bei Querkollektoren 220 kg pro Kollektor. Hierzu kann einI) Trapezblech, beschwert mit Kieselsteinen, auf dem man den Kollektorrahmen verschraubt wirdII) Betonsockel, auf denen das Grundgerüst verschraubt wirdverwendet werden.GBTo protect the panels from getting affected by strong winds they have to be screwed the tightly Roof structure. Isthis not possible, each panel must be attached to a minimum weight of 220 kg/panel. This can be done in two ways:I) Screw the A-frame to an aluminium trapeze plate and cover it with gravel.II) Use concrete blocks as a foundation and screw the A-frame to it.INell´ ipotesi non ci sia la possibilitá di avvitare il telaio sul <strong>tetto</strong>, prendete una lamiera a trapezio e riempite tutta conghiaia o un zoccolo in cemento dal peso di 330 kg / pannello che tenga la forza del vento.FESKUPOZORNENIE K MONTÁŽI : Ak sa kolektorové pole nedá upevnit priamo na spodnú strešnú konštrukciu,musí sa, pre zabezpecenie stability voci tlaku vetra, nosná konštrukcia zatazit hmotnostou 330 kg na kolektor.Na toto sa može použit:I. trapézový plech, zatažený štrkovými kamenmi, na ktorý sa nosná konštrukcia priskrutkujeII. betónový podstavec, na ktorý sa nosná konštrukcia priskrutkuje14A0725 09.2008
Montage-Anleitung Flachdach-Montage/Freiaufstellung • Mounting Instructions A-Frame • <strong>Montaggio</strong> su <strong>tetto</strong> <strong>piatto</strong> / o a terraNávod na montáž nosnej konštrukcie na rovnú strechu a do terénuI)II)15A0725 09.2008
Montage-Anleitung Flachdach-Montage/Freiaufstellung • Mounting Instructions A-Frame • <strong>Montaggio</strong> su <strong>tetto</strong> <strong>piatto</strong> / o a terraNávod na montáž nosnej konštrukcie na rovnú strechu a do terénuDBefestigung auf Dächern mit StehfalzStellen Sie sicher, dass die Blechfalze den Anforderungen genügen.I) Befestigung mit Falzdachklammer-Set “Winkel” I) oder “Trapez” II)Verschrauben Sie die Klammern mit den Winkelprofilen und befestigen Sie diese an den Blechdachfalzen.Löcher sind bauseits zu bohren.GBZink roofUsing the zinc roof clamps, “angled or shark tail”, mount the clamp to the rail (3). The holes must be drilled with a6.5mm drill bit. Connect the clamps now to the standing seam.I<strong>Montaggio</strong> con Kit staffe ad angolo per tetti di lamieraAvvitare le staffe come dimostrato con i profili a L e fissare alla lamiera di piegatura.FESKUpevnenie na plechovú strechu:I) príchytka na plechovú strechu - uholníkII) príchytka na plechovú strechu - vzpera- priskrutkovat príchytky na podlahový nosník a pevne spojit so stojacou drážkou16A0725 09.2008
Montage-Anleitung Flachdach-Montage/Freiaufstellung • Mounting Instructions A-Frame • <strong>Montaggio</strong> su <strong>tetto</strong> <strong>piatto</strong> / o a terraNávod na montáž nosnej konštrukcie na rovnú strechu a do terénuI)II)17A0725 09.2008
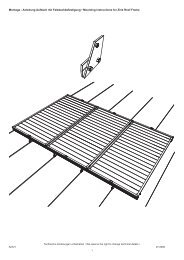
Montage-Anleitung Flachdach-Montage/Freiaufstellung • Mounting Instructions A-Frame • <strong>Montaggio</strong> su <strong>tetto</strong> <strong>piatto</strong> / o a terraNávod na montáž nosnej konštrukcie na rovnú strechu a do terénu1DStänderung montieren.Je ein Winkelprofil lang, ein Winkelprofil kurz hinten und ein Winkelprofil kurz unten mit Sechskantschraube M6 miteinander verschrauben. Im unteren Winkelprofil sind Bohrungen für die Bodenbefestigung vorhanden. Für 2 Kollektorenbenötigen Sie zwei Ständerungen. Für jeden weiteren Kollektor eine Ständerung.GBScrew the rails 1, 2 and 3 together using 6mm screws (9).The bottom rail hasholes for ground or roof fixing. The holes for wall fixing have to be drilled on sight.IMontare il profilo a cavalletto / cavallett.1 profilo a L lungo 2186mm, 1 profilo a L corto dietro 1545 mm , 1 profilo a L corto sotto 1545 mm. In quello sottosono i fori per avvitare a terra. Per due pannelli servono due cavaletti per ogni pannello in piú serve un cavaletto.FESKZmontovat trojuholník.Zoskrutkovat pomocou skrutiek M6x16 pozdlžnik, stojku a podlahový nosník dohromady. V podlahovom nosníkusú pripravené otvory na upevnenie ku strešnej konštrukcii. Pod každý kolektor je potrebný jeden trojuholník18A0725 09.2008
Montage-Anleitung Flachdach-Montage/Freiaufstellung • Mounting Instructions A-Frame • <strong>Montaggio</strong> su <strong>tetto</strong> <strong>piatto</strong> / o a terraNávod na montáž nosnej konštrukcie na rovnú strechu a do terénu129123293913A0725 1909.2008
Montage-Anleitung Flachdach-Montage/Freiaufstellung • Mounting Instructions A-Frame • <strong>Montaggio</strong> su <strong>tetto</strong> <strong>piatto</strong> / o a terraNávod na montáž nosnej konštrukcie na rovnú strechu a do terénu2DGBStänderung mit der Dachkonstruktion verschrauben.Beachten Sie hierzu unsere Hinweise auf Seite 12 und 14!Z-Profile befestigen. Maximaler Überstand der Z-Profile über die Ständerung: 500 mm!Darauf achten, daß die Dreiecke im Lot sind (Wasserwaage).Das Z-Profil muss Spannungsfrei montiert werden.Diagonalmaß prüfen! (A=B)Erweiterungssatz: Verbindungssatz mit den Z-Profilen verschrauben.Mounting the frame to the roof structure.Follow steps on page 14, 15 and ? Mount the Z-profile. The distance between the last triangle and theend of the Z-rail must not be more than 500mm. Pay attention that the triangles are aligned to each other.Use a string to check this. The Z-Rails must be mounted without any tension. Check cross measurements! (A=B)Mount the frame connectors.IMontare i profili a “Z”.Sporgenza max. 500 mm da sinistra come destra. ( vedi pagina 12, 14)Prendere le misure a livello, controllare la misura diagonale ( A=B)FESKZmontované trojuholníky zoskrutkovať so spodnou strešnou konštrukciou.Dodržiavať pritom montážner pokyny zo strany 12 a 14 !Z-profily upevniť, pritom dbať, aby trojuholníky boli v kolmici (vodováha). Maximálny presah Z-profilu 500 mm!Premerať uhlopriečky ! A- BSPAJACI SUBOR: Spojovací profil upevniť na Z-profily pribalenými skrutkami.20A0725 09.2008
Montage-Anleitung Flachdach-Montage/Freiaufstellung • Mounting Instructions A-Frame • <strong>Montaggio</strong> su <strong>tetto</strong> <strong>piatto</strong> / o a terraNávod na montáž nosnej konštrukcie na rovnú strechu a do terénu910max 500 mm54A4B91059621A0725 09.2008
Montage-Anleitung Flachdach-Montage/Freiaufstellung • Mounting Instructions A-Frame • <strong>Montaggio</strong> su <strong>tetto</strong> <strong>piatto</strong> / o a terraNávod na montáž nosnej konštrukcie na rovnú strechu a do terénu3DQuerstrebe wie gezeigt montieren.Dazu an geeigneter Stelle Löcher mit ∅ 8,5mm bohren und Querstrebe mit Gestell verschrauben.GBCross RailDrill holes 8.5mm on the appropriate place of the back rails. Use the cross rail (D) as a template.Attach cross rail (D), using screws (12), washers (10) and nuts (13), to the back rail of the frame.IMontare il profilo traverso come dimostrato.Forrate i fori con una punta di un ø di 8,5 mm.FESKVzperu montovať podľa zobrazenia.V spodnej časti stojky na príslušnom mieste vyvrtať otvor ∅ 8,5 mm a vzperu upevniť na stojkách.22A0725 09.2008
Montage-Anleitung Flachdach-Montage/Freiaufstellung • Mounting Instructions A-Frame • <strong>Montaggio</strong> su <strong>tetto</strong> <strong>piatto</strong> / o a terraNávod na montáž nosnej konštrukcie na rovnú strechu a do terénu131012 71210137A0725 2309.2008
Montage-Anleitung Flachdach-Montage/Freiaufstellung • Mounting Instructions A-Frame • <strong>Montaggio</strong> su <strong>tetto</strong> <strong>piatto</strong> / o a terraNávod na montáž nosnej konštrukcie na rovnú strechu a do terénu4DIn der Mitte beginnend den ersten Kollektor einlegen.Windsicherungen oben und unten anbringen.ACHTUNG! Bei Querkollektoren 4 Windsicherungen pro Kollektor anbringen!GBMont the panels starting with in the middle. Mount the wind hook (8) using screw (9) to the top andbottom of the panel. Attention! 4 wind hooks have to be mounted on each horizontal panel.IIniziare con il primo pannello in mezzo.Mettere la protezione contro vento, sopra e sotto.FESKMontáž začať prvým kolektorom od stredu.Namontovať veterné poistky hore a dole.24A0725 09.2008
Montage-Anleitung Flachdach-Montage/Freiaufstellung • Mounting Instructions A-Frame • <strong>Montaggio</strong> su <strong>tetto</strong> <strong>piatto</strong> / o a terraNávod na montáž nosnej konštrukcie na rovnú strechu a do terénu898925A0725 09.2008
Montage-Anleitung Flachdach-Montage/Freiaufstellung • Mounting Instructions A-Frame • <strong>Montaggio</strong> su <strong>tetto</strong> <strong>piatto</strong> / o a terraNávod na montáž nosnej konštrukcie na rovnú strechu a do terénu5DWeitere Kollektoren einlegen und ausrichten.Dichtungen aus Erweiterungsbausatz für Kollektorverbindung nicht vergessen! Windsicherungen anbringen. ProKollektor 2 Stück. Kollektorverbindungen herstellen.ACHTUNG! Bei Querkollektoren 4 Windsicherungen pro Kollektor anbringen!GBProceed on with the next panel.Place the seal from the extension kit in the panel connections before you place the panel.Make panel connections.IMettere il prossimo pannello,non dimenticare le guarnizioni OR ad ogni pannello.FESKDalšie kolektory položiť a vyrovnať.Nezabudnúť na tesniace krúžky z rozširovacieho montážneho súboru !Namontovať veterné poistky, 2 kusy na kolektor.Spojiť vývody kolektorov.26A0725 09.2008
Montage-Anleitung Flachdach-Montage/Freiaufstellung • Mounting Instructions A-Frame • <strong>Montaggio</strong> su <strong>tetto</strong> <strong>piatto</strong> / o a terraNávod na montáž nosnej konštrukcie na rovnú strechu a do terénu89A0725 2709.2008
Montage-Anleitung Flachdach-Montage/Freiaufstellung • Mounting Instructions A-Frame • <strong>Montaggio</strong> su <strong>tetto</strong> <strong>piatto</strong> / o a terraNávod na montáž nosnej konštrukcie na rovnú strechu a do terénuTechnische Änderungen vorbehalten • We reserve the right to change technical details •riserviamo il diritto di cambiare i particolari tecnici.28A0725 09.2008