LP6 Plus Volume Ventilator -And- LP10 Volume Ventilator With ...
LP6 Plus Volume Ventilator -And- LP10 Volume Ventilator With ...
LP6 Plus Volume Ventilator -And- LP10 Volume Ventilator With ...
You also want an ePaper? Increase the reach of your titles
YUMPU automatically turns print PDFs into web optimized ePapers that Google loves.
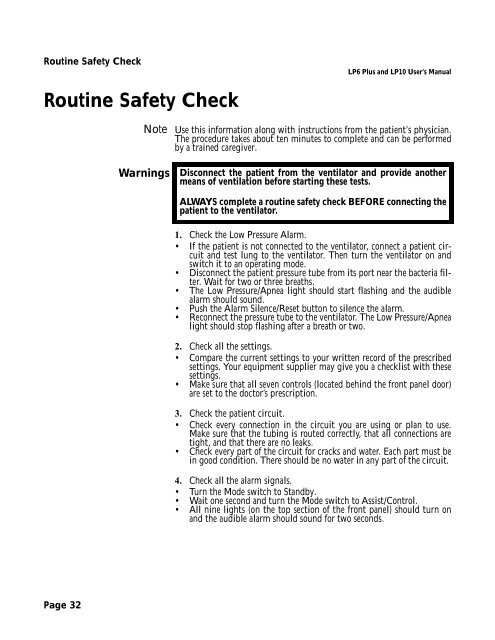
Routine Safety Check<br />
Routine Safety Check<br />
Page 32<br />
<strong>LP6</strong> <strong>Plus</strong> and <strong>LP10</strong> User’s Manual<br />
Note Use this information along with instructions from the patient’s physician.<br />
The procedure takes about ten minutes to complete and can be performed<br />
by a trained caregiver.<br />
Warnings Disconnect the patient from the ventilator and provide another<br />
means of ventilation before starting these tests.<br />
ALWAYS complete a routine safety check BEFORE connecting the<br />
patient to the ventilator.<br />
1. Check the Low Pressure Alarm.<br />
• If the patient is not connected to the ventilator, connect a patient circuit<br />
and test lung to the ventilator. Then turn the ventilator on and<br />
switch it to an operating mode.<br />
• Disconnect the patient pressure tube from its port near the bacteria filter.<br />
Wait for two or three breaths.<br />
• The Low Pressure/Apnea light should start flashing and the audible<br />
alarm should sound.<br />
• Push the Alarm Silence/Reset button to silence the alarm.<br />
• Reconnect the pressure tube to the ventilator. The Low Pressure/Apnea<br />
light should stop flashing after a breath or two.<br />
2. Check all the settings.<br />
• Compare the current settings to your written record of the prescribed<br />
settings. Your equipment supplier may give you a checklist with these<br />
settings.<br />
• Make sure that all seven controls (located behind the front panel door)<br />
are set to the doctor’s prescription.<br />
3. Check the patient circuit.<br />
• Check every connection in the circuit you are using or plan to use.<br />
Make sure that the tubing is routed correctly, that all connections are<br />
tight, and that there are no leaks.<br />
• Check every part of the circuit for cracks and water. Each part must be<br />
in good condition. There should be no water in any part of the circuit.<br />
4. Check all the alarm signals.<br />
• Turn the Mode switch to Standby.<br />
• Wait one second and turn the Mode switch to Assist/Control.<br />
• All nine lights (on the top section of the front panel) should turn on<br />
and the audible alarm should sound for two seconds.<br />
June 1999


