Comfort 211 accu / solar - Marantec
Comfort 211 accu / solar - Marantec
Comfort 211 accu / solar - Marantec

You also want an ePaper? Increase the reach of your titles
YUMPU automatically turns print PDFs into web optimized ePapers that Google loves.
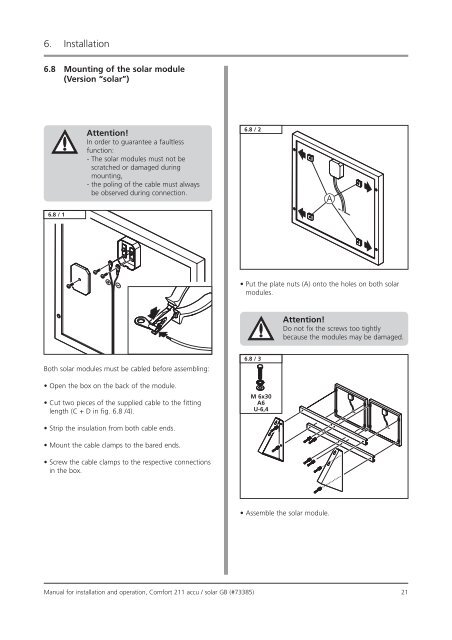
6. Installation<br />
6.8 Mounting of the <strong>solar</strong> module<br />
(Version “<strong>solar</strong>”)<br />
6.8 / 1<br />
Attention!<br />
In order to guarantee a faultless<br />
function:<br />
- The <strong>solar</strong> modules must not be<br />
scratched or damaged during<br />
mounting,<br />
- the poling of the cable must always<br />
be observed during connection.<br />
Both <strong>solar</strong> modules must be cabled before assembling:<br />
• Open the box on the back of the module.<br />
• Cut two pieces of the supplied cable to the fitting<br />
length (C + D in fig. 6.8 /4).<br />
• Strip the insulation from both cable ends.<br />
• Mount the cable clamps to the bared ends.<br />
• Screw the cable clamps to the respective connections<br />
in the box.<br />
M 6x30<br />
A6<br />
U-6,4<br />
Attention!<br />
Do not fix the screws too tightly<br />
because the modules may be damaged.<br />
• Assemble the <strong>solar</strong> module.<br />
Manual for installation and operation, <strong>Comfort</strong> <strong>211</strong> <strong>accu</strong> / <strong>solar</strong> GB (#73385) 21<br />
6.8 / 2<br />
• Put the plate nuts (A) onto the holes on both <strong>solar</strong><br />
modules.<br />
6.8 / 3<br />
A