XDCAM Compatibility Guide - Sony
XDCAM Compatibility Guide - Sony
XDCAM Compatibility Guide - Sony

You also want an ePaper? Increase the reach of your titles
YUMPU automatically turns print PDFs into web optimized ePapers that Google loves.
<strong>XDCAM</strong> Workflow <strong>Guide</strong><br />
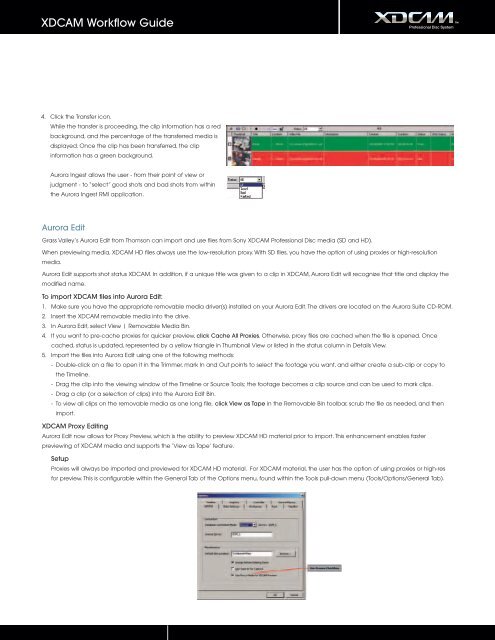
4. Click the Transfer icon.<br />
While the transfer is proceeding, the clip information has a red<br />
background, and the percentage of the transferred media is<br />
displayed. Once the clip has been transferred, the clip<br />
information has a green background.<br />
Aurora Ingest allows the user - from their point of view or<br />
judgment - to “select” good shots and bad shots from within<br />
the Aurora Ingest RMI application.<br />
Aurora Edit<br />
Grass Valley’s Aurora Edit from Thomson can import and use files from <strong>Sony</strong> <strong>XDCAM</strong> Professional Disc media (SD and HD).<br />
When previewing media, <strong>XDCAM</strong> HD files always use the low-resolution proxy. With SD files, you have the option of using proxies or high-resolution<br />
media.<br />
Aurora Edit supports shot status <strong>XDCAM</strong>. In addition, if a unique title was given to a clip in <strong>XDCAM</strong>, Aurora Edit will recognize that title and display the<br />
modified name.<br />
To import <strong>XDCAM</strong> files into Aurora Edit:<br />
1. Make sure you have the appropriate removable media driver(s) installed on your Aurora Edit. The drivers are located on the Aurora Suite CD-ROM.<br />
2. Insert the <strong>XDCAM</strong> removable media into the drive.<br />
3. In Aurora Edit, select View | Removable Media Bin.<br />
4. If you want to pre-cache proxies for quicker preview, click Cache All Proxies. Otherwise, proxy files are cached when the file is opened. Once<br />
cached, status is updated, represented by a yellow triangle in Thumbnail View or listed in the status column in Details View.<br />
5. Import the files into Aurora Edit using one of the following methods:<br />
- Double-click on a file to open it in the Trimmer, mark In and Out points to select the footage you want, and either create a sub-clip or copy to<br />
the Timeline.<br />
- Drag the clip into the viewing window of the Timeline or Source Tools; the footage becomes a clip source and can be used to mark clips.<br />
- Drag a clip (or a selection of clips) into the Aurora Edit Bin.<br />
- To view all clips on the removable media as one long file, click View as Tape in the Removable Bin toolbar, scrub the file as needed, and then<br />
import.<br />
<strong>XDCAM</strong> Proxy Editing<br />
Aurora Edit now allows for Proxy Preview, which is the ability to preview <strong>XDCAM</strong> HD material prior to import. This enhancement enables faster<br />
previewing of <strong>XDCAM</strong> media and supports the ‘View as Tape’ feature.<br />
Setup<br />
Proxies will always be imported and previewed for <strong>XDCAM</strong> HD material. For <strong>XDCAM</strong> material, the user has the option of using proxies or high-res<br />
for preview. This is configurable within the General Tab of the Options menu, found within the Tools pull-down menu (Tools/Options/General Tab).