MapInfo Professional Install Guide - Product Documentation - MapInfo
MapInfo Professional Install Guide - Product Documentation - MapInfo
MapInfo Professional Install Guide - Product Documentation - MapInfo
You also want an ePaper? Increase the reach of your titles
YUMPU automatically turns print PDFs into web optimized ePapers that Google loves.
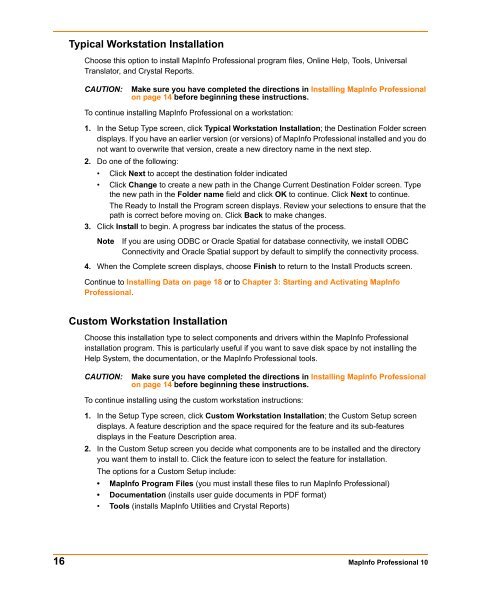
Typical Workstation <strong>Install</strong>ation<br />
Choose this option to install <strong>MapInfo</strong> <strong>Professional</strong> program files, Online Help, Tools, Universal<br />
Translator, and Crystal Reports.<br />
CAUTION: Make sure you have completed the directions in <strong>Install</strong>ing <strong>MapInfo</strong> <strong>Professional</strong><br />
on page 14 before beginning these instructions.<br />
To continue installing <strong>MapInfo</strong> <strong>Professional</strong> on a workstation:<br />
1. In the Setup Type screen, click Typical Workstation <strong>Install</strong>ation; the Destination Folder screen<br />
displays. If you have an earlier version (or versions) of <strong>MapInfo</strong> <strong>Professional</strong> installed and you do<br />
not want to overwrite that version, create a new directory name in the next step.<br />
2. Do one of the following:<br />
• Click Next to accept the destination folder indicated<br />
• Click Change to create a new path in the Change Current Destination Folder screen. Type<br />
the new path in the Folder name field and click OK to continue. Click Next to continue.<br />
The Ready to <strong>Install</strong> the Program screen displays. Review your selections to ensure that the<br />
path is correct before moving on. Click Back to make changes.<br />
3. Click <strong>Install</strong> to begin. A progress bar indicates the status of the process.<br />
Note If you are using ODBC or Oracle Spatial for database connectivity, we install ODBC<br />
Connectivity and Oracle Spatial support by default to simplify the connectivity process.<br />
4. When the Complete screen displays, choose Finish to return to the <strong>Install</strong> <strong>Product</strong>s screen.<br />
Continue to <strong>Install</strong>ing Data on page 18 or to Chapter 3: Starting and Activating <strong>MapInfo</strong><br />
<strong>Professional</strong>.<br />
Custom Workstation <strong>Install</strong>ation<br />
Choose this installation type to select components and drivers within the <strong>MapInfo</strong> <strong>Professional</strong><br />
installation program. This is particularly useful if you want to save disk space by not installing the<br />
Help System, the documentation, or the <strong>MapInfo</strong> <strong>Professional</strong> tools.<br />
CAUTION: Make sure you have completed the directions in <strong>Install</strong>ing <strong>MapInfo</strong> <strong>Professional</strong><br />
on page 14 before beginning these instructions.<br />
To continue installing using the custom workstation instructions:<br />
1. In the Setup Type screen, click Custom Workstation <strong>Install</strong>ation; the Custom Setup screen<br />
displays. A feature description and the space required for the feature and its sub-features<br />
displays in the Feature Description area.<br />
2. In the Custom Setup screen you decide what components are to be installed and the directory<br />
you want them to install to. Click the feature icon to select the feature for installation.<br />
The options for a Custom Setup include:<br />
• <strong>MapInfo</strong> Program Files (you must install these files to run <strong>MapInfo</strong> <strong>Professional</strong>)<br />
• <strong>Documentation</strong> (installs user guide documents in PDF format)<br />
• Tools (installs <strong>MapInfo</strong> Utilities and Crystal Reports)<br />
16 <strong>MapInfo</strong> <strong>Professional</strong> 10


