Controls Start-Up, Operation, Service, and ... - Climayoreo
Controls Start-Up, Operation, Service, and ... - Climayoreo
Controls Start-Up, Operation, Service, and ... - Climayoreo

You also want an ePaper? Increase the reach of your titles
YUMPU automatically turns print PDFs into web optimized ePapers that Google loves.
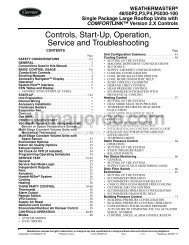
TEMPERATURE<br />
MEASUREMENT<br />
(CIRCUIT B)<br />
MEASUREMENT<br />
LOCATION<br />
(CIRCUIT A)<br />
Fig. 28 — Saturated Liquid Temperature<br />
Measurement (30GXN,R080-150 <strong>and</strong> 160)<br />
MEASUREMENT<br />
LOCATION (TYPICAL)<br />
Fig. 29 — Saturated Liquid Temperature<br />
Measurement (30GXN,R153, 163-350)<br />
Oil Charging/Low Oil Recharging<br />
OIL SPECIFICATION — If oil is added, it must meet the<br />
following Carrier specifications:<br />
Castrol........................Icematic®SW-220<br />
Oil type . . . . . . . . .Inhibited polyolester-based synthetic<br />
compressor lubricant for use in screw compressors.<br />
ISOViscosityGrade.........................220<br />
This oil is available in the following quantities from your<br />
local Carrier representative (see Table 36).<br />
Table 36 — Available Oil Quantities<br />
<strong>and</strong> Part Numbers<br />
QUANTITY<br />
TOTALINE PART<br />
NUMBER<br />
RCD PART<br />
NUMBER<br />
1 Quart P903-1225 —<br />
1Gallon P903-1201 PP23BZ104-001<br />
5Gallons P903-1205 PP23BZ104-005<br />
56<br />
Addition of oil charge to 30HX,GXN,GXR systems:<br />
1. If the 30HX,GXN,GXR unit shuts off repeatedly on Low<br />
Oil Level (Alert number 124 or 125), this may be an<br />
indication of inadequate oil charge. It could also mean<br />
simply that oil is in the process of being reclaimed from<br />
the low-side of the system.<br />
2. Begin by running the unit at full load for 1 1/ 2 hours. Use<br />
the Manual Control feature of the software if the unit<br />
does not normally run at full load.<br />
3. After running the unit for 1 1/ 2 hours, allow the unit to<br />
restart <strong>and</strong> run normally. If the Low Oil Level alarms<br />
persist, continue following this procedure.<br />
4. Close the liquid line service valve, <strong>and</strong> place a pressure<br />
gage on top of the cooler. Enable the <strong>Service</strong> Test feature<br />
using the Navigator <strong>and</strong> turn the EOR switch to Enable.<br />
<strong>Start</strong> the desired compressor by turning it On under the<br />
‘COMP’ sub-mode. Select item ‘CC.A1’ for compressor<br />
A1, ‘CC.B1’ for compressor B1, etc.<br />
5. Before starting the compressor, the unit will go through<br />
its normal pre-lube pump routine. If there is an insufficient<br />
level of oil in the oil separator, the compressor will<br />
not start, <strong>and</strong> a pre-start oil pressure alarm will be posted.<br />
Skip to Step 8.<br />
6. If the compressor starts successfully, observe the cooler<br />
pressure gage. When this gage reads approximately<br />
10 psig, turn the selected compressor Off from the<br />
Navigator <strong>and</strong> move the EOR switch to the Off position.<br />
7. Open the liquid line service valve <strong>and</strong> allow the unit to<br />
restart <strong>and</strong> run normally. If the Low Oil Level alarms<br />
persist, continue following this procedure.<br />
8. If none of the previous steps were successful, the unit is<br />
low on oil charge. Add oil to the oil separator using the<br />
1 /4-in. Schrader-type fitting on the discharge line entering<br />
the top of the oil separator (30HX units) or through the<br />
Schrader fitting on the top of the oil separator (30GXN,R<br />
units).<br />
Do not add oil at any other location as improper unit operation<br />
may result.<br />
9. Make sure that the unit is not running when adding oil, as<br />
this will make the oil charging process easier. Because the<br />
system is under pressure even when the unit is not running,<br />
it will be necessary to use a suitable pump (h<strong>and</strong><br />
pump or electric pump) to add oil to the system.<br />
10. Using a suitable pump, add 1 /2 gal.(1.89L)ofCastrol<br />
Icematic ® SW-220 Polyolester oil (absolutely no substitutes<br />
are approved) to the system. Make sure that the oil<br />
level safety switch is NOT jumpered, <strong>and</strong> allow the unit<br />
to restart <strong>and</strong> run normally. Do not exceed maximum oil<br />
change. See Table 37.<br />
Table 37 — Factory Oil Charges<br />
UNIT CIRCUIT CIRCUIT CIRCUIT CIRCUIT<br />
SIZE A(gal) A(L) B(gal) B(L)<br />
30GX080-178 5.0 18.9 5.0 18.9<br />
30GX204-268 7.0 26.5 5.0 18.9<br />
30GX281-350 7.0 26.5 7.0 26.5<br />
30HXA076-186 5.0 18.9 5.0 18.9<br />
30HXC076-186 4.5 17.0 4.5 17.0<br />
30HXA206-271 8.0 30.2 5.0 18.9<br />
30HXC206-271 7.5 28.4 5.0 18.9