Sterilemax Table Top Steam Sterilizer
Sterilemax Table Top Steam Sterilizer
Sterilemax Table Top Steam Sterilizer

You also want an ePaper? Increase the reach of your titles
YUMPU automatically turns print PDFs into web optimized ePapers that Google loves.
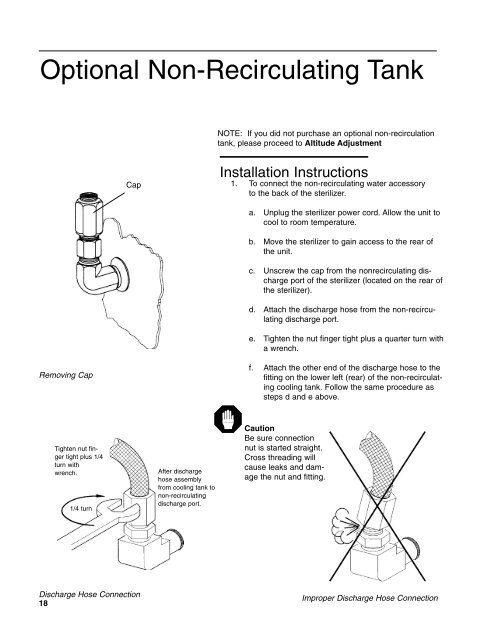
Optional Non-Recirculating Tank<br />
Removing Cap<br />
Tighten nut finger<br />
tight plus 1/4<br />
turn with<br />
wrench.<br />
1/4 turn<br />
Cap<br />
Discharge Hose Connection<br />
18<br />
After discharge<br />
hose assembly<br />
from cooling tank to<br />
non-recirculating<br />
discharge port.<br />
NOTE: If you did not purchase an optional non-recirculation<br />
tank, please proceed to Altitude Adjustment<br />
Installation Instructions<br />
1. To connect the non-recirculating water accessory<br />
to the back of the sterilizer.<br />
a. Unplug the sterilizer power cord. Allow the unit to<br />
cool to room temperature.<br />
b. Move the sterilizer to gain access to the rear of<br />
the unit.<br />
c. Unscrew the cap from the nonrecirculating discharge<br />
port of the sterilizer (located on the rear of<br />
the sterilizer).<br />
d. Attach the discharge hose from the non-recirculating<br />
discharge port.<br />
e. Tighten the nut finger tight plus a quarter turn with<br />
a wrench.<br />
f. Attach the other end of the discharge hose to the<br />
fitting on the lower left (rear) of the non-recirculating<br />
cooling tank. Follow the same procedure as<br />
steps d and e above.<br />
Caution<br />
Be sure connection<br />
nut is started straight.<br />
Cross threading will<br />
cause leaks and damage<br />
the nut and fitting.<br />
Improper Discharge Hose Connection