MCL-Link Lite Version 2.11 User's Guide
MCL-Link Lite Version 2.11 User's Guide
MCL-Link Lite Version 2.11 User's Guide

You also want an ePaper? Increase the reach of your titles
YUMPU automatically turns print PDFs into web optimized ePapers that Google loves.
1-10<br />
<strong>MCL</strong>-<strong>Link</strong> <strong>Lite</strong> <strong>Version</strong> <strong>2.11</strong> User’s <strong>Guide</strong><br />
Using <strong>MCL</strong>-<strong>Link</strong> <strong>Lite</strong><br />
The <strong>MCL</strong>-<strong>Link</strong> <strong>Lite</strong> main window contains buttons to perform all the different functions<br />
necessary for maintaining the terminals.<br />
Status<br />
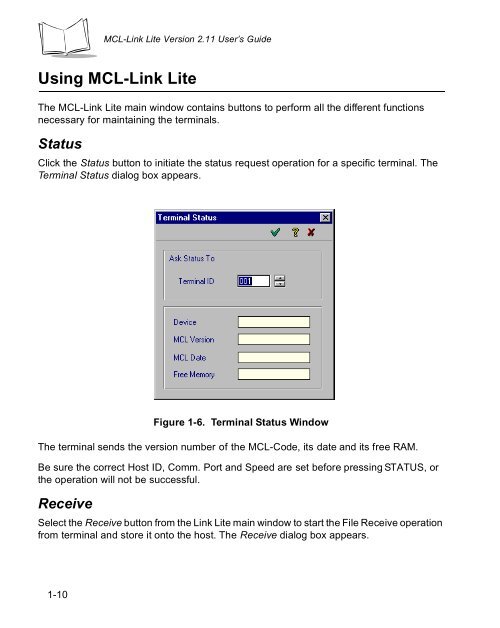
Click the Status button to initiate the status request operation for a specific terminal. The<br />
Terminal Status dialog box appears.<br />
Figure 1-6. Terminal Status Window<br />
The terminal sends the version number of the <strong>MCL</strong>-Code, its date and its free RAM.<br />
Be sure the correct Host ID, Comm. Port and Speed are set before pressing STATUS, or<br />
the operation will not be successful.<br />
Receive<br />
Select the Receive button from the <strong>Link</strong> <strong>Lite</strong> main window to start the File Receive operation<br />
from terminal and store it onto the host. The Receive dialog box appears.
![MC55 Regulatory Guide [Spanish] (P/N 72-108860 ... - Enterprise](https://img.yumpu.com/14574395/1/190x133/mc55-regulatory-guide-spanish-p-n-72-108860-enterprise.jpg?quality=85)
![ES400 Regulatory Guide [Spanish] (P/N 72-134312-01ES Rev. A)](https://img.yumpu.com/14415156/1/190x127/es400-regulatory-guide-spanish-p-n-72-134312-01es-rev-a.jpg?quality=85)
![MC35 Regulatory Information [Spanish] - Symbol](https://img.yumpu.com/14415086/1/190x143/mc35-regulatory-information-spanish-symbol.jpg?quality=85)