CRD 1700-1000M Cradle - Symbol
CRD 1700-1000M Cradle - Symbol
CRD 1700-1000M Cradle - Symbol

Create successful ePaper yourself
Turn your PDF publications into a flip-book with our unique Google optimized e-Paper software.
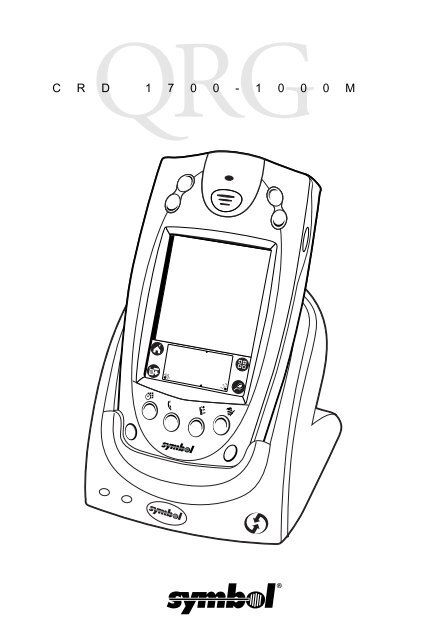
C R D 1 7 0 0 - 1 0 0 0 M
C R D 1 7 0 0 - 1 0 0 0 M<br />
© 2000 SYMBOL TECHNOLOGIES, INC. All rights reserved.<br />
<strong>Symbol</strong> reserves the right to make changes to any product to improve reliability,<br />
function, or design.<br />
<strong>Symbol</strong> does not assume any product liability arising out of, or in connection with, the<br />
application or use of any product, circuit, or application described herein.<br />
No license is granted, either expressly or by implication, estoppel, or otherwise under<br />
any patent right or patent, covering or relating to any combination, system,<br />
apparatus, machine, material, method, or process in which <strong>Symbol</strong> products might<br />
be used. An implied license only exists for equipment, circuits, and subsystems<br />
contained in <strong>Symbol</strong> products.<br />
<strong>Symbol</strong> is a registered trademark of <strong>Symbol</strong> Technologies, Inc. Other product names<br />
mentioned in this manual may be trademarks or registered trademarks of their<br />
respective companies and are hereby acknowledged.<br />
<strong>Symbol</strong> Technologies, Inc.<br />
One <strong>Symbol</strong> Plaza<br />
Holtsville, N.Y. 11742-1300<br />
http://www.symbol.com<br />
Patents<br />
This product is covered by one or more of the following U.S. and foreign Patents:<br />
U.S. Patent No. 4,460,120; 4,496,831; 4,593,186; 4,603,262; 4,607,156; 4,652,750;<br />
4,673,805; 4,736,095; 4,758,717; 4,816,660; 4,845,350; 4,896,026; 4,897,532; 4,923,281;<br />
4,933,538; 4,992,717; 5,015,833; 5,017,765; 5,021,641; 5,029,183; 5,047,617; 5,103,461;<br />
5,113,445; 5,130,520; 5,140,144; 5,142,550; 5,149,950; 5,157,687; 5,168,148; 5,168,149;<br />
5,180,904; 5,216,232; 5,229,591; 5,230,088; 5,235,167; 5,243,655; 5,247,162; 5,250,791;<br />
5,250,792; 5,260,553; 5,262,627; 5,262,628; 5,266,787; 5,278,398; 5,280,162; 5,280,163;<br />
5,280,164; 5,280,498; 5,304,786; 5,304,788; 5,306,900; 5,321,246; 5,324,924; 5,337,361;<br />
5,367,151; 5,373,148; 5,378,882; 5,396,053; 5,396,055; 5,399,846; 5,408,081; 5,410,139;<br />
5,410,140; 5,412,198; 5,418,812; 5,420,411; 5,436,440; 5,444,231; 5,449,891; 5,449,893;<br />
5,468,949; 5,471,042; 5,478,998; 5,479,000; 5,479,002; 5,479,441; 5,504,322; 5,519,577;<br />
5,528,621; 5,532,469; 5,543,610; 5,545,889; 5,552,592; 5,557,093; 5,578,810; 5,581,070;<br />
5,589,679; 5,589,680; 5,608,202; 5,612,531; 5,619,028; 5,627,359; 5,637,852; 5,664,229;<br />
5,668,803; 5,675,139; 5,693,929; 5,698,835; 5,705,800; 5,714,746; 5,723,851; 5,734,152;<br />
5,734,153; 5,742,043; 5,745,794; 5,754,587; 5,762,516; 5,763,863; 5,767,500; 5,789,728;<br />
5,789,731; 5,808,287; 5,811,785; 5,811,787; 5,815,811; 5,821,519; 5,821,520; 5,823,812;<br />
5,828,050; 5,850,078; 5,861,615; 5,874,720; 5,875,415; 5,900,617; 5,902,989; 5,907,146;<br />
5,912,450; 5,914,478; 5,917,173; 5,920,059; 5,923,025; 5,929,420; 5,945,658; 5,945,659;<br />
5,946,194; 5,959,285; 6,002,918; 6,021,947; 6,047,892; 6,050,491; 6,053,413; 6,056,200;<br />
6,065,678; 6,067,297; 6,068,190; D305,885; D341,584; D344,501; D359,483; D362,453;<br />
D363,700; D363,918; D370,478; D383,124; D391,250; D405,077; D406,581; D414,171;<br />
D414,172, D419,548; D423,468; D424,035.<br />
Invention No. 55,358; 62,539; 69,060; 69,187 (Taiwan); No. 1,601,796; 1,907,875;<br />
1,955,269 (Japan).<br />
European Patent 367,299; 414,281; 367,300; 367,298; UK 2,072,832; France 81/03938;<br />
Italy 1,138,713.<br />
rev. 06/00
Q u i c k R e f e r e n c e<br />
Introduction<br />
The <strong>Symbol</strong> Technologies <strong>CRD</strong> <strong>1700</strong>-<strong>1000M</strong> serves as an<br />
essential data communications device, enabling you to<br />
synchronize the information on your SPT <strong>1700</strong> terminal and the<br />
Palm Desktop software using HotSync ® technology.<br />
Using the <strong>CRD</strong> <strong>1700</strong>-<strong>1000M</strong>, the SPT <strong>1700</strong> can HotSync with a<br />
host computer either directly through the serial cable or remotely<br />
through the phone lines. A switch on the back of the cradle<br />
controls which type of sync the cradle is to perform. With<br />
customized or third party software, it can also be used to<br />
synchronize your SPT <strong>1700</strong> terminal with corporate databases<br />
and other host computers.<br />
This guide covers the set up and use of the <strong>CRD</strong> <strong>1700</strong>-<strong>1000M</strong><br />
including Australian variant <strong>CRD</strong> <strong>1700</strong>-10MA. For more<br />
information about the SPT <strong>1700</strong> terminal, please refer to the SPT<br />
<strong>1700</strong> Series Quick Reference Guide (p/n 70-37543-xx) or the SPT<br />
<strong>1700</strong> Product Reference Guide (p/n 70-37544-xx).<br />
About this Guide<br />
This guide provides basic information on the following topics:<br />
• Setting up the <strong>CRD</strong> <strong>1700</strong>-<strong>1000M</strong> on page 3<br />
• Installing the HotSync Software on page 5<br />
• Setting Up the SPT <strong>1700</strong> for US/Canada Modem HotSync on<br />
page 5<br />
• Setting Up the SPT <strong>1700</strong> for International Modem HotSync<br />
on page 6<br />
• Operating the <strong>Cradle</strong> on page 7<br />
- Performing a HotSync Operation for the First Time on<br />
page 8<br />
- Performing a Local HotSync on page 10<br />
- Performing a Modem HotSync on page 10<br />
- Charging the SPT <strong>1700</strong> Battery on page 11<br />
- Spare Battery Charging on page 11<br />
• Troubleshooting on page 12.<br />
1
C R D 1 7 0 0 - 1 0 0 0 M<br />
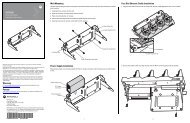
Parts of the <strong>CRD</strong> <strong>1700</strong>-<strong>1000M</strong><br />
Spare<br />
Battery<br />
Charging<br />
Slot<br />
Modem/Serial<br />
Switch<br />
Power Port<br />
Line In<br />
Line Out<br />
RJ-45 Port<br />
Spare<br />
Battery<br />
Charge<br />
LED<br />
Terminal<br />
Battery<br />
Charge LED<br />
HotSync<br />
Button<br />
2
Q u i c k R e f e r e n c e<br />
There are four connection ports on the rear of the <strong>CRD</strong> <strong>1700</strong>-<br />
<strong>1000M</strong>:<br />
Parts<br />
Line In (use with standard<br />
RJ-11 connectors)<br />
Line Out (use with<br />
standard RJ-11 connectors)<br />
RJ-45 (Serial Port)<br />
Power<br />
Function<br />
Used for connection to the phone line system.<br />
Used for connection to a handset in a loop-through fashion.<br />
Used for direct connection to your computer using the<br />
supplied RJ-45 to DB-9 cable. Only use this port and cable<br />
if you also intend to HotSync your SPT <strong>1700</strong> directly<br />
to your computer.<br />
A standard barrel port used for connecting the power<br />
supply.<br />
Setting up the <strong>CRD</strong> <strong>1700</strong>-<strong>1000M</strong><br />
The <strong>CRD</strong> <strong>1700</strong>-<strong>1000M</strong> can either sit on a desk or be mounted on<br />
a wall, using a special wall mount bracket available from <strong>Symbol</strong>.<br />
Setting up the <strong>CRD</strong> <strong>1700</strong>-<strong>1000M</strong> involves connecting your cradle<br />
to your computer, connecting power, connecting the cradle to the<br />
phone line, installing the HotSync Software to enable<br />
synchronization, and setting up the terminal for modem hotsync.<br />
3
C R D 1 7 0 0 - 1 0 0 0 M<br />
To connect your <strong>CRD</strong> <strong>1700</strong>-<strong>1000M</strong> to your computer:<br />
1. Turn off your computer and plug the cable from the RJ-45<br />
port on the cradle into the serial communications port on your<br />
computer.<br />
Tip:<br />
Your <strong>CRD</strong> <strong>1700</strong>-<strong>1000M</strong> requires a dedicated port. It<br />
cannot share a port with an internal modem or other<br />
device. If you are unsure about the location of the serial<br />
port on your computer, refer to the user’s manual supplied<br />
with the computer.<br />
2. To connect power, connect<br />
one end of the line cord to<br />
the power port on the back of<br />
the cradle, and the other end<br />
into the power supply, as<br />
shown. Connect the other<br />
end of the cable from the<br />
power supply to a wall outlet.<br />
4
Q u i c k R e f e r e n c e<br />
3. To connect the cradle to a<br />
phone line, plug one end of<br />
the phone cord into the<br />
Line In port on your cradle,<br />
and plug the other end into<br />
a wall phone jack.<br />
4. Set the Modem/Serial<br />
switch to Modem for modem<br />
operation, or Serial for<br />
serial operation.<br />
Installing the HotSync Software<br />
Using HotSync technology, you can fully synchronize the<br />
information on your SPT <strong>1700</strong> terminal with the information on<br />
your computer. Changes you make on your SPT <strong>1700</strong> terminal or<br />
Palm Desktop appear in both places after you synchronize.<br />
For instructions on installing the HotSync Software, please refer to<br />
the SPT <strong>1700</strong> Product Reference Guide, p/n 70-33757-xx.<br />
Setting Up the SPT <strong>1700</strong> for US/Canada Modem<br />
HotSync<br />
The HotSync application in the SPT <strong>1700</strong> must be configured to<br />
use the <strong>CRD</strong> <strong>1700</strong>-<strong>1000M</strong> as a modem.<br />
To launch the HotSync application:<br />
1. Power on the SPT <strong>1700</strong>.<br />
2. Tap the icon to display the Application screen.<br />
3. Tap the icon to launch the HotSync application.<br />
4. On the HotSync screen, tap the Modem box.<br />
5. Make sure Palm Modem US/Canada is selected.<br />
6. Tap the phone number field directly underneath the Modem<br />
Sync icon to display the Phone Setup screen.<br />
5
C R D 1 7 0 0 - 1 0 0 0 M<br />
7. On the Phone Setup screen, enter the phone number and<br />
other information, checking the appropriate check boxes as<br />
needed, or by entering the information with the stylus, and<br />
tap OK. The HotSync screen redisplays, showing the updated<br />
phone number information.<br />
Setting Up the SPT <strong>1700</strong> for International Modem<br />
HotSync<br />
1. Complete Steps 1-4 in the previous section, Setting Up the<br />
SPT <strong>1700</strong> for US/Canada Modem HotSync on page 5.<br />
2. On the HotSync screen, tap the icon. A pull-down menu<br />
displays the Modem Setup options.<br />
3. Tap the Connection Setup option with the stylus to display<br />
the Connection Preferences screen.<br />
4. On the Connection Preferences screen, tap the down arrow<br />
next to each of the setup choices to display a pull-down<br />
menu.<br />
a. For port, select <strong>Cradle</strong>.<br />
b. For speed, select 57,600 bps.<br />
c. Under Flow Control, select Automatic.<br />
d. Tap the Modem box.<br />
e. Set the speaker volume to the desired level.<br />
f. Under String, enter “AT+GCI=xx;Z” where xx is the country<br />
code for your country, as defined by the values in the<br />
following table.<br />
g. Tap the TouchTone box.<br />
Tip: Note that after entering the String information, the<br />
Name field displays a Custom option.<br />
6
Q u i c k R e f e r e n c e<br />
Value<br />
Meaning<br />
B5<br />
C8<br />
C9<br />
CA<br />
USA, Canada<br />
Austria, Denmark, Germany, Greece, Ireland, Italy, Iceland,<br />
Luxembourg, Netherlands, Norway, Portugal,<br />
Spain, and Sweden.<br />
Belgium, UK<br />
Finland, France, Switzerland<br />
09 Australia (Note: Australia specific hardware is necessary<br />
in the cradle identified as <strong>CRD</strong> <strong>1700</strong>-10MA)<br />
5. Tap Done with the stylus. The HotSync screen redisplays.<br />
6. Tap on the pull-down menu for name, and select the custom<br />
option you just created.<br />
Tip: To switch back to North American/Canadian modem<br />
usage, reenter the String information on the Connections<br />
Preferences screen, selecting the USA value<br />
code of B5.<br />
Operating the <strong>Cradle</strong><br />
The Sync Select switch on the back of the <strong>CRD</strong> <strong>1700</strong>-<strong>1000M</strong> can<br />
be set in either of two positions:<br />
• SERIAL - in the right position, the cradle automatically<br />
wakes the SPT <strong>1700</strong> (if it is asleep) and performs a serial<br />
HotSync when the HotSync button is pressed. There is nothing<br />
you need to do on the SPT <strong>1700</strong> to facilitate serial<br />
HotSync.<br />
• MODEM - in the left position, the cradle automatically wakes<br />
up the SPT <strong>1700</strong> (if it is asleep), initializes the modem electronics,<br />
and performs a modem HotSync when the HotSync<br />
button is pressed.<br />
7
C R D 1 7 0 0 - 1 0 0 0 M<br />
Tip:<br />
The modem must be set up on the SPT <strong>1700</strong>, and the<br />
phone line must be plugged in, in order to properly perform<br />
a modem HotSync. See Setting Up the SPT <strong>1700</strong><br />
for Modem HotSync in the previous section.<br />
Performing a HotSync Operation for the First Time<br />
The first time you synchronize your data, you need to enter user<br />
information on both the SPT <strong>1700</strong> terminal and the Palm Desktop.<br />
Once you enter this information and synchronize, the HotSync<br />
Manager recognizes your SPT <strong>1700</strong> terminal and doesn’t ask for<br />
this information again. If you are a System Administrator preparing<br />
several SPT <strong>1700</strong> connected terminals for a group of users, see<br />
Creating a User Profile in the SPT <strong>1700</strong> Product Reference Guide<br />
before performing the following steps.<br />
Tip: You must perform your first HotSync operation with a<br />
local, direct connection, rather than using a modem.<br />
To perform a HotSync operation for the first time:<br />
1. Double-click the Palm Desktop icon on the Windows desktop<br />
(or select Palm Desktop from the Start menu) to start the<br />
Palm Desktop software.<br />
2. Click the icon in the Windows System<br />
Tray to open the HotSync Manager menu.<br />
Tip: The Windows System Tray is usually in<br />
the lower-right corner on your computer<br />
display. The location may vary depending<br />
on the location of the taskbar and<br />
the version of Windows you are using.<br />
3. On the HotSync Manager menu, click Local to<br />
indicate that you are using the cradle to synchronize.<br />
4. Set the Sync Select switch to SERIAL.<br />
8
Q u i c k R e f e r e n c e<br />
5. Turn on the SPT <strong>1700</strong> terminal and slide it into the cradle.<br />
HotSync<br />
Button<br />
Tip:<br />
The curved edge on the bottom of the SPT <strong>1700</strong> terminal<br />
should align smoothly with the cradle when it is inserted<br />
properly.<br />
6. Press the button on the front of the <strong>CRD</strong> <strong>1700</strong>-<strong>1000M</strong> to<br />
open the New User dialog.<br />
7. Enter a user name for your SPT<br />
<strong>1700</strong> terminal and click the OK<br />
button to open the HotSync<br />
Progress dialog and start the synchronization<br />
process.<br />
Tip: Every SPT <strong>1700</strong> connected<br />
terminal should have a unique name. Never try to synchronize<br />
more than one SPT <strong>1700</strong> connected terminal<br />
to the same user name.<br />
The HotSync progress window appears on the desktop. A<br />
similar screen displays the HotSync progress on the SPT<br />
<strong>1700</strong>. The Palm Desktop displays a message to indicate that<br />
the process is complete.<br />
9
C R D 1 7 0 0 - 1 0 0 0 M<br />
Performing a Local HotSync<br />
After you complete the first HotSync operation, the HotSync<br />
process is even faster and easier!<br />
To conduct a local HotSync operation:<br />
1. Set the sync select switch to the SERIAL position. If the<br />
HotSync Manager is not running on your host PC, start it.<br />
See the previous section, Performing a HotSync Operation<br />
for the First Time.<br />
2. Insert the SPT <strong>1700</strong> terminal in the cradle.<br />
3. Press the button on the front of the <strong>CRD</strong> <strong>1700</strong>-<strong>1000M</strong> to<br />
open the New User dialog. The terminal wakes up and begins<br />
the HotSync process.<br />
4. Wait for Palm Desktop to display a message indicating that<br />
the process is complete.<br />
Performing a Modem HotSync<br />
Before leaving your host computer, if you plan to<br />
perform a remote modem HotSync, start HotSync<br />
Manager. Click Modem on the HotSync Manager<br />
menu to indicate that you intend to perform a modem<br />
HotSync.<br />
To conduct a Modem HotSync operation from a<br />
remote site:<br />
1. Set the Sync Select switch to the Modem position.<br />
2. Insert the SPT <strong>1700</strong> terminal in the cradle.<br />
3. Press the button on the front of the cradle. The terminal<br />
starts the HotSync process, then displays a Service Connection<br />
Progress screen, which reports the progress of the<br />
HotSync. If the modem has any problems dialing or communicating,<br />
the terminal displays an error message indicating<br />
the problem.<br />
10
Q u i c k R e f e r e n c e<br />
4. The dial tone, dialing sequence, and connection sequence is<br />
heard, as well as reported on the display. Once connected,<br />
the speaker turns off and the sync progress is reported on<br />
the display.<br />
5. Once HotSync is complete, tap OK on the terminal display.<br />
Charging the SPT <strong>1700</strong> Battery<br />
The cradle may also be used to charge the SPT <strong>1700</strong> lithium-ion<br />
battery. To charge the terminal’s battery:<br />
1. Ensure the cradle is powered<br />
on.<br />
2. Insert the terminal in the cradle.<br />
The Terminal Charge LED turns red to<br />
indicate charging, then turns green<br />
when the battery is fully charged<br />
(approximately 2 hours).<br />
Tip: If the battery in the terminal<br />
is low, the Terminal<br />
Terminal<br />
Charge LED may flicker or Charge<br />
turn yellow during a<br />
LED<br />
HotSync operation. The<br />
LED returns to red when the operation is complete.<br />
Spare Battery Charging<br />
To charge the terminal’s spare<br />
battery, insert the battery in the spare<br />
battery charging slot in the top of the<br />
cradle, and gently press down on the<br />
battery to ensure proper contact.<br />
Orient the battery so that the<br />
charging contacts are facing down<br />
and toward the back of the cradle.<br />
The Spare Battery Charge LED turns<br />
Spare<br />
Battery<br />
Charge<br />
LED<br />
11
C R D 1 7 0 0 - 1 0 0 0 M<br />
red to indicate charging, then turns green when the battery is fully<br />
charged (approximately 2 hours).<br />
Troubleshooting<br />
If you require more information on the HotSync process, please<br />
refer to the HotSync chapter in your SPT <strong>1700</strong> Product Reference<br />
Guide, p/n 70-37544-xx.<br />
Symptom Cause Suggested Action<br />
LEDs do not light<br />
when the cradle is<br />
plugged in.<br />
LED does not light<br />
when the cradle is<br />
connected.<br />
Attempt by the cradle<br />
to HotSync the<br />
terminal failed.<br />
<strong>Cradle</strong> is not receiving<br />
power.<br />
Terminal is not seated<br />
firmly in the cradle.<br />
Terminal was removed<br />
from the cradle while<br />
the HotSync was in<br />
progress.<br />
Terminal’s battery is<br />
dead.<br />
Active Error dialog box<br />
on terminal.<br />
Modem or telephone<br />
lines being operated in<br />
an electrically noisy<br />
environment.<br />
Make sure the power supply is securely<br />
connected and the cradle is<br />
receiving power.<br />
Reseat the terminal in the cradle.<br />
Replace the terminal in the cradle.<br />
This allows the cradle to attempt another<br />
HotSync.<br />
Wait 2 minutes. The battery needs to<br />
recharge before it can perform a<br />
HotSync.<br />
Error dialog box must be cleared in<br />
the terminal. Use the stylus to press<br />
“OK” on the terminal’s touchscreen.<br />
Modify init string in US/Canada to<br />
“AT&F\N5” forcing MNP error correction<br />
or “AT&F+MS=V32B” forcing<br />
V32bis (14,400 bps) connection. For<br />
International operation use<br />
“AT&F\N5;+GCI=xx;” forcing MNP<br />
error correction or<br />
"AT&F+MS=V32B;+GCI=xx;" forcing<br />
V32bis (14,400 bps) connection,<br />
respectively. (See page 7 for xx values.)<br />
12
Q u i c k R e f e r e n c e<br />
Regulatory Information<br />
Radio Frequency Interference Requirements<br />
This device has been tested and found to comply with the limits for a Class B digital<br />
device pursuant to Part 15 of the Federal Communications Commissions Rules and<br />
Regulation. These limits are designed to provide reasonable protection against<br />
harmful interference when the equipment is operated in a commercial environment.<br />
This equipment generates, uses, and can radiate radio frequency energy and, if not<br />
installed and used in accordance with the instruction manual, may cause harmful<br />
interference to radio communications. Operation of this equipment in a residential<br />
area is likely to cause harmful interference in which case the user will be required to<br />
correct the interference at his own expense.<br />
However, there is no guarantee that interference will not occur in a particular<br />
installation. If the equipment does cause harmful interference to radio or television<br />
reception, which can be determined by turning the equipment off and on, the user is<br />
encouraged to try to correct the interference by one or more of the following<br />
measures:<br />
• Re-orient or relocate the receiving antenna.<br />
• Increase the separation between the equipment and receiver.<br />
• Connect the equipment into an outlet on a circuit different from that which the<br />
receiver is connected.<br />
• Consult the dealer or an experienced radio/TV technician for help.<br />
Radio Frequency Interference Requirements - Canada<br />
This Class B digital apparatus complies with Industry Canada Standard ICES-003.<br />
Cet appareil numérique de la classe B est conform à la norme NMB-003 d’Industrie<br />
Canada.<br />
TELECOM APPROVAL WARNINGS AND NOTICES<br />
Connecting to the telephone network<br />
A compliant telephone lead is required with RJ11 plug (line is on middle pair)<br />
connection to modem, terminated with an appropriate and correctly wired local<br />
telecom connector compatible with the telephone network. Such a cable may be<br />
sourced from your local supplier. Alternatively compliant RJ11 plug to RJ11 plug<br />
cables may be used with a range of adapters for places such as Europe.<br />
CAUTION: To reduce risk of fire, use only No. 26 AWG or larger telecommunication<br />
line cord.<br />
When installing always connect the telecom cable first to the cradle and then to the<br />
telecom network. Reverse the procedure on disconnection by first removing from the<br />
telephone network socket.<br />
13
C R D 1 7 0 0 - 1 0 0 0 M<br />
USA<br />
This equipment complies with Part 68 of the FCC Rules. On the bottom of this<br />
equipment is a label that contains, among other information, the FCC Registration<br />
Number and Ringer Equivalence Number (REN) for this equipment. You must, upon<br />
request, provide this information to your telephone company.<br />
This equipment uses RJ11 jacks for connection to the phone lines.<br />
An FCC compliant telephone cord and modular plug are provided with this<br />
equipment. This equipment is designed to be connected to the telephone network or<br />
premises wiring using a compatible modular jack which is Part 68 compliant. See<br />
installation instructions for details.<br />
The REN is useful to determine the quantity of devices you may connect to your<br />
telephone line and still have all those devices ring when your telephone number is<br />
called. In most, but not all areas, the sum of the REN's of all devices connected to<br />
one line should not exceed five (5). To be certain of the number of devices you may<br />
connect to your line, as determined by the REN, you should contact your local<br />
telephone company to determine the maximum REN for your calling area.<br />
If your telephone equipment causes harm to the telephone network, the Telephone<br />
Company may discontinue your service temporarily. If possible, they will notify you in<br />
advance. But if advance notice is not practical, you will be notified as soon as<br />
possible. You will be informed of your right to file a complaint with the FCC.<br />
Your telephone company may make changes in its facilities, equipment, operations<br />
or procedures that could affect the proper functioning of your equipment. If they do,<br />
you will be notified in advance to give you and opportunity to maintain uninterrupted<br />
telephone service.<br />
If you experience trouble with this telephone equipment, please contact <strong>Symbol</strong><br />
Technologies, Inc., (800) 653-5350 for information on obtaining service or repairs.<br />
The telephone company may ask that you disconnect this equipment from the<br />
network until the problem has been corrected or until you are sure that the equipment<br />
is not malfunctioning.<br />
NOTE: There are no user serviceable parts contained in this equipment.<br />
Canada<br />
NOTICE: The Industry Canada (IC) label identifies certified equipment. This<br />
certification means that the equipment meets telecommunications network<br />
protective, operational and safety requirement as prescribed in the appropriate<br />
Terminal Equipment Technical Requirement document(s). The department does not<br />
guarantee the equipment will operate to the user's satisfaction.<br />
Before installing this equipment, users should ensure that it is permissible to be<br />
connected to the facilities of the local telecommunications company. The equipment<br />
must also be installed using an acceptable method of connection. The customer<br />
should be aware that compliance with the above conditions may not prevent<br />
degradation of service in some situations.<br />
14
Q u i c k R e f e r e n c e<br />
Repairs to certified equipment should be coordinated by a representative designated<br />
by the supplier. Any repairs or alterations made by a user to this equipment, or<br />
equipment malfunctions, may give the telephone communications company cause to<br />
require the user to disconnect the equipment.<br />
Users should ensure for their own protection, that the electrical ground connections<br />
of the power utility, telephone lines and internal metallic water pipe system, if present,<br />
are connected together. This precaution may be particularly important in rural areas.<br />
Caution: Users should not attempt to make such connections themselves, but should<br />
contact the appropriate electric inspection authority, or electrician, as appropriate.<br />
NOTICE: The Ringer Equivalence Number (REN) assigned to each terminal device<br />
provides an indication of the maximum number of terminals allowed to be connected<br />
to a telephone interface. The termination on an interface may consist of any<br />
combination of devices subject only to the requirement that the sum of the Ringer<br />
Equivalence Numbers of all the devices does not exceed 5.<br />
AUSTRALIA (version <strong>CRD</strong><strong>1700</strong>-10MA)<br />
The Australian Ringer Equivalence Number (REN) of this device is 0.1. The REN<br />
value is a guide to the maximum number of telecommunications devices that can be<br />
connected together, in parallel, to one telephone line. The maximum permitted REN<br />
value is 3.0 and hence the sum REN value of all connected devices must not exceed<br />
3.0.<br />
EUROPE<br />
The equipment meets European Directive requirements for pan-European single<br />
terminal connection to the Public Switched Telephone Network (PSTN) using DTMF<br />
signalling (tone dial). However, due to differences between the individual PSTN's<br />
provided in different countries, this does not, of itself, give an unconditional assurance<br />
of successful operation on every PSTN network termination point.<br />
Note for Switzerland - Problems may be encountered due to Advice of Charge (AoC)<br />
tone bursts used for metering/ billing purposes. To avoid difficulties a cable or adapter<br />
containing an AoC 12kHz filter is necessary. In case of difficulty, please contact your<br />
equipment supplier for advice.<br />
In the event of any problems, you should contact your equipment supplier in the first<br />
instance.<br />
Parallel Equipment loading in Europe<br />
The Loading Factor (LF) is low at 22 Loading Units (LU) and should allow for the<br />
operation of several parallel connected equipment on the telephone line, should the<br />
application permit. The total loading of an installation can be obtained by adding the<br />
LU values of connected equipment. This can then be compared with the LF value that<br />
the telephone network can support as given by the operator of the telephone network.<br />
The total equipment LF should be less than the network LF to avoid risking a<br />
degradation in the equipment performance. (e.g. 4 items similar to the <strong>CRD</strong><strong>1700</strong>-<br />
<strong>1000M</strong> modem specification of 22 LU will operate on a network terminating point that<br />
can support 88 LU.)<br />
15
C R D 1 7 0 0 - 1 0 0 0 M<br />
DECLARATION OF CONFORMITY<br />
We,<br />
of<br />
<strong>Symbol</strong> Technologies, Inc.<br />
One <strong>Symbol</strong> Plaza, Holtsville, NY 11742-1300, USA<br />
declare under our sole responsibility that this product:<br />
1. Meets the essential requirements of Directive 1999/5/EC (R&TTE) and conforms to the standards listed below. The<br />
procedures detailed in Annex II of the directive have been followed.<br />
2. Is designed to interwork with the following Public Switched Telephone Networks:<br />
Austria, Belgium, Denmark, Finland, France, Germany, Greece, Iceland, Ireland, Italy, Liechtenstein, Luxembourg,<br />
Netherlands, Norway, Portugal, Spain, Sweden, Switzerland, United Kingdom.<br />
to which this declaration relates, is in conformity with the following standards and/or<br />
other normative documents.<br />
ETS TBR21: 1998<br />
EN 60950: 1992 + A1-A4, A11<br />
EN 55022: 1998 (Class B)<br />
EN 55024: 1998<br />
Dornu Narnor<br />
(name)<br />
Senior Director, Regulatory<br />
(title)<br />
September 2000<br />
(signature of authorised person)<br />
(date)<br />
16
Q u i c k R e f e r e n c e<br />
Warranty<br />
<strong>Symbol</strong> Technologies, Inc. (“<strong>Symbol</strong>”) manufactures its hardware products in accordance with<br />
industry-standard practices. <strong>Symbol</strong> warrants that for a period of twelve (12) months from date of<br />
shipment, products will be free from defects in materials and workmanship.<br />
This warranty is provided to the original owner only and is not transferable to any third party. It shall<br />
not apply to any product (i) which has been repaired or altered unless done or approved by <strong>Symbol</strong>,<br />
(ii) which has not been maintained in accordance with any operating or handling instructions<br />
supplied by <strong>Symbol</strong>, (iii) which has been subjected to unusual physical or electrical stress, misuse,<br />
abuse, power shortage, negligence or accident or (iv) which has been used other than in<br />
accordance with the product operating and handling instructions. Preventive maintenance is the<br />
responsibility of customer and is not covered under this warranty.<br />
Wear items and accessories having a <strong>Symbol</strong> serial number, will carry a 90-day limited warranty.<br />
Non-serialized items will carry a 30-day limited warranty.<br />
Warranty Coverage and Procedure<br />
During the warranty period, <strong>Symbol</strong> will repair or replace defective products returned to <strong>Symbol</strong>’s<br />
manufacturing plant in the US. For warranty service in North America, call the <strong>Symbol</strong> Support<br />
Center at 1-800-653-5350. International customers should contact the local <strong>Symbol</strong> office or<br />
support center. If warranty service is required, <strong>Symbol</strong> will issue a Return Material Authorization<br />
Number. Products must be shipped in the original or comparable packaging, shipping and<br />
insurance charges prepaid. <strong>Symbol</strong> will ship the repaired or replacement product freight and<br />
insurance prepaid in North America. Shipments from the US or other locations will be made F.O.B.<br />
<strong>Symbol</strong>’s manufacturing plant.<br />
<strong>Symbol</strong> will use new or refurbished parts at its discretion and will own all parts removed from<br />
repaired products. Customer will pay for the replacement product in case it does not return the<br />
replaced product to <strong>Symbol</strong> within 3 days of receipt of the replacement product. The process for<br />
return and customer’s charges will be in accordance with <strong>Symbol</strong>’s Exchange Policy in effect at the<br />
time of the exchange.<br />
Customer accepts full responsibility for its software and data including the appropriate backup<br />
thereof.<br />
Repair or replacement of a product during warranty will not extend the original warranty term.<br />
<strong>Symbol</strong>’s Customer Service organization offers an array of service plans, such as on-site, depot, or<br />
phone support, that can be implemented to meet customer’s special operational requirements and<br />
are available at a substantial discount during warranty period.<br />
General<br />
Except for the warranties stated above, <strong>Symbol</strong> disclaims all warranties, express or implied, on<br />
products furnished hereunder, including without limitation implied warranties of merchantability and<br />
fitness for a particular purpose. The stated express warranties are in lieu of all obligations or<br />
liabilities on part of <strong>Symbol</strong> for damages, including without limitation, special, indirect, or<br />
consequential damages arising out of or in connection with the use or performance of the product.<br />
Seller’s liability for damages to buyer or others resulting from the use of any product, shall in no way<br />
exceed the purchase price of said product, except in instances of injury to persons or property.<br />
Some states (or jurisdictions) do not allow the exclusion or limitation of incidental or consequential<br />
damages, so the proceeding exclusion or limitation may not apply to you.<br />
17
Service Information<br />
Before you use the unit, it must be configured to operate in your facility’s network and<br />
run your applications.<br />
If you have a problem running your unit or using your equipment, contact your<br />
facility’s Technical or Systems Support. If there is a problem with the equipment, they<br />
will contact the <strong>Symbol</strong> Support Center:<br />
United States 1-800-653-5350 Canada 905-629-7226<br />
United Kingdom 0800 328 2424 Asia/Pacific 337-6588<br />
Australia 1-800-672-906 Austria 1-505-5794<br />
Denmark 7020-1718 Finland 9 5407 580<br />
France 01-40-96-52-21 Germany 6074-49020<br />
Italy 2-484441 Mexico 5-520-1835<br />
Netherlands 315-27<strong>1700</strong> Norway 66810600<br />
South Africa 11-4405668 Spain 9-1-320-39-09<br />
Sweden 84452900<br />
Latin America Sales Support<br />
1-800-347-0178 Inside US<br />
+1-561-483-1275 Outside US<br />
Europe/Mid-East Distributor Operations Contact local distributor or call<br />
+44 208 945 7360<br />
72-40933-02<br />
Revision A— October 2000<br />
<strong>Symbol</strong> Technologies, Inc. One <strong>Symbol</strong> Plaza Holtsville, NY 11742-1300


![MC55 Regulatory Guide [Spanish] (P/N 72-108860 ... - Enterprise](https://img.yumpu.com/14574395/1/190x133/mc55-regulatory-guide-spanish-p-n-72-108860-enterprise.jpg?quality=85)
![ES400 Regulatory Guide [Spanish] (P/N 72-134312-01ES Rev. A)](https://img.yumpu.com/14415156/1/190x127/es400-regulatory-guide-spanish-p-n-72-134312-01es-rev-a.jpg?quality=85)
![MC35 Regulatory Information [Spanish] - Symbol](https://img.yumpu.com/14415086/1/190x143/mc35-regulatory-information-spanish-symbol.jpg?quality=85)