Interactive Program Guide - Cogeco
Interactive Program Guide - Cogeco
Interactive Program Guide - Cogeco

You also want an ePaper? Increase the reach of your titles
YUMPU automatically turns print PDFs into web optimized ePapers that Google loves.
DIGITAL VIDEO RECORDING 32<br />
Manage Your Personal Video Library<br />
A recorded program remains in your personal video library until you decide to delete it unless you have it set to<br />
delete when space is needed. Your DVR will record and store up to 90 hours of standard definition programming<br />
and up to 20 hours of High Definition programming*. There are several options for making the most efficient use<br />
of DVR storage space:<br />
To Delete Recordings<br />
From a Recorded <strong>Program</strong> Information screen, select the Icon to delete<br />
the recording. Select the Icon to modify the Delete Priority, which gives<br />
you additional options such as deleting the recording when space is needed.<br />
Copy Recordings to a VCR or DVD<br />
After you watch a recording, decide to either erase it or keep it permanently<br />
by transferring it to a VCR or DVD.<br />
When you copy recordings to a VCR or DVD, make sure that the recording is displayed on the TV screen for the entire<br />
time the recording is being copied. If you change channels or display guide screens during the copying process, your<br />
tape copy will contain these images and you may not have a complete copy of the recording.<br />
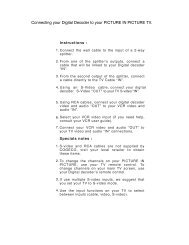
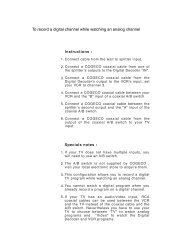
1. Connect the RCA Jacks connection on the back of the DVR to your VCR or DVD Video In.<br />
2. Put a tape in your VCR or DVD in your DVD recorder.<br />
3. Access your list of Recorded <strong>Program</strong>s.<br />
4. Highlight a program from your list and press OK/Select or INFO to select the recorded program you want transferred.<br />
5. From the Information Screen, select to restart from the beginning.<br />
6. Start recording on the VCR or DVD when playback begins.<br />
7. As the recording plays, it is copied to your VCR or DVD.<br />
Note: Refer to your VCR or DVD User Manual for specific instructions.<br />
Recording Low and Full Notices<br />
To help you manage your personal video library, i-<strong>Guide</strong> will advise you<br />
with an on-screen notice when the available memory gets low or full.<br />
If recording space becomes full during a recording, the recording will stop.<br />
Make sure you have enough recording space to record the entire program<br />
before you begin to avoid missing part of the program.<br />
Modify Recording Options<br />
i-<strong>Guide</strong> gives you flexibility to manage your personal video library. You can<br />
change your Recording Options at any time, as often as you like.<br />
From the Main Menu or Quick Menu (or from LIST on the remote**)<br />
Select DVR, then select Future Recordings to see a list of your Scheduled<br />
Recordings. Highlight a program title and press OK/Select or INFO.<br />
* Recording HD programing requires a DVR connection to a HD television.<br />
** May not appear on all remotes.<br />
Select the Icon from the <strong>Program</strong> Information Screen. Select the<br />
Icon to change the Recording Options or select the Icon to delete this<br />
program from your list of Future Recordings.<br />
Use the buttons on your remote to change Recording Options:<br />
Change the frequency of the recording, such as every day<br />
or once a week.<br />
Specify how many recordings to save.<br />
Set a Save Until parameter, either until you delete or delete<br />
automatically when space is needed.<br />
Change the start and end times in order to catch every<br />
minute of a program, even if it runs over.<br />
From Listings<br />
Select your Scheduled Recording in the listings; it will be indicated by the red dot in the Instant Info.<br />
Press OK/Select or INFO and select<br />
the Icon to change your options<br />
or delete the Scheduled Recording.<br />
From here, select Icon to cancel<br />
the recording, or select Icon to<br />
see all the Recording Options.<br />
Recording Notices<br />
Recording Starting Notice<br />
Before a Scheduled Recording begins, a notice will appear on-screen giving<br />
you the opportunity to confirm or cancel the Scheduled Recording. If you<br />
don’t do anything when the recording is scheduled to start, the DVR will<br />
automatically tune to the channel and begin recording. Live TV<br />
programming that has been temporarily recorded will be erased once<br />
the Scheduled Recording starts.<br />
Recording Stopped Notice<br />
Changing the channel during a recording will stop the recording. You will<br />
see a notice confirming whether you want to stop the recording and change channels or continue recording. You<br />
can SWAP to watch live TV while continuing a current recording. (See SWAP section of this manual for more<br />
information.)<br />
Swap Icon on Stop Recording Notice<br />
The SWAP Icon will appear on the Stop Recording Notice screen if you<br />
attempt to change the channel while both tuners are recording.*<br />
Select the Icon and press OK/Select to SWAP to view another<br />
channel on the other tuner.<br />
Select the Icon and press press OK/Select to stop the recording and<br />
change the channel.<br />
<strong>Guide</strong> Tip<br />
DVR is not a long-term storage device. To maximize your storage space, review the contents of your library regularly<br />
and discard the recordings you no longer wish to save. See “Managing Your Personal Video Library” in this manual.<br />
* Not available with single-tuner DVR<br />
DIGITAL VIDEO RECORDING<br />
33