Wire Rope Hoists _ Operating and Maintenance ... - STAHL-POLSKA
Wire Rope Hoists _ Operating and Maintenance ... - STAHL-POLSKA
Wire Rope Hoists _ Operating and Maintenance ... - STAHL-POLSKA

Create successful ePaper yourself
Turn your PDF publications into a flip-book with our unique Google optimized e-Paper software.
3 Installation<br />
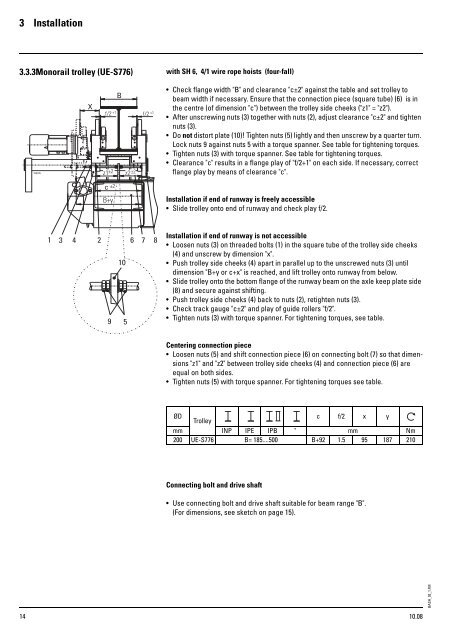
3.3.3Monorail trolley (UE-S776)<br />
14<br />
with SH 6, 4/1 wire rope hoists (four-fall)<br />
Check flange width "B" <strong>and</strong> clearance "c±2" against the table <strong>and</strong> set trolley to<br />
beam width if necessary. Ensure that the connection piece (square tube) (6) is in<br />
the centre (of dimension "c") between the trolley side cheeks ("z1" = "z2").<br />
After unscrewing nuts (3) together with nuts (2), adjust clearance "c±2" <strong>and</strong> tighten<br />
nuts (3).<br />
Do not distort plate (10)! Tighten nuts (5) lightly <strong>and</strong> then unscrew by a quarter turn.<br />
Lock nuts 9 against nuts 5 with a torque spanner. See table for tightening torques.<br />
Tighten nuts (3) with torque spanner. See table for tightening torques.<br />
Clearance "c" results in a flange play of "f/2+1" on each side. If necessary, correct<br />
flange play by means of clearance "c".<br />
Installation if end of runway is freely accessible<br />
Slide trolley onto end of runway <strong>and</strong> check play f/2.<br />
Installation if end of runway is not accessible<br />
Loosen nuts (3) on threaded bolts (1) in the square tube of the trolley side cheeks<br />
(4) <strong>and</strong> unscrew by dimension "x".<br />
Push trolley side cheeks (4) apart in parallel up to the unscrewed nuts (3) until<br />
dimension "B+y or c+x" is reached, <strong>and</strong> lift trolley onto runway from below.<br />
Slide trolley onto the bottom flange of the runway beam on the axle keep plate side<br />
(8) <strong>and</strong> secure against shifting.<br />
Push trolley side cheeks (4) back to nuts (2), retighten nuts (3).<br />
Check track gauge "c±2" <strong>and</strong> play of guide rollers "f/2".<br />
Tighten nuts (3) with torque spanner. For tightening torques, see table.<br />
Centering connection piece<br />
Loosen nuts (5) <strong>and</strong> shift connection piece (6) on connecting bolt (7) so that dimensions<br />
"z1" <strong>and</strong> "z2" between trolley side cheeks (4) <strong>and</strong> connection piece (6) are<br />
equal on both sides.<br />
Tighten nuts (5) with torque spanner. For tightening torques see table.<br />
ØD<br />
Trolley<br />
c f/2 x y<br />
mm INP IPE IPB " mm Nm<br />
200 UE-S776 B= 185....500 B+92 1.5 95 187 210<br />
Connecting bolt <strong>and</strong> drive shaft<br />
Use connecting bolt <strong>and</strong> drive shaft suitable for beam range "B".<br />
(For dimensions, see sketch on page 15).<br />
10.08<br />
BASH_02_1.FM