Wire Rope Hoists _ Operating and Maintenance ... - STAHL-POLSKA
Wire Rope Hoists _ Operating and Maintenance ... - STAHL-POLSKA
Wire Rope Hoists _ Operating and Maintenance ... - STAHL-POLSKA

You also want an ePaper? Increase the reach of your titles
YUMPU automatically turns print PDFs into web optimized ePapers that Google loves.
6 Inspection <strong>and</strong> maintenance<br />
40<br />
a/b [mm] c<br />
50 Hz 60 Hz [mm]<br />
130 150 40<br />
70 80 20<br />
40 50 10<br />
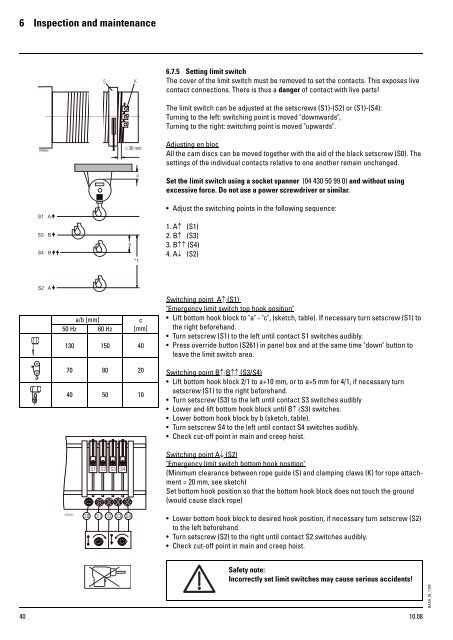
6.7.5 Setting limit switch<br />
The cover of the limit switch must be removed to set the contacts. This exposes live<br />
contact connections. There is thus a danger of contact with live parts!<br />
The limit switch can be adjusted at the setscrews (S1)-(S2) or (S1)-(S4):<br />
Turning to the left: switching point is moved "downwards",<br />
Turning to the right: switching point is moved "upwards".<br />
Adjusting en bloc<br />
All the cam discs can be moved together with the aid of the black setscrew (S0). The<br />
settings of the individual contacts relative to one another remain unchanged.<br />
Set the limit switch using a socket spanner (04 430 50 99 0) <strong>and</strong> without using<br />
excessive force. Do not use a power screwdriver or similar.<br />
Adjust the switching points in the following sequence:<br />
1. A↑ (S1)<br />
2. B↑ (S3)<br />
3. B↑↑ (S4)<br />
4. A↓ (S2)<br />
Switching point A↑ (S1)<br />
"Emergency limit switch top hook position"<br />
Lift bottom hook block to "a" - "c", (sketch, table). If necessary turn setscrew (S1) to<br />
the right beforeh<strong>and</strong>.<br />
Turn setscrew (S1) to the left until contact S1 switches audibly.<br />
Press override button (S261) in panel box <strong>and</strong> at the same time "down" button to<br />
leave the limit switch area.<br />
Switching point B↑/B↑↑ (S3/S4)<br />
Lift bottom hook block 2/1 to a+10 mm, or to a+5 mm for 4/1, if necessary turn<br />
setscrew (S1) to the right beforeh<strong>and</strong>.<br />
Turn setscrew (S3) to the left until contact S3 switches audibly<br />
Lower <strong>and</strong> lift bottom hook block until B↑ (S3) switches.<br />
Lower bottom hook block by b (sketch, table).<br />
Turn setscrew S4 to the left until contact S4 switches audibly.<br />
Check cut-off point in main <strong>and</strong> creep hoist.<br />
Switching point A↓ (S2)<br />
"Emergency limit switch bottom hook position"<br />
(Minimum clearance between rope guide (S) <strong>and</strong> clamping claws (K) for rope attachment<br />
= 20 mm, see sketch)<br />
Set bottom hook position so that the bottom hook block does not touch the ground<br />
(would cause slack rope)<br />
Lower bottom hook block to desired hook position, if necessary turn setscrew (S2)<br />
to the left beforeh<strong>and</strong>.<br />
Turn setscrew (S2) to the right until contact S2 switches audibly.<br />
Check cut-off point in main <strong>and</strong> creep hoist.<br />
Safety note:<br />
Incorrectly set limit switches may cause serious accidents!<br />
10.08<br />
BASH_02_1.FM