Instructions for web - Gifkins Dovetail Jig
Instructions for web - Gifkins Dovetail Jig
Instructions for web - Gifkins Dovetail Jig

Create successful ePaper yourself
Turn your PDF publications into a flip-book with our unique Google optimized e-Paper software.
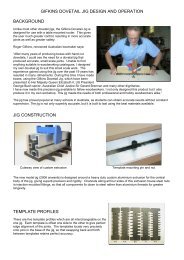
1. For this to work, you must start by positioning the board symmetrically across the<br />
fingers.<br />
2. As described in note 31 (page 10), to position the stop you use a spacer only ½ as thick as<br />
your saw kerf. You then use a spacer the same thickness as your saw kerf <strong>for</strong> all the<br />
dovetailing.<br />
3. It is vital that you mark a line on all the boards where you are going to add the extra<br />
width to allow <strong>for</strong> the saw kerf.<br />
4. In all situations you cut from the stop up to the line with the spacer in.<br />
5. In all situations you cut the rest of the joint with the spacer out (ie. from the line up to<br />
the edge away from the stop)<br />
6. If you are making the pin wider (as above), then you cut the dovetail slot where the line<br />
is TWICE, once with the spacer in and once with the spacer out (this is when using the<br />
dovetail cutter).<br />
7. If you are making the gap between the pins wider, then you cut the gap between the pins<br />
twice, once with the spacer in and once with the spacer out (this is when using the<br />
straight cutter).<br />
There are lots of different situations depending on the size of the project, the template<br />
you are using and how far down you want to cut the lid off, so it is important to practice on<br />
offcuts to see how your particular situation will work.<br />
24