Instructions for web - Gifkins Dovetail Jig
Instructions for web - Gifkins Dovetail Jig
Instructions for web - Gifkins Dovetail Jig

Create successful ePaper yourself
Turn your PDF publications into a flip-book with our unique Google optimized e-Paper software.
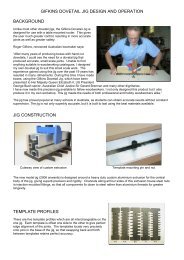
INITIAL SET-UP OF JIG<br />
Follow steps 1 to 9 under “CUTTING DOVETAIL JOINTS” below. If the joint you cut is too loose, then remove<br />
some of the shims from behind the backing board on the tapered finger side. If the joint is too tight, add shims to<br />
get a looser fit (10 extra shims are provided). Now cut another set of pins (steps 7 to 9). Repeat this process<br />
until the required fit is obtained. You only need to do this adjustment the first time you use the jig.<br />
NOTE: Each shim is 0.25 mm thick. Adding one shim DECREASES the width of the pin by only 0.08 mm. This gives<br />
very fine adjustment, but it also means that adding or subtracting one shim makes very little difference.<br />
Once the adjustment has been made you should get exactly the same fit every time you use the jig.<br />
IMPORTANT: It is vital that you have at least 2 mm of bearing (on the router bit) above the<br />
table, <strong>for</strong> the template to run against. SEE NOTE 27 if using stock less than 7 mm thick with an<br />
“A” template OR less than 14 mm with a “B”<br />
CUTTING DOVETAIL JOINTS<br />
1 Mark the outside face of all boards (i.e. outside faces of the box or drawer). It is also useful to mark the<br />
bottom edges of the box or drawer.<br />
2 With the dovetail cutter in the router, adjust the height of the cutter so the top of the cutter is above the<br />
template by the thickness of the timber you wish to dovetail. Be<strong>for</strong>e turning the router on, check that the<br />
bearing on the cutter is AT LEAST 2 mm above the table. See NOTES 10, 11 & 27<br />
3 Stand the board <strong>for</strong> the dovetail slots on its end above the straight fingers (as shown in the drawing on page<br />
1), with the outside face away from the jig. Adjust the board sideways to get the layout of the joint that you<br />
want. See NOTES 17 & 30.<br />
4 Clamp work securely in place. Make sure clamps are safely above the cutter. See NOTE 16.<br />
5 Set the stop against the side of the workpiece and lock it in place. Do not move the stop until both halves of<br />
the joint are cut.<br />
6 Start the router, and with the bearing on the cutter running against the template on the jig, cut all the<br />
dovetail slots. See NOTE 25. This is now the first half of the joint finished. Remove the board with the<br />
dovetail slots. NOTE: The first time the jig is used, the router bit will cut into the craftwood backing board<br />
on the jig.<br />
7 Stand the board <strong>for</strong> the pins on its end above the tapered fingers (on the other side of the jig), with the<br />
outside face away from the jig and its edge against the stop. Use the same EDGE of the stop as used <strong>for</strong> the<br />
dovetail slots, but on the opposite side of the jig. See NOTE 9. Clamp securely in place.<br />
8 Fit the straight cutter to the router (adjust the height as in step 2 above if necessary). Once again, check<br />
that the clamp is safely above the cutter.<br />
9 Start the router, and with the bearing on the cutter running against the template on the jig, cut all the pins.<br />
See NOTE 26. Once again, the router bit will cut into the backing board the first time the jig is used.<br />
2