Instructions for web - Gifkins Dovetail Jig
Instructions for web - Gifkins Dovetail Jig
Instructions for web - Gifkins Dovetail Jig

Create successful ePaper yourself
Turn your PDF publications into a flip-book with our unique Google optimized e-Paper software.
11 UNEQUAL THICKNESS. If the two pieces of timber to be dovetailed are unequal thickness, then the<br />
height of the dovetail cutter should be set to the thickness of the stock used <strong>for</strong> the pins and the height<br />
of the straight cutter should be set to the thickness of the stock used <strong>for</strong> the dovetails. If this isn’t<br />
obvious then look at a joint to see what is going on.<br />
12 SHIMS. The fit of the joint can be modified by adding shims (makes the joint looser) or by removing<br />
shims (makes the joint tighter). The shims are located behind the craftwood backing board on the tapered<br />
finger side of the jig. When you get your cutters re-sharpened, you may need to add more shims.<br />
NOTE: Each shim is 0.25 mm thick. Adding one shim DECREASES the width of the pin by only 0.08 mm.<br />
This gives very fine adjustment, but it also means that adding or subtracting one shim makes very little<br />
difference.<br />
Because the shims adjust the size of the pins, it is best to cut the pins after the dovetail slots. This<br />
makes it quicker to remedy errors if the jig is out of adjustment.<br />
13 BACKING BOARDS. The craftwood backing boards support the inside of the cut to prevent tearout on<br />
the inside of the joint. The router cuts into this craftwood the first time the jig is used. If you are using<br />
the jig <strong>for</strong> thinner timber after using it <strong>for</strong> thicker timber, then you may need to turn over or replace the<br />
craftwood to prevent tearout on the inside of your project. If replacing it, use only 12 mm (1/2”)<br />
craftwood. It may be necessary to adjust the shims if the new craftwood is not exactly the same<br />
thickness as the original.<br />
14 CHANGING TEMPLATES. If changing the template to a different profile, it is necessary to change the<br />
backing boards so that the back of the cut is fully supported. It is worth having a pair of backing boards<br />
<strong>for</strong> each template and to keep them <strong>for</strong> that template only.<br />
15 CUTTERS. It is a good idea to have a pair of cutters put aside with the jig, and to not use the cutters <strong>for</strong><br />
other jobs. If you have more than one set of cutters, keep them clearly marked, so that you know which<br />
set the jig is adjusted <strong>for</strong>.<br />
16 CLAMPS. If the workpiece is wider than about 100 mm use a clamp from both sides. When clamping the<br />
workpiece to the jig, check that the end of the board is sitting flush against the template. Make sure the<br />
clamps are safely above the cutter BEFORE starting the router.<br />
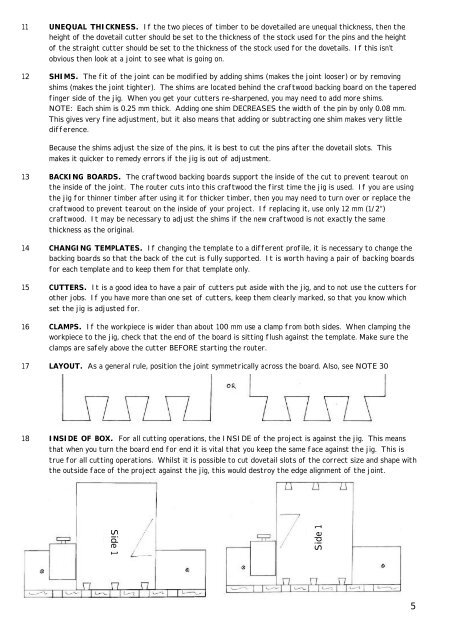
17 LAYOUT. As a general rule, position the joint symmetrically across the board. Also, see NOTE 30<br />
18 INSIDE OF BOX. For all cutting operations, the INSIDE of the project is against the jig. This means<br />
that when you turn the board end <strong>for</strong> end it is vital that you keep the same face against the jig. This is<br />
true <strong>for</strong> all cutting operations. Whilst it is possible to cut dovetail slots of the correct size and shape with<br />
the outside face of the project against the jig, this would destroy the edge alignment of the joint.<br />
Side 1<br />
Side 1<br />
5