Instructions for web - Gifkins Dovetail Jig
Instructions for web - Gifkins Dovetail Jig
Instructions for web - Gifkins Dovetail Jig

Create successful ePaper yourself
Turn your PDF publications into a flip-book with our unique Google optimized e-Paper software.
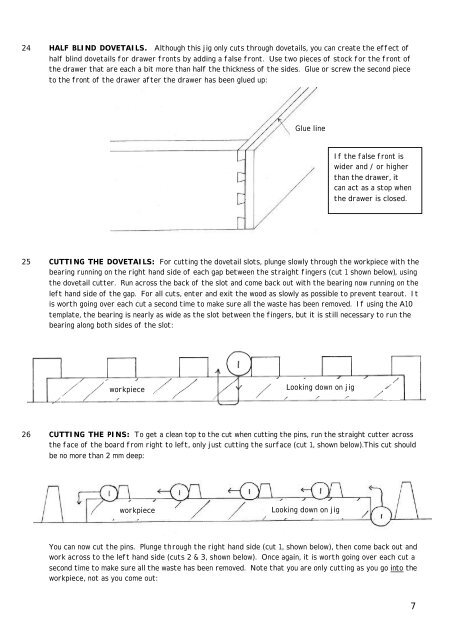
24 HALF BLIND DOVETAILS. Although this jig only cuts through dovetails, you can create the effect of<br />
half blind dovetails <strong>for</strong> drawer fronts by adding a false front. Use two pieces of stock <strong>for</strong> the front of<br />
the drawer that are each a bit more than half the thickness of the sides. Glue or screw the second piece<br />
to the front of the drawer after the drawer has been glued up:<br />
25 CUTTING THE DOVETAILS: For cutting the dovetail slots, plunge slowly through the workpiece with the<br />
bearing running on the right hand side of each gap between the straight fingers (cut 1 shown below), using<br />
the dovetail cutter. Run across the back of the slot and come back out with the bearing now running on the<br />
left hand side of the gap. For all cuts, enter and exit the wood as slowly as possible to prevent tearout. It<br />
is worth going over each cut a second time to make sure all the waste has been removed. If using the A10<br />
template, the bearing is nearly as wide as the slot between the fingers, but it is still necessary to run the<br />
bearing along both sides of the slot:<br />
26 CUTTING THE PINS: To get a clean top to the cut when cutting the pins, run the straight cutter across<br />
the face of the board from right to left, only just cutting the surface (cut 1, shown below).This cut should<br />
be no more than 2 mm deep:<br />
Glue line<br />
workpiece Looking down on jig<br />
workpiece Looking down on jig<br />
If the false front is<br />
wider and / or higher<br />
than the drawer, it<br />
can act as a stop when<br />
the drawer is closed.<br />
You can now cut the pins. Plunge through the right hand side (cut 1, shown below), then come back out and<br />
work across to the left hand side (cuts 2 & 3, shown below). Once again, it is worth going over each cut a<br />
second time to make sure all the waste has been removed. Note that you are only cutting as you go into the<br />
workpiece, not as you come out:<br />
7