Instructions for web - Gifkins Dovetail Jig
Instructions for web - Gifkins Dovetail Jig
Instructions for web - Gifkins Dovetail Jig

Create successful ePaper yourself
Turn your PDF publications into a flip-book with our unique Google optimized e-Paper software.
NOTES: (see page 20 <strong>for</strong> additional notes)<br />
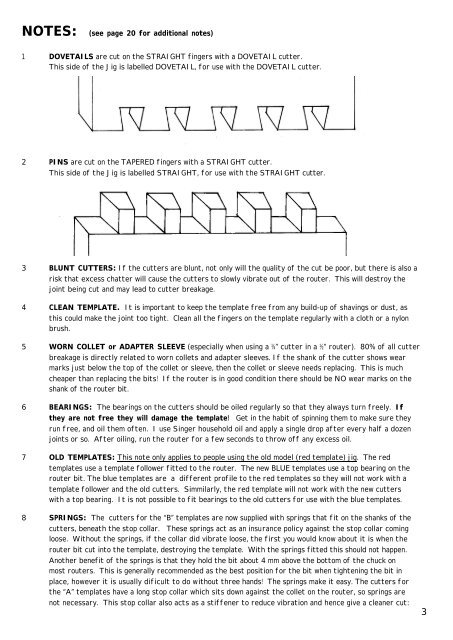
1 DOVETAILS are cut on the STRAIGHT fingers with a DOVETAIL cutter.<br />
This side of the <strong>Jig</strong> is labelled DOVETAIL, <strong>for</strong> use with the DOVETAIL cutter.<br />
2 PINS are cut on the TAPERED fingers with a STRAIGHT cutter.<br />
This side of the <strong>Jig</strong> is labelled STRAIGHT, <strong>for</strong> use with the STRAIGHT cutter.<br />
3 BLUNT CUTTERS: If the cutters are blunt, not only will the quality of the cut be poor, but there is also a<br />
risk that excess chatter will cause the cutters to slowly vibrate out of the router. This will destroy the<br />
joint being cut and may lead to cutter breakage.<br />
4 CLEAN TEMPLATE. It is important to keep the template free from any build-up of shavings or dust, as<br />
this could make the joint too tight. Clean all the fingers on the template regularly with a cloth or a nylon<br />
brush.<br />
5 WORN COLLET or ADAPTER SLEEVE (especially when using a ¼” cutter in a ½” router). 80% of all cutter<br />
breakage is directly related to worn collets and adapter sleeves. If the shank of the cutter shows wear<br />
marks just below the top of the collet or sleeve, then the collet or sleeve needs replacing. This is much<br />
cheaper than replacing the bits! If the router is in good condition there should be NO wear marks on the<br />
shank of the router bit.<br />
6 BEARINGS: The bearings on the cutters should be oiled regularly so that they always turn freely. If<br />
they are not free they will damage the template! Get in the habit of spinning them to make sure they<br />
run free, and oil them often. I use Singer household oil and apply a single drop after every half a dozen<br />
joints or so. After oiling, run the router <strong>for</strong> a few seconds to throw off any excess oil.<br />
7 OLD TEMPLATES: This note only applies to people using the old model (red template) jig. The red<br />
templates use a template follower fitted to the router. The new BLUE templates use a top bearing on the<br />
router bit. The blue templates are a different profile to the red templates so they will not work with a<br />
template follower and the old cutters. Simmilarly, the red template will not work with the new cutters<br />
with a top bearing. It is not possible to fit bearings to the old cutters <strong>for</strong> use with the blue templates.<br />
8 SPRINGS: The cutters <strong>for</strong> the “B” templates are now supplied with springs that fit on the shanks of the<br />
cutters, beneath the stop collar. These springs act as an insurance policy against the stop collar coming<br />
loose. Without the springs, if the collar did vibrate loose, the first you would know about it is when the<br />
router bit cut into the template, destroying the template. With the springs fitted this should not happen.<br />
Another benefit of the springs is that they hold the bit about 4 mm above the bottom of the chuck on<br />
most routers. This is generally recommended as the best position <strong>for</strong> the bit when tightening the bit in<br />
place, however it is usually dificult to do without three hands! The springs make it easy. The cutters <strong>for</strong><br />
the “A” templates have a long stop collar which sits down against the collet on the router, so springs are<br />
not necessary. This stop collar also acts as a stiffener to reduce vibration and hence give a cleaner cut:<br />
3