S h e f f i e l d Wood Stove - Lopi
S h e f f i e l d Wood Stove - Lopi
S h e f f i e l d Wood Stove - Lopi

You also want an ePaper? Increase the reach of your titles
YUMPU automatically turns print PDFs into web optimized ePapers that Google loves.
32 Optional Equipment<br />
.<br />
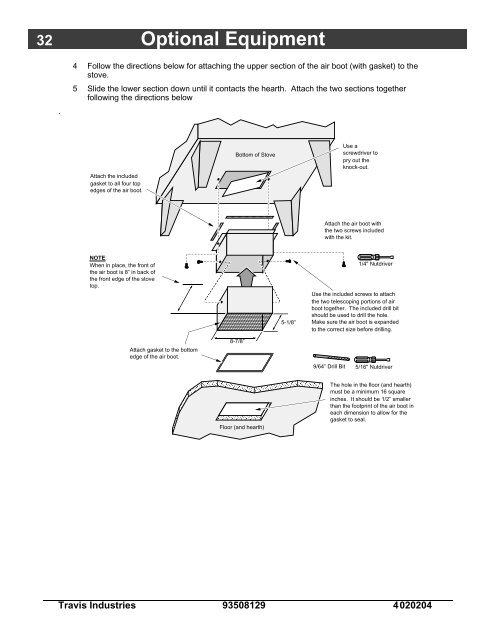
4 Follow the directions below for attaching the upper section of the air boot (with gasket) to the<br />
stove.<br />
5 Slide the lower section down until it contacts the hearth. Attach the two sections together<br />
following the directions below<br />
Attach the included<br />
gasket to all four top<br />
edges of the air boot.<br />
NOTE:<br />
When in place, the front of<br />
the air boot is 8” in back of<br />
the front edge of the stove<br />
top.<br />
Attach gasket to the bottom<br />
edge of the air boot.<br />
Bottom of <strong>Stove</strong><br />
<br />
<br />
<br />
8-7/8”<br />
Travis Industries 93508129 4020204<br />
5-1/8”<br />
Attach the air boot with<br />
the two screws included<br />
with the kit.<br />
1/4" Nutdriver<br />
Use the included screws to attach<br />
the two telescoping portions of air<br />
boot together. The included drill bit<br />
should be used to drill the hole.<br />
Make sure the air boot is expanded<br />
to the correct size before drilling.<br />
9/64” Drill Bit<br />
<br />
<br />
<br />
<br />
<br />
Floor (and hearth)<br />
<br />
<br />
<br />
Use a<br />
screwdriver to<br />
pry out the<br />
knock-out.<br />
5/16" Nutdriver<br />
The hole in the floor (and hearth)<br />
must be a minimum 16 square<br />
inches. It should be 1/2” smaller<br />
than the footprint of the air boot in<br />
each dimension to allow for the<br />
gasket to seal.