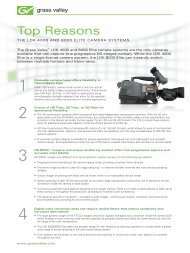
K2 Dyno Replay System Quick Start Guide - Grass Valley
K2 Dyno Replay System Quick Start Guide - Grass Valley
K2 Dyno Replay System Quick Start Guide - Grass Valley

Create successful ePaper yourself
Turn your PDF publications into a flip-book with our unique Google optimized e-Paper software.
<strong>K2</strong> <strong>Dyno</strong><br />
<strong>Replay</strong> <strong>System</strong><br />
<strong>Quick</strong> <strong>Start</strong> <strong>Guide</strong><br />
Software Version 2.0<br />
071-8681-03<br />
May 2011
Affiliate with the N.V. KEMA in The Netherlands<br />
CERTIFICATE<br />
Certificate Number: 510040.001<br />
The Quality <strong>System</strong> of:<br />
Thomson Inc, and its wordwide <strong>Grass</strong> <strong>Valley</strong> division affiliates DBA<br />
GRASS VALLEY<br />
Headquarters<br />
400 Providence Mine Rd<br />
Nevada City, CA 95959<br />
United States<br />
Kapittelweg 10<br />
4827 HG Breda<br />
The Nederlands<br />
Rue du Clos Courtel<br />
CS 31719<br />
35517 Cesson-Sevigné Cedex<br />
France<br />
40 Rue de Bray<br />
2 Rue des Landelles<br />
35510 Cesson Sevigné<br />
France<br />
Carl-Benz-Strasse 6-8<br />
67105 Schifferstadt<br />
Germany<br />
15655 SW Greystone Ct.<br />
Beaverton, OR 97006<br />
United States<br />
7140 Baymeadows Way<br />
Ste 101<br />
Jacksonville, FL 32256<br />
United States<br />
1 rue de l’Hautil<br />
Z.I. des Boutries BP 150<br />
78702 Conflans-Sainte<br />
Honorine Cedex<br />
France<br />
Spinnereistrasse 5<br />
CH-5300 Turgi<br />
Switzerland<br />
Including its implementation, meets the requirements of the standard:<br />
ISO 9001:2008<br />
10 Presidential Way<br />
Suite 300<br />
Woburn, MA 01801<br />
United States<br />
2300 So. Decker Lake Blvd.<br />
Salt Lake City, UT 84119<br />
United States<br />
Technopole Brest-Iroise<br />
Site de la Pointe du Diable<br />
CS 73808<br />
29238 Brest Cedex 3<br />
France<br />
Brunnenweg 9<br />
D-64331 Weiterstadt<br />
Germany<br />
Scope:<br />
The design, manufacture and support of video and audio hardware and software products and<br />
related systems.<br />
This Certificate is valid until: June 14, 2012<br />
This Certificate is valid as of: June 14, 2009<br />
Certified for the first time: June 14, 2000<br />
H. Pierre Sallé<br />
President<br />
KEMA-Registered Quality<br />
The method of operation for quality certification is defined in the KEMA General Terms<br />
And Conditions For Quality And Environmental Management <strong>System</strong>s Certifications.<br />
Integral publication of this certificate is allowed.<br />
KEMA-Registered Quality, Inc.<br />
4377 County Line Road<br />
Chalfont, PA 18914<br />
Ph: (215)997-4519<br />
Fax: (215)997-3809<br />
CRT 001 073004<br />
Accredited By:<br />
ANAB
<strong>K2</strong> <strong>Dyno</strong><br />
<strong>Replay</strong> <strong>System</strong><br />
<strong>Quick</strong> <strong>Start</strong> <strong>Guide</strong><br />
Software Version 2.0<br />
071-8681-03<br />
May 2011
Copyright Copyright © <strong>Grass</strong> <strong>Valley</strong> USA, LLC. All rights reserved. Printed in the United States of<br />
America. Portions of software © 2000 – 2010, Microsoft Corporation. All rights reserved. This<br />
document may not be copied in whole or in part, or otherwise reproduced except as specifically<br />
permitted under U.S. copyright law, without the prior written consent of <strong>Grass</strong> <strong>Valley</strong> USA,<br />
LLC., P.O. Box 59900, Nevada City, California 95959-7900. This product may be covered by<br />
one or more U.S. and foreign patents.<br />
Disclaimer Product options and specifications subject to change without notice. The information in this<br />
manual is furnished for informational use only, is subject to change without notice, and should<br />
not be construed as a commitment by <strong>Grass</strong> <strong>Valley</strong> USA, LLC. <strong>Grass</strong> <strong>Valley</strong> USA, LLC.<br />
assumes no responsibility or liability for any errors or inaccuracies that may appear in this<br />
publication.<br />
U.S. Government<br />
Restricted Rights<br />
Legend<br />
Trademarks and<br />
Logos<br />
Revision Status<br />
Use, duplication, or disclosure by the United States Government is subject to restrictions as set<br />
forth in subparagraph (c)(1)(ii) of the Rights in Technical Data and Computer Software clause<br />
at DFARS 252.277-7013 or in subparagraph c(1) and (2) of the Commercial Computer<br />
Software Restricted Rights clause at FAR 52.227-19, as applicable. Manufacturer is <strong>Grass</strong><br />
<strong>Valley</strong> USA, LLC., P.O. Box 59900, Nevada City, California 95959-7900 U.S.A.<br />
<strong>Grass</strong> <strong>Valley</strong>, STRATUS, <strong>K2</strong>, Aurora, Summit, ChannelFlex, <strong>Dyno</strong>, Solo, ClipStore, Infinity,<br />
Turbo, Profile, Profile XP, NetCentral, NewsBrowse, NewsEdit, NewsQ, NewsShare, NewsQ<br />
Pro, and Media Manager are either registered trademarks or trademarks of <strong>Grass</strong> <strong>Valley</strong> USA,<br />
LLC. in the United States and/or other countries. <strong>Grass</strong> <strong>Valley</strong> USA, LLC. products are covered<br />
by U.S. and foreign patents, issued and pending. Additional information regarding <strong>Grass</strong> <strong>Valley</strong><br />
USA, LLC. trademarks and other proprietary rights may be found at www.grassvalley.com.<br />
Other trademarks and logos used in this document are either registered trademarks or<br />
trademarks of the manufacturers or vendors of the associated products, such as Microsoft®<br />
Windows® operating system, Windows Media® player, Internet Explorer® internet browser,<br />
and SQL Server. <strong>Quick</strong>Time and the <strong>Quick</strong>Time logo are trademarks or registered<br />
trademarks of Apple Computer, Inc., used under license therefrom.<br />
Rev Date Description<br />
June 17, 2009 Initial release of the <strong>K2</strong> <strong>Dyno</strong> <strong>Replay</strong> <strong>System</strong> <strong>Quick</strong> <strong>Start</strong> <strong>Guide</strong> –<br />
071-8681-00<br />
January 28, 2010 Updates for version 1.5 – 071-8681-01<br />
April 13, 2010 Updates for version 1.6 – 071-8681-02<br />
May 16, 2011 Updates for version 2.0 – 071-8681-03<br />
4 <strong>K2</strong> <strong>Dyno</strong> <strong>Replay</strong> <strong>System</strong> <strong>Quick</strong> <strong>Start</strong> <strong>Guide</strong> 16 May 2011
Chapter 1<br />
Installation<br />
This section documents the installation of the bundled <strong>K2</strong> Summit Production<br />
Client and <strong>K2</strong> <strong>Dyno</strong> <strong>Replay</strong> Controller that you buy as a <strong>Dyno</strong>-Pack. If you are<br />
connecting a <strong>K2</strong> Solo Media Server or a <strong>K2</strong> Summit Production Client that is not<br />
part of a <strong>Dyno</strong>-Pack and has not been previously controlled by a <strong>K2</strong> <strong>Dyno</strong> Controller,<br />
refer to the <strong>K2</strong> <strong>Dyno</strong> Controller Installation Manual.<br />
Unpack and check contents<br />
Find the following items in the packaging for the <strong>K2</strong> Summit Production Client.<br />
<strong>K2</strong> Summit Production Client<br />
NOTE: Do not lose the Recovery Flash<br />
Drive that is stored inside the bezel.<br />
It contains the image for this specific<br />
<strong>K2</strong> Summit Production Client.<br />
Rack slides<br />
rass all roup<br />
rass all roup<br />
us s s<br />
us s s<br />
us s us s s s<br />
us s uss s s<br />
us s uss s s<br />
us s us s s s<br />
us s s<br />
rass us s all s roup<br />
rass all roup<br />
rass all roup<br />
rass all roup<br />
rass all roup<br />
rass all roup<br />
Find the following items in the packaging for the <strong>K2</strong> <strong>Dyno</strong> Controller. 1<br />
<strong>K2</strong> <strong>Dyno</strong> <strong>Replay</strong> Controller<br />
Power cord<br />
Recovery Flash Drive<br />
NOTE: Do not lose the Recovery Flash<br />
Drive. It contains the image for this<br />
specific <strong>K2</strong> <strong>Dyno</strong> <strong>Replay</strong> Controller.<br />
1. Optional accessory: AES breakout cables (<strong>K2</strong>-AES-Breakout)<br />
Licenses and<br />
Warranties<br />
Release Notes<br />
Power cords<br />
LTC cables<br />
rass all roup<br />
rass all roup<br />
us s s<br />
us s s<br />
us s us s s s<br />
us s uss s s<br />
us s uss s s<br />
us s us s s s<br />
us s s<br />
rass us s all s roup<br />
rass all roup<br />
rass all roup<br />
rass all roup<br />
rass all roup<br />
rass all roup<br />
Keyboard<br />
16 May 2011 <strong>K2</strong> <strong>Dyno</strong> <strong>Replay</strong> <strong>System</strong> <strong>Quick</strong> <strong>Start</strong> <strong>Guide</strong> 5<br />
Mouse<br />
Licenses and<br />
Warranties<br />
Release Notes
Chapter 1 Installation<br />
Gather additional items<br />
To complete a typical <strong>K2</strong> <strong>Dyno</strong> <strong>Replay</strong> <strong>System</strong>, as referenced in this <strong>Quick</strong> <strong>Start</strong><br />
<strong>Guide</strong>, you must provide the following items:<br />
<strong>System</strong> overview<br />
Two VGA monitors (1280 x<br />
1024 x 32 or greater) and cables<br />
Ethernet cable, either crossover or<br />
straight-through<br />
Video monitors and cables Audio monitoring system<br />
USB keyboard USB mouse<br />
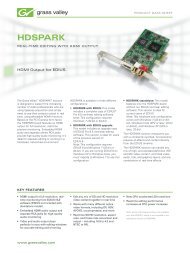
The procedures and explanations in this <strong>Quick</strong> <strong>Start</strong> <strong>Guide</strong> assume a typical <strong>K2</strong> <strong>Dyno</strong><br />
<strong>Replay</strong> <strong>System</strong>, such as that illustrated in the following diagram. If your installation<br />
requires a different system configuration, apply the information in this <strong>Quick</strong> <strong>Start</strong><br />
<strong>Guide</strong> accordingly.<br />
SDI in (A) C1<br />
Ethernet<br />
connection<br />
<strong>K2</strong> <strong>Dyno</strong> Controller<br />
<strong>K2</strong> SUMMIT PRODUCTION<br />
CLIENT<br />
Record Play<br />
C4<br />
<strong>K2</strong> Summit Client<br />
SDI in (B) C2<br />
AppCenter Pro<br />
on <strong>K2</strong> Summit<br />
Production Client<br />
SDI out (C)<br />
SDI out (D)<br />
Video/audio monitoring<br />
Also refer to “Channel operation overview” on page 26 and “<strong>K2</strong> AppCenter Elite<br />
ChannelFlex configurations” on page 28.<br />
6 <strong>K2</strong> <strong>Dyno</strong> <strong>Replay</strong> <strong>System</strong> <strong>Quick</strong> <strong>Start</strong> <strong>Guide</strong> 16 May 2011<br />
C3<br />
<strong>K2</strong> <strong>Dyno</strong> <strong>Replay</strong><br />
application VGA<br />
output<br />
PGM<br />
P1<br />
PVW<br />
P2
Cable <strong>K2</strong> Summit Client<br />
<br />
<br />
Cable <strong>K2</strong> Summit Client<br />
If desired, mount the <strong>K2</strong> Summit Client in an equipment rack. Refer to the <strong>K2</strong> <strong>System</strong><br />
<strong>Guide</strong> for rack mount procedures.<br />
Make <strong>K2</strong> Summit Client cable connections as illustrated.<br />
<br />
<br />
<br />
<br />
Each channel can be both an input (record channel) and an output (play channel). For<br />
the <strong>K2</strong> <strong>Dyno</strong> <strong>Replay</strong> <strong>System</strong> documented in this <strong>Quick</strong> <strong>Start</strong> <strong>Guide</strong>, C1 and C2 are<br />
record channels and C3 and C4 are play channels.<br />
For complete cabling instructions, refer to the <strong>K2</strong> <strong>System</strong> <strong>Guide</strong>. If using ChannelFlex<br />
Suite features, refer to the <strong>K2</strong> <strong>Dyno</strong> Controller Installation Manual and the <strong>K2</strong><br />
AppCenter User Manual.<br />
Cable <strong>K2</strong> <strong>Dyno</strong> Controller<br />
Make <strong>K2</strong> <strong>Dyno</strong> Controller cable connections as illustrated.<br />
<br />
<br />
<br />
<br />
RS-232<br />
100-240 V~<br />
4A 50-60Hz<br />
<br />
<br />
<br />
<br />
<br />
<br />
<br />
<br />
<br />
<br />
<br />
<br />
<br />
<br />
<br />
<br />
<br />
<br />
The Ethernet connection between the <strong>K2</strong> Summit Client and the <strong>K2</strong> <strong>Dyno</strong> Controller<br />
can be via direct connect cable or via an Ethernet switch.<br />
16 May 2011 <strong>K2</strong> <strong>Dyno</strong> <strong>Replay</strong> <strong>System</strong> <strong>Quick</strong> <strong>Start</strong> <strong>Guide</strong> 7
Chapter 1 Installation<br />
<strong>Start</strong> up <strong>K2</strong> <strong>Dyno</strong> Controller<br />
Open<br />
power<br />
switch<br />
door<br />
Press<br />
power<br />
switch<br />
100-240 V~<br />
4A 50-60Hz<br />
There is no logon for the <strong>K2</strong> <strong>Dyno</strong> Controller. After you have started the <strong>Dyno</strong>,<br />
proceed to “<strong>Start</strong> up <strong>K2</strong> Summit Client” and the topics dealing with configuring the<br />
<strong>K2</strong> Summit before proceeding to “<strong>Start</strong> using the <strong>K2</strong> <strong>Dyno</strong> Controller” on page 13.<br />
<strong>Start</strong> up <strong>K2</strong> Summit Client<br />
RS-232<br />
Press<br />
standby<br />
switch<br />
<strong>K2</strong> SUMMIT PRODUCTION<br />
CLIENT<br />
Log on to the <strong>K2</strong> Summit Client with the default Windows administrator account:<br />
Username: Administrator<br />
Password: admin<strong>K2</strong><br />
(The password is case sensitive)<br />
At first startup, End User License Agreements appear on the <strong>K2</strong> Summit Client<br />
screen. Accept the agreements to continue.<br />
The Power LED goes on and stays on. The Service LED stays off. <strong>Start</strong>up processes<br />
complete in approximately two minutes and the <strong>K2</strong> Summit Production Client is<br />
ready for connection and operation.<br />
8 <strong>K2</strong> <strong>Dyno</strong> <strong>Replay</strong> <strong>System</strong> <strong>Quick</strong> <strong>Start</strong> <strong>Guide</strong> 16 May 2011
Configure network<br />
If the network has not previously been configured, configure it now. A <strong>K2</strong> <strong>Dyno</strong><br />
Controller package configured at the factory will have these settings already<br />
configured.<br />
Configure network<br />
On both the <strong>K2</strong> Summit Client and on the <strong>K2</strong> <strong>Dyno</strong> Controller, use standard Windows<br />
operating system procedures to configure a static IP address. IP addresses must be on<br />
the same subnet. You can also configure a host name if desired.<br />
16 May 2011 <strong>K2</strong> <strong>Dyno</strong> <strong>Replay</strong> <strong>System</strong> <strong>Quick</strong> <strong>Start</strong> <strong>Guide</strong> 9
Chapter 1 Installation<br />
Configure <strong>K2</strong> Summit Client channels<br />
A<br />
AppCenter ppCenter er<br />
1<br />
Configure channels according to your required formats and resolutions.<br />
Open AppCenter and logon with the <strong>K2</strong> administrator account. If a licensing message<br />
appears, refer to <strong>K2</strong> Release Notes.<br />
Click <strong>System</strong> | Configuration.<br />
Click tabs, buttons,<br />
and scroll bar to<br />
locate settings.<br />
Select from drop-down<br />
lists to make settings.<br />
Click OK and Yes<br />
to save settings.<br />
For the default <strong>K2</strong> administrator account, use the following to logon:<br />
Username: <strong>K2</strong>Admin<br />
Password: <strong>K2</strong>admin<br />
(The password is case sensitive)<br />
In Configuration Manager, click Channel and then select a channel tab to make<br />
settings for 2 record 2 play mode as follows:<br />
Configure channels C1 and C2 as record channels. Make video and audio settings<br />
as appropriate for your input.<br />
Configure channels C3 and C4 as play channels. Make video and audio settings as<br />
appropriate for your output.<br />
If using ChannelFlex features, refer to the <strong>K2</strong> AppCenter User Manual.<br />
10 <strong>K2</strong> <strong>Dyno</strong> <strong>Replay</strong> <strong>System</strong> <strong>Quick</strong> <strong>Start</strong> <strong>Guide</strong> 16 May 2011<br />
2<br />
3<br />
4<br />
5
Monitor <strong>K2</strong> Summit Client channels<br />
Monitor <strong>K2</strong> Summit Client channels<br />
On the VGA monitor connected to the <strong>K2</strong> Summit Client, you can monitor the four<br />
channels. This requires an AppCenter Pro license.<br />
In AppCenter, click View | Video Monitor Toolbar<br />
Full Screen<br />
Video Monitor<br />
<strong>K2</strong> SUMMIT PRODUCTION<br />
CLIENT<br />
TIP: You can also double-click on a monitor area in multi-view or<br />
control screen to switch between views.<br />
16 May 2011 <strong>K2</strong> <strong>Dyno</strong> <strong>Replay</strong> <strong>System</strong> <strong>Quick</strong> <strong>Start</strong> <strong>Guide</strong> 11
Chapter 1 Installation<br />
12 <strong>K2</strong> <strong>Dyno</strong> <strong>Replay</strong> <strong>System</strong> <strong>Quick</strong> <strong>Start</strong> <strong>Guide</strong> 16 May 2011
Chapter 2<br />
Operation<br />
<strong>Start</strong> using the <strong>K2</strong> <strong>Dyno</strong> Controller<br />
5<br />
3<br />
<strong>K2</strong> <strong>Replay</strong><br />
Client ay <strong>K2</strong> <strong>Replay</strong><br />
Connect<br />
or Reconnect.<br />
4<br />
New <br />
session<br />
1<br />
Client <strong>K2</strong> <strong>Dyno</strong> <strong>Replay</strong> Controller.<br />
<br />
On<br />
<strong>Start</strong>.<br />
After <strong>Start</strong> is pressed, the Home tab displays on the controller’s touch screen and on<br />
its VGA output screen.<br />
16 May 2011 <strong>K2</strong> <strong>Dyno</strong> <strong>Replay</strong> <strong>System</strong> <strong>Quick</strong> <strong>Start</strong> <strong>Guide</strong> 13<br />
2<br />
<br />
<strong>K2</strong> Client<br />
Summit<br />
Server<br />
Add
Chapter 2 Operation<br />
View home page status<br />
*The remaining storage time is available in terms of an Event Day. <strong>Dyno</strong> takes into<br />
account the available time for all Record channels.<br />
Select input and playout channels<br />
Home 1 <br />
2<br />
3 <br />
<br />
1 Select A or B input<br />
(camera angle)<br />
<br />
To gang channels, press both P1 and P2 at the same time.<br />
For more information about channel operation modes, refer to “Channel operation<br />
overview” on page 26.<br />
14 <strong>K2</strong> <strong>Dyno</strong> <strong>Replay</strong> <strong>System</strong> <strong>Quick</strong> <strong>Start</strong> <strong>Guide</strong> 16 May 2011<br />
M/E<br />
Send<br />
Goto<br />
2 Select P1 or P2<br />
playout<br />
PGM PVW<br />
P1 P2
<strong>Replay</strong><br />
Live/Local button<br />
Red = Live: You are watching the live video of the<br />
selected channel being recorded.<br />
Clear = Off: A highlight clip or playlist has been<br />
loaded into a player channel.<br />
<br />
<br />
Local<br />
Live<br />
Shift button<br />
Clear = Bottom function: For each button, the<br />
function shown on the bottom of the button<br />
label is currently active. Trim<br />
Take<br />
Shift<br />
3<br />
<br />
<br />
<br />
<br />
<br />
Chapter 2 Operation<br />
Yellow = <strong>Replay</strong>: You are controlling your replay in<br />
still, slow motion or normal playout mode.<br />
The recording of the live video continues<br />
while you are in this mode.<br />
Yellow = Top function: For each button, the function<br />
shown on the top of the button label is<br />
currently active.<br />
<br />
1<br />
<br />
<br />
<br />
To switch angles during playout, press A, B or C. The Shift button also affects controls displayed on the<br />
touch screen. For more information on button functions, refer to “Controller buttons: Reference” on the<br />
inside back cover.<br />
16 May 2011 <strong>K2</strong> <strong>Dyno</strong> <strong>Replay</strong> <strong>System</strong> <strong>Quick</strong> <strong>Start</strong> <strong>Guide</strong> 15<br />
M/E<br />
Send<br />
Goto<br />
Local<br />
Live<br />
Shift<br />
2<br />
PGM PVW<br />
P1 P2<br />
Trim<br />
Take
Chapter 2 Operation<br />
Capture highlight clip<br />
7<br />
<br />
<br />
<br />
6<br />
<br />
<br />
<br />
<br />
1 2<br />
3<br />
<br />
<br />
<br />
5<br />
<br />
<br />
Add Lib<br />
Add HL<br />
16 <strong>K2</strong> <strong>Dyno</strong> <strong>Replay</strong> <strong>System</strong> <strong>Quick</strong> <strong>Start</strong> <strong>Guide</strong> 16 May 2011<br />
M/E<br />
Send<br />
Goto<br />
<br />
<br />
<br />
<br />
<br />
<br />
<br />
4<br />
<br />
<br />
PGM PVW<br />
P1 P2
Add metadata<br />
<br />
EnternameEnter<br />
<br />
F1<br />
<br />
<br />
3<br />
<br />
<br />
1 <br />
<br />
7<br />
<br />
<br />
<br />
Chapter 2 Operation<br />
<br />
2<br />
<br />
<br />
You can pre-make metadata keywords with the <strong>Dyno</strong> Keyword Editor application,<br />
which you install on a separate PC. You then import <strong>K2</strong> <strong>Dyno</strong> Editor files (XML) into<br />
the <strong>Dyno</strong> Controller by opening them on the Library tab. See Import page.<br />
16 May 2011 <strong>K2</strong> <strong>Dyno</strong> <strong>Replay</strong> <strong>System</strong> <strong>Quick</strong> <strong>Start</strong> <strong>Guide</strong> 17<br />
4<br />
6<br />
5
Chapter 2 Operation<br />
Play highlight clip<br />
1 Highlight<br />
2 <br />
3 <br />
<br />
4<br />
You can customize play operations as follows:<br />
On the Home tab or VGA monitor, click Auto Cue.<br />
select a highlight, it is automatically cued up.<br />
Auto<br />
Cue In this mode, when you<br />
On the Home tab or VGA monitor click Auto Play.<br />
select a highlight, it automatically plays.<br />
Auto<br />
Play<br />
In this mode, when you<br />
18 <strong>K2</strong> <strong>Dyno</strong> <strong>Replay</strong> <strong>System</strong> <strong>Quick</strong> <strong>Start</strong> <strong>Guide</strong> 16 May 2011<br />
M/E<br />
Send<br />
Goto<br />
PGM PVW<br />
P1 P2<br />
<br />
Match<br />
Cue Up
Create a playlist: Controller interface<br />
1 Highlight<br />
Chapter 2 Operation<br />
On the controller touch screen, select the Playlist tab to see the highlight clip added to<br />
the playlist.<br />
Create a playlist: VGA interface<br />
3<br />
<br />
<br />
New PL<br />
Add PL<br />
<br />
<br />
<br />
2<br />
<br />
You can also move highlight clips within the playlist using the mouse or with the cut/<br />
move or copy/paste soft keys.<br />
16 May 2011 <strong>K2</strong> <strong>Dyno</strong> <strong>Replay</strong> <strong>System</strong> <strong>Quick</strong> <strong>Start</strong> <strong>Guide</strong> 19
Chapter 2 Operation<br />
Play a playlist with mix effects<br />
1 <br />
4<br />
4<br />
<br />
<br />
<br />
<br />
<br />
<br />
<br />
<br />
<br />
<br />
To select mix effects, such as transition types, touch the button next to the event and<br />
toggle through the options. You can put playlists into a loop by pressing the Loop<br />
button.<br />
The Playlist button performs different tasks based on how many times you press it:<br />
Press the Playlist button once — the Playlist tab displays<br />
Press the Playlist button twice — the last clip inserted is cued up<br />
Press the Playlist button three times— the first event in the playlist is cued up<br />
20 <strong>K2</strong> <strong>Dyno</strong> <strong>Replay</strong> <strong>System</strong> <strong>Quick</strong> <strong>Start</strong> <strong>Guide</strong> 16 May 2011<br />
<br />
<br />
2<br />
<br />
<br />
<br />
<br />
3
Setting up auxiliary audio<br />
1<br />
<br />
<br />
Aux<br />
Show<br />
Add auxiliary audio to a playlist<br />
1<br />
<br />
<br />
<br />
2<br />
3<br />
<br />
<br />
<br />
<br />
Main<br />
<br />
Chapter 2 Operation<br />
P1P2<br />
Audio clips display a speaker icon. Audio clips are derived from importing 16 bit, 48 kHz<br />
.wav files. The Playlist screen displays two auxiliary audio events at a time. You can add<br />
audio clips from a Highlight or a Library bin.<br />
16 May 2011 <strong>K2</strong> <strong>Dyno</strong> <strong>Replay</strong> <strong>System</strong> <strong>Quick</strong> <strong>Start</strong> <strong>Guide</strong> 21<br />
2<br />
<br />
3<br />
<br />
Add Pl
Chapter 2 Operation<br />
Import<br />
1<br />
<br />
<br />
3 <br />
Session<br />
2 list<br />
<br />
Library<br />
<br />
7<br />
<br />
CopyPaste<br />
On the Config tab touch Network | Transfers to monitor transfer progress. Indicators<br />
on highlight clip thumbnails also show progress.<br />
If you are importing keywords, confirm that you want to overwrite any existing<br />
keyword file already on the <strong>Dyno</strong>. You create these files with the <strong>Dyno</strong> Keyword<br />
Editor application.<br />
22 <strong>K2</strong> <strong>Dyno</strong> <strong>Replay</strong> <strong>System</strong> <strong>Quick</strong> <strong>Start</strong> <strong>Guide</strong> 16 May 2011<br />
1<br />
4 <strong>Dyno</strong><br />
Controller<br />
<strong>Dyno</strong> Controller<br />
<br />
<br />
<br />
Open<br />
<br />
<br />
1<br />
1<br />
6<br />
5
Chapter 2 Operation<br />
Set export path<br />
If you’re exporting to a non-network drive, insert a USB drive before setting the<br />
export path.<br />
Export<br />
1<br />
Config <br />
<br />
4<br />
<br />
5 Primary<br />
6 Accept<br />
All<br />
To monitor transfer progress on the CONFIG tab, touch Network | Transfers.<br />
16 May 2011 <strong>K2</strong> <strong>Dyno</strong> <strong>Replay</strong> <strong>System</strong> <strong>Quick</strong> <strong>Start</strong> <strong>Guide</strong> 23<br />
2<br />
<br />
Network<br />
3<br />
Send List<br />
HIGHLIGHT<br />
1 <br />
2<br />
3 Shift <br />
4 Send
Chapter 2 Operation<br />
Manage bins<br />
1 HIGHLIGHT or LIBRARY <br />
<br />
Touch < or > to navigate between bins.You can use a keyboard to navigate bins on<br />
the Library tab.<br />
24 <strong>K2</strong> <strong>Dyno</strong> <strong>Replay</strong> <strong>System</strong> <strong>Quick</strong> <strong>Start</strong> <strong>Guide</strong> 16 May 2011<br />
1<br />
3 <br />
<br />
5 <br />
2 <br />
<br />
4
Shutdown <strong>K2</strong> <strong>Dyno</strong> Controller<br />
1<br />
CONFIG<br />
Chapter 2 Operation<br />
16 May 2011 <strong>K2</strong> <strong>Dyno</strong> <strong>Replay</strong> <strong>System</strong> <strong>Quick</strong> <strong>Start</strong> <strong>Guide</strong> 25<br />
2<br />
<br />
4 <br />
5<br />
3<br />
EXIT
Chapter 2 Operation<br />
Channel operation overview<br />
The following sections explain channel operation modes.<br />
Standard mode<br />
3 Record, 1 Playback/PGM<br />
<strong>K2</strong> Summit Client<br />
Record Record Record Play<br />
The 3 Record and 1 Playback channel set-up is done when the session is configured<br />
at start-up screen<br />
A,B,C angles can be selected for playback on the D (P2) channel<br />
In this mode the P1 and P2 Player channel always illuminates red.<br />
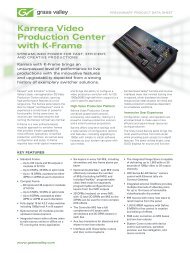
Multichannel independent mode<br />
2 Record, 2 Playback. Also known as “A-Side, B-Side”.<br />
A<br />
C1 C2 C3 C4<br />
A<br />
B<br />
C<br />
<strong>K2</strong> <strong>Dyno</strong> Controller<br />
PGM playout<br />
with transitions<br />
The 2 Record and 2 Playback channel set-up is done when the session is configured<br />
at start-up screen<br />
A,B, angles can be selected for playback on P1 or P2<br />
P1 and P2 playout channel content can be “swapped” by pressing buttons Fn then<br />
Take.<br />
26 <strong>K2</strong> <strong>Dyno</strong> <strong>Replay</strong> <strong>System</strong> <strong>Quick</strong> <strong>Start</strong> <strong>Guide</strong> 16 May 2011<br />
D<br />
P2<br />
P2<br />
Record Record<br />
C1<br />
Play Play<br />
C3<br />
P1<br />
P1<br />
Cue A or B angle on P1<br />
or P2 channel.<br />
Playback independently<br />
C2<br />
B<br />
C4<br />
P2<br />
P2<br />
Select either P1 or<br />
P2 button to control<br />
that playout channel.
Multichannel + gang mode<br />
2 Record, 2 Playback. Player channels in sync.<br />
Record Record<br />
C1<br />
A<br />
Play Play<br />
C3<br />
P1<br />
P1 gang<br />
Cue A or B angle on P1<br />
or P2 channel.<br />
Playback independently<br />
then put in Gang mode.<br />
Chapter 2 Operation<br />
The 2 Record and 2 Playback channel set-up is done when the session is configured<br />
at start-up screen<br />
A,B, angles can be selected for playback on the P1, (C3) or P2 (C4)<br />
Gang operation is based on Independent mode with selection of both channels and<br />
turning on gang<br />
Preview/Program mode<br />
2 Record, 1 Playback/PGM, 1 Preview.<br />
A<br />
P2 gang<br />
The 2 Record and 2 Playback channel set-up is done when the session is configured<br />
at start-up screen<br />
A,B, angles can be selected for playback on the C Program (C3) and D (C4) Preview<br />
In this mode, the PVW button illuminates yellow when PGM is selected. PVW lights<br />
green when selected and the Take button illuminates green to indicate ready for Take<br />
to PGM channel.<br />
16 May 2011 <strong>K2</strong> <strong>Dyno</strong> <strong>Replay</strong> <strong>System</strong> <strong>Quick</strong> <strong>Start</strong> <strong>Guide</strong> 27<br />
C2<br />
B<br />
C4<br />
P2<br />
Press both P1 and<br />
P2 buttons at same<br />
time to enter Gang<br />
mode. Press P1 or<br />
P2 to get out of<br />
Mutichannel mode.<br />
Record Record<br />
C1<br />
Play Play<br />
Toggle Preview<br />
control mode<br />
on and off.<br />
C3 PGM<br />
C4<br />
Press Shift P1<br />
P2<br />
then PVW or<br />
PGM button<br />
TAKE<br />
Cue A or B angle on<br />
Preview channel.<br />
C2<br />
B<br />
PVW<br />
Press Take to<br />
put Preview<br />
cued point onto<br />
Program.
Chapter 2 Operation<br />
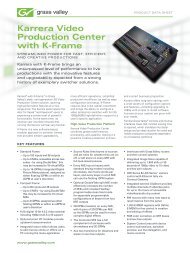
<strong>K2</strong> AppCenter Elite ChannelFlex configurations<br />
<strong>Dyno</strong>-Packs are available to provide ChannelFlex features, such as these illustrated<br />
examples.<br />
<br />
<br />
<br />
<br />
<br />
<strong>K2</strong> <strong>Dyno</strong> Controller setup: 4 record, 2 playout<br />
C1<br />
<br />
<strong>K2</strong> Summit Client<br />
C2<br />
<strong>K2</strong> Summit Client<br />
<br />
There are many other types of configuration setups. For more information,<br />
consult your <strong>Grass</strong> <strong>Valley</strong> representative.<br />
28 <strong>K2</strong> <strong>Dyno</strong> <strong>Replay</strong> <strong>System</strong> <strong>Quick</strong> <strong>Start</strong> <strong>Guide</strong> 16 May 2011<br />
C3<br />
C4<br />
<br />
<br />
<br />
<br />
<br />
<strong>K2</strong> <strong>Dyno</strong> Controller setup: 1 Super Slo Mo, 2 regular inputs, 2 playout<br />
<br />
<br />
<br />
<br />
<br />
<br />
<br />
C1<br />
C2<br />
C3<br />
C4
Tips and shortcuts<br />
Chapter 2 Operation<br />
To assign a rating (stars) to a highlight clip, use keyboard shortcut F1.<br />
The Shift button toggles between the top and bottom functions, as labeled on the<br />
controller’s buttons. The Shift button also affects the function of controls displayed<br />
on the touch screen.<br />
From Config | Panel, you can adjust controller panel attributes such as LCD and<br />
button brightness. You can adjust the speed, range, and other parameters of the jog<br />
knob and the T-bar.<br />
To play an angle from the beginning of the clip, press FN and then press A or B or C.<br />
Swap channels between PI and P2 playout channels by pressing Fn and then Take.<br />
To cue up a highlight, double-tap on the highlight.<br />
All Angle Playlist — select highlight clip, press Fn then Add PL.<br />
Change angles in the playlist — Fn and Angle button<br />
Slot box selection:<br />
To select a bin, enter its number. Example: typing 1 selects bin 1.<br />
To select a particular slot inside a bin, type the bin number and the slot number.<br />
Example: typing 1.2 cues up the second slot in bin 1.<br />
To select a particular angle, type the bin, slot, and angle number. Example,<br />
typing 1.2.3 selects the third angle of the second slot in bin 1<br />
To add a pause to a single event in a playlist, press Fn and the corresponding M/E<br />
symbol to the right of the event.<br />
16 May 2011 <strong>K2</strong> <strong>Dyno</strong> <strong>Replay</strong> <strong>System</strong> <strong>Quick</strong> <strong>Start</strong> <strong>Guide</strong> 29
Chapter 2 Operation<br />
30 <strong>K2</strong> <strong>Dyno</strong> <strong>Replay</strong> <strong>System</strong> <strong>Quick</strong> <strong>Start</strong> <strong>Guide</strong> 16 May 2011
Chapter 3<br />
Problems and solutions<br />
The following table provides corrective action for some common problems.<br />
Problem Possible Cause Corrective Action<br />
<strong>Dyno</strong> <strong>Replay</strong> Controller can<br />
not connect to <strong>K2</strong> Summit<br />
Client.<br />
Play channel video output is<br />
periodically unstable in E-to-E<br />
mode.<br />
The channel output is black in<br />
E-to-E, but playback is fine.<br />
Bad cable connection or network<br />
setup.<br />
Audio level too high or too low Record or play channel audio<br />
level adjusted too low.<br />
Digital video display device<br />
does not display properly.<br />
Check network cable connections. At the Command<br />
Prompt, ping the network IP address.<br />
Video reference is not connected. If E-to-E mode is used, you must connect a video<br />
reference signal.<br />
Loss of input signal. Verify that you have a valid input signal.<br />
Wrong video output type selected<br />
for the Play channel.<br />
In Summit AppCenter, use the audio level in recorder<br />
to adjust audio level. Use audio level adjust in player<br />
to adjust audio output level.<br />
Verify and select video output type required by the<br />
display device (see display device manuals).<br />
16 May 2011 <strong>K2</strong> <strong>Dyno</strong> <strong>Replay</strong> <strong>System</strong> <strong>Quick</strong> <strong>Start</strong> <strong>Guide</strong> 31
Chapter 3 Problems and solutions<br />
Finding more information<br />
You can find the information you need in product manuals and elsewhere.<br />
<strong>K2</strong> <strong>Dyno</strong> Release Notes and <strong>K2</strong> Release Notes — The release notes contain the latest<br />
information about the software shipped on your system. The information includes<br />
software upgrade instructions, software specifications, software requirements, feature<br />
changes from the previous releases, and any known problems. Because release notes<br />
contain the latest information, they are provided as a printed document, rather than<br />
being included in the Documentation Set.<br />
<strong>K2</strong> Summit Production Client <strong>Quick</strong> <strong>Start</strong> <strong>Guide</strong> — You receive this guide in the<br />
product packaging with your <strong>K2</strong> Summit Production Client. The <strong>Quick</strong> <strong>Start</strong> <strong>Guide</strong><br />
provides step-by-step installation instructions for basic installation and operation of<br />
your <strong>K2</strong> Summit Production Client, including recording and playing clips.<br />
<strong>K2</strong> Documentation Set — The full set of support documentation, including this <strong>Quick</strong><br />
<strong>Start</strong> <strong>Guide</strong>, is available on the Documentation Set zip file that you download with<br />
your product. The <strong>K2</strong> Documentation Set includes the following documents:<br />
<strong>K2</strong> <strong>Dyno</strong> Installation Manual — Provides instructions for a installing a <strong>K2</strong> <strong>Dyno</strong><br />
<strong>Replay</strong> <strong>System</strong> using a <strong>K2</strong> Solo Media Server or a <strong>K2</strong> Summit Production Client<br />
that is not part of a <strong>Dyno</strong>-Pack and has not been previously controlled by a <strong>K2</strong><br />
<strong>Dyno</strong> Controller.<br />
<strong>K2</strong> <strong>Dyno</strong> User Manual — Provides instructions for configuring and operating the <strong>K2</strong><br />
<strong>Dyno</strong> <strong>Replay</strong> Application via the controller and the VGA interface.<br />
<strong>K2</strong> <strong>Dyno</strong> Service Manual — Contains information on servicing and maintenance.<br />
<strong>K2</strong> <strong>System</strong> <strong>Guide</strong> — Contains the product specifications and step-by-step<br />
instructions for modifying system settings.<br />
<strong>K2</strong> AppCenter User Manual — Provides instructions for configuring and operating<br />
the media channels of the <strong>K2</strong> Summit Production Client.<br />
<strong>K2</strong> Summit Production Client Service Manual — Contains information on servicing<br />
and maintenance.<br />
<strong>K2</strong> Solo Media Server Service Manual — Contains information on servicing and<br />
maintenance.<br />
32 <strong>K2</strong> <strong>Dyno</strong> <strong>Replay</strong> <strong>System</strong> <strong>Quick</strong> <strong>Start</strong> <strong>Guide</strong> 16 May 2011
<strong>Grass</strong> <strong>Valley</strong> Product Support<br />
<strong>Grass</strong> <strong>Valley</strong> Product Support<br />
To get technical assistance, check on the status of a question, or to report a new issues,<br />
contact <strong>Grass</strong> <strong>Valley</strong> Product Support via e-mail, the Web, or by phone or fax.<br />
Web Technical Support<br />
To access support information on the Web, visit the product support Web page on the<br />
<strong>Grass</strong> <strong>Valley</strong> Web site. You can download software or find solutions to problems.<br />
World Wide Web:http://www.grassvalley.com/support/<br />
Technical Support E-mail Address:gvgtechsupport@grassvalley.com<br />
<strong>Grass</strong> <strong>Valley</strong> Knowledge Base:http://grassvalley.novosolutions.net/<br />
In the Knowledge Base you can search by topic, search by product, or browse the<br />
Table of Contents to find Frequently Asked Questions (FAQ).<br />
Telephone Support<br />
Use the following information to contact Product Support by phone.<br />
International Support Centers<br />
Our international support centers are available 24 hours a day, 7 days a week.<br />
Support Center Toll free In country<br />
France +800 80 80 20 20 +33 1 48 25 20 20<br />
United States +1 800 547 8949 +1 530 478 4148<br />
Authorized Local Support Representative<br />
A local support representative may be available in your country. To locate a support<br />
center during normal local business hours, refer to the following list. This list is<br />
regularly updated on the website for <strong>Grass</strong> <strong>Valley</strong> Product Support<br />
(http://www.grassvalley.com/support/contact/phone/)<br />
After–hours local phone support is also available for warranty and contract<br />
customers.<br />
Region Country Telephone<br />
Asia China +86 10 5883 7575<br />
Hong Kong, Taiwan, Korea,<br />
Macau<br />
+852 2531 3058<br />
Japan +81 3 6848 5561<br />
Southeast Asia - Malaysia +603 7492 3303<br />
Southeast Asia - Singapore +65 6379 1313<br />
India +91 22 676 10324<br />
16 May 2011 <strong>K2</strong> <strong>Dyno</strong> <strong>Replay</strong> <strong>System</strong> <strong>Quick</strong> <strong>Start</strong> <strong>Guide</strong> 33
Chapter 3 Problems and solutions<br />
Region Country Telephone<br />
Pacific Australia 1 300 721 495<br />
New Zealand 0800 846 676<br />
For callers outside Australia or<br />
New Zealand<br />
+61 3 8540 3650<br />
Central America, South America All +55 11 5509 3440<br />
North America North America, Mexico,<br />
Caribbean<br />
+1 800 547 8949;<br />
+1 530 478 4148<br />
Europe UK, Ireland, Israel +44 1189 230 499<br />
Benelux – Netherlands +31 (0) 35 62 38 421<br />
Benelux – Belgium +32 (0) 2 334 90 30<br />
France +800 80 80 20 20;<br />
+33148252020<br />
Germany, Austria,<br />
Eastern Europe<br />
Belarus, Russia, Tadzhikistan,<br />
Ukraine, Uzbekistan<br />
+49 6150 104 444<br />
+7 495 258 09 20<br />
Northern Europe +45 404 72 237<br />
Southern Europe – Italy +39 06 87 20 35 28<br />
Southern Europe – Spain +34 91 512 03 50<br />
Middle East, Near East, Africa Middle East +971 4 299 64 40<br />
Near East and Africa +800 80 80 20 20;<br />
+33148252020<br />
34 <strong>K2</strong> <strong>Dyno</strong> <strong>Replay</strong> <strong>System</strong> <strong>Quick</strong> <strong>Start</strong> <strong>Guide</strong> 16 May 2011
Waste Electrical and Electronic Equipment Directive<br />
Waste Electrical and Electronic Equipment Directive<br />
16 May 2011 <strong>K2</strong> <strong>Dyno</strong> <strong>Replay</strong> <strong>System</strong> <strong>Quick</strong> <strong>Start</strong> <strong>Guide</strong> 35
Controller buttons: Reference<br />
1 New PL Create new playlist<br />
Add PL Add current selected item to PL as bottom<br />
event<br />
2 Add Lib Add clip to Library type bin (Default bin)<br />
Add HL Add selected item to selected Highlight bin.<br />
3<br />
Match Match to timecode point in record train<br />
Cue Up Cue up current selected item<br />
4 Shift<br />
5<br />
6<br />
7<br />
8<br />
9<br />
10<br />
11<br />
1 2 3 4 5 6 7 8<br />
9 10 11 12 13 14 15 16<br />
The Shift button toggles between top and bottom functions.<br />
To add multiple clips in the order selected, press and hold Fn.<br />
To add a range of clips, press Shift and select first and last clip in the series.<br />
17<br />
18<br />
19<br />
20<br />
21<br />
Enable Shift Function. On buttons, toggles<br />
between top and bottom functions. On touch<br />
screen, similarly toggles function of controls.<br />
Fast Toggles Fast Jog on/off<br />
Play<br />
Open Open selected playlist<br />
■ Stop<br />
Locking REW<br />
Navigate to previous<br />
Locking FFW<br />
Navigate to next<br />
D Change current angle to D<br />
A Change current angle to A<br />
E Change current angle to E<br />
B Change current angle to B<br />
F Change current angle to F<br />
C Change current angle to C<br />
12 Fn Invokes special functions<br />
13 Local Switch between local (playback) and<br />
Live live (record) views on play channels<br />
14 Brws Browse remote record trains<br />
Add Mrk Adds mark at current point in record train<br />
15 PGM Toggles Preview/Program mode<br />
P1 Player 1 output or ganged channel<br />
16 PVW Toggles Preview/Program mode<br />
P2 Player 2 output or ganged channel<br />
17<br />
M/E Turn on/off Flying M/E (Lights green)<br />
PL Open Playlist page. If cue point not in PL, cue<br />
up last. If cue point in PL, cue up first.<br />
18 Send Send clip to preset path<br />
Goto Go to selection, HL, TC<br />
19<br />
20<br />
21<br />
Top Cue up beginning of clip or playlist<br />
Mark in point<br />
Btm Cue up to end of clip or playlist<br />
Mark out point<br />
Trim Trim HL or event in and out point<br />
Take Skip to next event in playlist. Swap video on<br />
preview channel and program channel,<br />
complete Trim function.