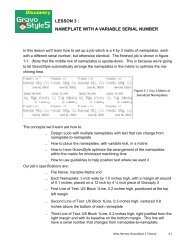
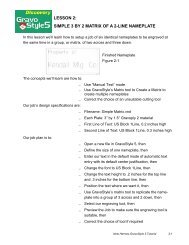
Importing And Vectorizing A Bitmap Image - Gravograph
Importing And Vectorizing A Bitmap Image - Gravograph
Importing And Vectorizing A Bitmap Image - Gravograph

Create successful ePaper yourself
Turn your PDF publications into a flip-book with our unique Google optimized e-Paper software.
anything smaller will be considered to be unwanted noise.<br />
We’ll click “OK”, and yet another dialog<br />
window, labeled “Color reduction”<br />
will pop up. We’ll ignore this<br />
window for now and click on “OK” to<br />
proceed.<br />
GravoStyle will now perform the vectorization<br />
and we’ll see its result in<br />
Figure 7-7.<br />
Figure 7-7 Vectorization Complete<br />
STEP 4: TROUBLESHOOT THE LOGO<br />
What we’re looking at in Figure 7-7 is two objects superimposed.<br />
They are the vector contours and the original bitmap<br />
image. Which one is on top? It doesn’t matter. We’ll simply<br />
grab the center handle of the shown selection and move it<br />
away to separate the vectors from the bitmap (Figure 7-8).<br />
We’ll then make sure that the bitmap is selected and we’ll<br />
delete it - we have no further use for it.<br />
(In Figure 7-8, we can see that it was the vector image that<br />
we dragged - we’ll merely unselect it, then select the bitmap<br />
and delete the bitmap.)<br />
If we look closely at our vectorized image (we can zoom in<br />
with the right mouse button for a closer look) we’ll that there<br />
is an unexpected and unwanted border all around it.<br />
Figure 7-6 Color Reduction Window<br />
Figure 7-8 Vector and <strong>Bitmap</strong> <strong>Image</strong>s<br />
Separated<br />
New Hermes GravoStyle 5 Tutorial 7-3