Instructions - Rittal
Instructions - Rittal
Instructions - Rittal

You also want an ePaper? Increase the reach of your titles
YUMPU automatically turns print PDFs into web optimized ePapers that Google loves.
7 Operation<br />
The recooling unit is switched on and off by the<br />
higher-level control. It operates automatically, i.e.<br />
the cooling medium is pumped continuously and<br />
heat extracted from it during this process.<br />
A controller provides automatic control based on the<br />
hysteresis set. The controller has a display for the<br />
indication of temperature values and buttons for<br />
setting operating parameters.<br />
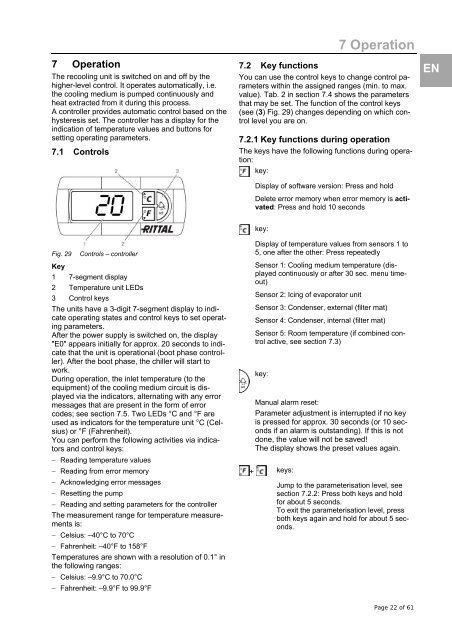
7.1 Controls<br />
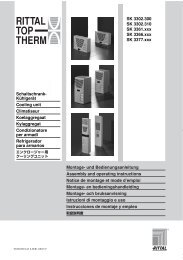
Fig. 29 Controls – controller<br />
Key<br />
1 7-segment display<br />
2 Temperature unit LEDs<br />
3 Control keys<br />
The units have a 3-digit 7-segment display to indicate<br />
operating states and control keys to set operating<br />
parameters.<br />
After the power supply is switched on, the display<br />
"E0" appears initially for approx. 20 seconds to indicate<br />
that the unit is operational (boot phase controller).<br />
After the boot phase, the chiller will start to<br />
work.<br />
During operation, the inlet temperature (to the<br />
equipment) of the cooling medium circuit is displayed<br />
via the indicators, alternating with any error<br />
messages that are present in the form of error<br />
codes; see section 7.5. Two LEDs °C and °F are<br />
used as indicators for the temperature unit °C (Celsius)<br />
or °F (Fahrenheit).<br />
You can perform the following activities via indicators<br />
and control keys:<br />
Reading temperature values<br />
Reading from error memory<br />
Acknowledging error messages<br />
Resetting the pump<br />
Reading and setting parameters for the controller<br />
The measurement range for temperature measurements<br />
is:<br />
Celsius: –40°C to 70°C<br />
Fahrenheit: –40°F to 158°F<br />
Temperatures are shown with a resolution of 0.1° in<br />
the following ranges:<br />
Celsius: –9.9°C to 70.0°C<br />
Fahrenheit: –9.9°F to 99.9°F<br />
7 Operation<br />
7.2 Key functions<br />
You can use the control keys to change control parameters<br />
within the assigned ranges (min. to max.<br />
value). Tab. 2 in section 7.4 shows the parameters<br />
that may be set. The function of the control keys<br />
(see (3) Fig. 29) changes depending on which control<br />
level you are on.<br />
7.2.1 Key functions during operation<br />
The keys have the following functions during operation:<br />
key:<br />
+<br />
Display of software version: Press and hold<br />
Delete error memory when error memory is activated:<br />
Press and hold 10 seconds<br />
key:<br />
Display of temperature values from sensors 1 to<br />
5, one after the other: Press repeatedly<br />
Sensor 1: Cooling medium temperature (displayed<br />
continuously or after 30 sec. menu timeout)<br />
Sensor 2: Icing of evaporator unit<br />
Sensor 3: Condenser, external (filter mat)<br />
Sensor 4: Condenser, internal (filter mat)<br />
Sensor 5: Room temperature (if combined control<br />
active, see section 7.3)<br />
key:<br />
Manual alarm reset:<br />
Parameter adjustment is interrupted if no key<br />
is pressed for approx. 30 seconds (or 10 seconds<br />
if an alarm is outstanding). If this is not<br />
done, the value will not be saved!<br />
The display shows the preset values again.<br />
keys:<br />
Jump to the parameterisation level, see<br />
section 7.2.2: Press both keys and hold<br />
for about 5 seconds.<br />
To exit the parameterisation level, press<br />
both keys again and hold for about 5 seconds.<br />
Page 22 of 61<br />
EN