Rittal Therm User Manual
Rittal Therm User Manual
Rittal Therm User Manual
You also want an ePaper? Increase the reach of your titles
YUMPU automatically turns print PDFs into web optimized ePapers that Google loves.
<strong>Rittal</strong> <strong>Therm</strong> 6.0<br />
<strong>User</strong> <strong>Manual</strong><br />
<strong>Rittal</strong> <strong>Therm</strong><br />
Version 6.0<br />
<strong>User</strong> <strong>Manual</strong><br />
Status: 01.09.2010<br />
Created 01/2010 Page 1 of 1
<strong>Rittal</strong> <strong>Therm</strong> 6.0<br />
Contents<br />
<strong>User</strong> <strong>Manual</strong><br />
1 Program description ............................................................................................ 3<br />
2 Installation ........................................................................................................... 4<br />
2.1 System requirements ................................................................................... 4<br />
2.2 Setup............................................................................................................ 4<br />
3 Deinstallation....................................................................................................... 5<br />
4 General notes on the user interface .................................................................... 5<br />
5 Welcome screen.................................................................................................. 6<br />
6 Main menu “File” ................................................................................................. 9<br />
6.1 Menu function “Data import”......................................................................... 9<br />
6.2 Menu function “Data export”....................................................................... 10<br />
6.3 Menu function “Print” .................................................................................. 11<br />
6.4 Menu function “Exit” ................................................................................... 11<br />
7 Main menu “Projects” ........................................................................................ 11<br />
7.1 Menu function “New” .................................................................................. 11<br />
7.2 Menu function “Overview” .......................................................................... 12<br />
8 Main menu “Additional info”............................................................................... 14<br />
8.1 Menu function “Program Pressure Drop”.................................................... 14<br />
8.2 Menu function “Maintenance and commissioning” ..................................... 14<br />
8.3 Menu function “Climate engineering services” ........................................... 14<br />
8.4 Menu function “Humidity calculation”.......................................................... 16<br />
8.5 Menu function “Climate diagrams”.............................................................. 16<br />
8.6 Menu function “www.rittal.com” .................................................................. 16<br />
9 Main menu “Options”......................................................................................... 17<br />
9.1 Menu function “SI units” ............................................................................. 17<br />
9.2 Menu function “Anglo-Saxon units” ............................................................ 17<br />
9.3 Menu function “Heat loss” .......................................................................... 17<br />
9.4 Menu function “Update via the Internet” ..................................................... 20<br />
9.5 Menu function “Settings” ............................................................................ 21<br />
10 Main menu “Help”.............................................................................................. 22<br />
10.1 Menu function “Help” .................................................................................. 22<br />
10.2 Menu function “Info” ................................................................................... 23<br />
11 Expert and express modes................................................................................ 23<br />
12 Calculation......................................................................................................... 24<br />
13 Interface ............................................................................................................ 30<br />
14 File “microweb.ini” ............................................................................................. 30<br />
Created 01/2010 Page 2 of 2
<strong>Rittal</strong> <strong>Therm</strong> 6.0<br />
<strong>User</strong> <strong>Manual</strong><br />
1 Program description<br />
The basic purpose of the software <strong>Rittal</strong> <strong>Therm</strong> 6.0 is to calculate the effective<br />
surface area and the heat dissipation via this surface for a selected enclosure<br />
specification. The external and internal temperatures, and the voltage and frequency<br />
of the available power system are required as input parameters. On this basis, the<br />
program determines appropriate selections of wall- and roof-mounted climate control<br />
units from the following categories:<br />
• Fans<br />
• Air/air heat exchangers<br />
• Cooling units<br />
• Air/water heat exchangers<br />
• Heating units<br />
• Climate control doors<br />
The program also takes into account the geometry of the available climate control<br />
units and specifies only those units which are suitable for the selected enclosures.<br />
The 30-day trial version asks the user to enter an unlock code 30 days after the first<br />
program start. With this code, the program is identified as a full version and then runs<br />
without time limitations. After registration at http://www.rittal.com/registration, you will<br />
automatically receive a copy of each new CD version.<br />
When <strong>Therm</strong> 6.0 is started, a software package integrating the Windows operating<br />
system, an Apache-compatible server, a MySQL database and a PHP interpreter is<br />
installed on your computer. Such packages are referred to as WAMPs for short. The<br />
installation is performed with the tool Microweb from IndigoStar in the version 2.00<br />
dated 12 April 2007. Subsequently, the browser is opened automatically and the<br />
<strong>Therm</strong> start page is displayed.<br />
<strong>Therm</strong> 6.0 uses HTML, JavaScript, PHP version 5.1.4, MySQL version 5.0.27 and<br />
ionCube PHP Encoder 6.5.13.<br />
PHP is a server-side programming language which can be incorporated into the<br />
HTML pages of Web applications. When a page is called, the PHP code contained<br />
on that page (together with any files required by this code) is read, parsed and<br />
executed; the finished page is then output to the browser.<br />
MySQL is a SQL relational database which stores its data in the form of tables. It has<br />
also been handling the database activities of SAP since May 2003. The database<br />
system SAP DB has been renamed MaxDB and is now based on the MySQL core.<br />
Created 01/2010 Page 3 of 3
<strong>Rittal</strong> <strong>Therm</strong> 6.0<br />
<strong>User</strong> <strong>Manual</strong><br />
ionCube PHP Encoder is a PHP accelerator and encoder solution. It accelerates<br />
PHP scripts by saving them in their compiled state, eliminating the need for<br />
compilation at runtime. A number of other optimised features also serve to speed up<br />
script execution.<br />
2 Installation<br />
2.1 System requirements<br />
The following minimum system requirements should be observed to allow smooth<br />
working:<br />
• 500 MB free hard disk space<br />
• UTF8-enabled browser; the following browsers have been tested:<br />
o Microsoft Internet Explorer 5.5, 6.0 and 7.0<br />
o Mozilla Firefox 3.0<br />
o Opera 8.54 and 9.63<br />
• CPU with 1.8 GHz clock rate<br />
• Windows 2000 or XP:<br />
o Pentium 4, Celeron or equivalent AMD processor<br />
o 512 MB RAM<br />
• Windows Vista:<br />
o Dual-Core or equivalent processor<br />
o 1 GB RAM<br />
2.2 Setup<br />
The program starts automatically from the CD if the “Autostart” function is enabled for<br />
the CD drive. Otherwise, it can also be started manually by double-clicking the file<br />
“microweb.exe”. All data are stored in a MySQL database. To enable writing to the<br />
database, the data are copied to the temporary folder of your Windows installation<br />
when <strong>Therm</strong> is started for the first time. You can find out where this is on your local<br />
PC by opening the MS DOS command prompt and entering “echo %TEMP%”.<br />
You can accelerate the execution of <strong>Therm</strong> by installing the software on your<br />
computer. To do so, it is sufficient to copy the whole contents of the CD to your local<br />
PC and to run the file “microweb.exe” from there. The setup program will create<br />
appropriate links for the Start menu and the Desktop, as well as the required<br />
uninstaller information. To run the setup program, double-click the file “setup.exe” in<br />
the root folder of the CD. Follow the setup instructions which appear on the screen. It<br />
is not necessary to restart the computer.<br />
Created 01/2010 Page 4 of 4
<strong>Rittal</strong> <strong>Therm</strong> 6.0<br />
<strong>User</strong> <strong>Manual</strong><br />
The installer and uninstaller programs are multilingual and start in the language of<br />
your installed Windows operating system.<br />
The user must possess write authorisation for the temporary folder, as this is where<br />
the databases, projects and import/export files are stored. It must be possible to<br />
modify these files during the application runtime.<br />
The installation creates a program folder as specified by the user. The default folder<br />
is “C:\Program Files\<strong>Rittal</strong>\ApplicationName”, but this path can be changed freely by<br />
the user. If the specified folder does not yet exist, it will be created.<br />
Further subfolders are created within the selected installation folder:<br />
...\ApplicationName\firefox<br />
...\ ApplicationName\htdocs<br />
...\ ApplicationName\mysql<br />
...\ ApplicationName\php<br />
Modifiable files are managed in the temporary folder, where the following subfolders<br />
are installed<br />
...\microweb\localhost\mysql\data00xx<br />
...\ ApplicationName\projekte (projects)<br />
...\ ApplicationName\sicherung (backups)<br />
...\ ApplicationName\verlustdaten (heat loss data)<br />
All files are installed locally.<br />
3 Deinstallation<br />
Deinstallation removes the installed files, folders and Windows registry entries, with<br />
the exception of the data in the<br />
temporary folder.<br />
<br />
Note:<br />
If an installation<br />
folder contains files or subfolders which were not<br />
installed or created<br />
by the <strong>Therm</strong> application itself, these files and<br />
subfolders will not be deleted.<br />
4 General notes on the user interface<br />
The user interface is based on the Microsoft Windows standard GUI, i.e. it comprises<br />
• a menu bar in text form<br />
• a working area<br />
Created 01/2010 Page 5 of 5
<strong>Rittal</strong> <strong>Therm</strong> 6.0<br />
<strong>User</strong> <strong>Manual</strong><br />
<br />
Note:<br />
The main menu<br />
bar remains visible for the whole program runtime.<br />
5 Welcome screen<br />
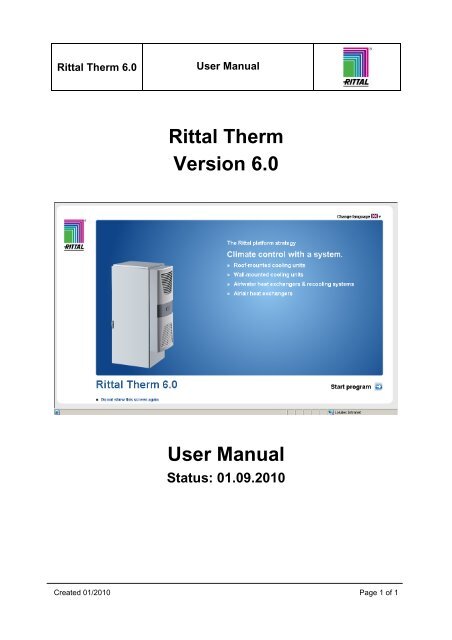
The welcome screen comprises a Flash animation and an alternative page which is<br />
called automatically if Adobe Flash is not installed on the computer concerned. To be<br />
able to use the full functionality of the program, you should install the latest Flash<br />
version, which can be obtained from http://get.adobe.com/de/flashplayer/.<br />
The desired language can here be set by way of the mouse-sensitive image area<br />
“Change language” which can be seen on the screen depicted below, or else<br />
changed at any other time during program execution. The language selection will<br />
influence not only the user interface texts, but also the displayed addresses and the<br />
date format.<br />
Created 01/2010 Page 6 of 6
<strong>Rittal</strong> <strong>Therm</strong> 6.0<br />
<strong>User</strong> <strong>Manual</strong><br />
If you click on the link “Do not show this screen again”, the start screen will be<br />
skipped when <strong>Therm</strong> is called the next time. If required, this setting can be changed<br />
back later via the menu function “Options” – “Settings”, under “Introduction page”.<br />
Clicking on the “Start program” button calls the “Quick start” tab.<br />
This tab contains the options<br />
• Calculate enclosure climate control<br />
• Configure machine cooling<br />
• Manage projects<br />
• Additional info<br />
• <strong>User</strong> manual<br />
The function “Calculate enclosure climate control” opens a new project. By clicking<br />
on “Configure machine cooling”, you jump to a multiple-page form which can be filled<br />
out directly and then output as a PDF to request a qualified quotation for a recooling<br />
system from <strong>Rittal</strong>. “Manage projects” switches the interface to the overview of<br />
existing projects, “Additional info” selects the “Additional info” tab, and “<strong>User</strong> manual”<br />
opens a description of the software in the form of a PDF.<br />
Created 01/2010 Page 7 of 7
<strong>Rittal</strong> <strong>Therm</strong> 6.0<br />
<strong>User</strong> <strong>Manual</strong><br />
If the language was not already specified during the program setup, a screen asking<br />
you to select your desired language will appear in place of the Flash animation.<br />
Created 01/2010 Page 8 of 8
<strong>Rittal</strong> <strong>Therm</strong> 6.0<br />
<strong>User</strong> <strong>Manual</strong><br />
6 Main menu “File”<br />
6.1 Menu function “Data import”<br />
Selecting this function opens a window with three tabs: “All data”, “Heat loss” and<br />
“Project data”. This permits you to either take over all the data from a previous<br />
program version, or else to specifically import projects and heat loss data from<br />
previously saved files into <strong>Therm</strong>. If you choose to import all data, you must also<br />
specify the project import language, which will determine the language in which the<br />
device names will be taken over into the project data. The import path can be<br />
changed via the menu function “Options” – “Settings” under “Save files at”.<br />
When <strong>Therm</strong> 6.0 is started for the first time, the program will search for any previous<br />
program version which may be installed on the computer and will then automatically<br />
present the data import tab “All data”.<br />
Created 01/2010 Page 9 of 9
<strong>Rittal</strong> <strong>Therm</strong> 6.0<br />
<strong>User</strong> <strong>Manual</strong><br />
6.2 Menu function “Data export”<br />
Selecting this function opens a window with two tabs: “Heat loss” and “Project data”.<br />
This permits you to export specific heat loss or project data from the existing <strong>Therm</strong><br />
database. The export path can be changed via the menu function “Options” –<br />
“Settings” under “Save file as”.<br />
Created 01/2010 Page 10 of 10
<strong>Rittal</strong> <strong>Therm</strong> 6.0<br />
6.3 Menu function “Print”<br />
Prints the current screen contents.<br />
<strong>User</strong> <strong>Manual</strong><br />
6.4 Menu function “Exit”<br />
This function closes the program. In Firefox, it is not permissible to close the program<br />
using this command; instead, an info note will be displayed to explain how the<br />
program can be closed in another way.<br />
7 Main menu “Projects”<br />
7.1 Menu function “New”<br />
This function calls the “New calculation” tab, where it is possible to initiate a new<br />
climate control calculation. This tab contains the options<br />
• Create new project<br />
o Specify minimum temperature for heating<br />
o Outdoor installation with exposure to the sun<br />
• Edit existing project<br />
Created 01/2010 Page 11 of 11
<strong>Rittal</strong> <strong>Therm</strong> 6.0<br />
<strong>User</strong> <strong>Manual</strong><br />
You can select one or other of the sub-options “Specify minimum temperature for<br />
heating” or “Outdoor installation with exposure to the sun”, but not both together. It is<br />
also permissible to deselect both. Once you have made your choice, a new project is<br />
created by clicking on “Create new project”.<br />
Clicking on “Edit existing project” opens the project overview.<br />
7.2 Menu function “Overview”<br />
This function calls the “Project overview” with a tabular overview of all existing<br />
projects. Clicking on the pen icon opens an existing project, in the same way as a<br />
double-click on the corresponding row of the table. Clicking on the red cross will<br />
delete the corresponding project.<br />
Created 01/2010 Page 12 of 12
<strong>Rittal</strong> <strong>Therm</strong> 6.0<br />
<strong>User</strong> <strong>Manual</strong><br />
Created 01/2010 Page 13 of 13
<strong>Rittal</strong> <strong>Therm</strong> 6.0<br />
<strong>User</strong> <strong>Manual</strong><br />
8 Main menu “Additional info”<br />
8.1 Menu function “Program Pressure Drop”<br />
This function calls up information on the program “Pressure Drop”.<br />
Pressure Drop 6.2 for Windows calculates the pressure losses caused by the friction<br />
of a liquid or gas flowing through a pipe (both laminar and turbulent flows); in<br />
addition, it is possible to calculate pressure changes related to the geodetic height<br />
(pipe runs upwards) and changes in kinetic energy.<br />
Besides simple pipes, the program calculations take into account also the losses<br />
attributable to pipe fittings (changes of direction, etc.) and various accessories<br />
(valves, expansion compensator, etc.). The individual elements can be combined<br />
freely, permitting calculation of an overall pressure drop.<br />
To be able to calculate a pressure drop, the program requires corresponding data to<br />
describe both the pipes (roughness) and the flow media (density, viscosity). For<br />
typical pipes and many liquids and gases, including mixtures, these data can be<br />
taken directly from the program's own databases. A further user-defined database<br />
enables you to save and recall data for any individually used media.<br />
Further infos and answers to frequently asked questions (in German, English, French<br />
and Dutch) can be found at http://www.pressure-drop.com. The shareware version of<br />
this program can be found in the <strong>Therm</strong> subfolder \htdocs\Druckverlust.<br />
8.2 Menu function “Maintenance and commissioning”<br />
This function opens a PDF file with detailed information on the topic of “Maintenance<br />
and commissioning”. To be able to view this file, you must install the latest version of<br />
Acrobat Reader, which can be obtained from http://get.adobe.com/uk/reader/.<br />
8.3 Menu function “Climate engineering services”<br />
This function opens a PDF file with detailed information on the topics “Project<br />
planning for enclosure climate control and machine cooling”, “<strong>Therm</strong>al analysis (IR<br />
thermography and on-site temperature measurements)” and “Preparation of CFD<br />
analyses and flow models – Tests performed in the company's own laboratories”.<br />
Created 01/2010 Page 14 of 14
<strong>Rittal</strong> <strong>Therm</strong> 6.0<br />
<strong>User</strong> <strong>Manual</strong><br />
Created 01/2010 Page 15 of 15
<strong>Rittal</strong> <strong>Therm</strong> 6.0<br />
<strong>User</strong> <strong>Manual</strong><br />
8.4 Menu function “Humidity calculation”<br />
This function opens a new page entitled “Humidity calculation”.<br />
The required input values are here the temperature in degrees Celsius and either the<br />
relative humidity as a percentage or the dew point in degrees Celsius. When you<br />
click on the button “Calculate”, the absolute humidity in grams per cubic metre is<br />
calculated for the specified temperature, together with the corresponding relative<br />
humidity as a percentage or the dew point in degrees Celsius, depending on the<br />
previous selection.<br />
8.5 Menu function “Climate diagrams”<br />
This function provides a link to the Internet page http://www.ecmwf.int.<br />
8.6 Menu function “www.rittal.com”<br />
This function provides a link to the Internet page http://www.rittal.com.<br />
Created 01/2010 Page 16 of 16
<strong>Rittal</strong> <strong>Therm</strong> 6.0<br />
9 Main menu “Options”<br />
<strong>User</strong> <strong>Manual</strong><br />
9.1 Menu function “SI units”<br />
If you select this function, the following SI units are used in all data screens:<br />
°C, mm, W, m 2 , m 3<br />
9.2 Menu function “Anglo-Saxon units”<br />
If you select this function, the following Anglo-Saxon units are used in all data<br />
screens: °F, BTU, sq.ft., CFM<br />
9.3 Menu function “Heat loss”<br />
This function opens a window in which the heat loss data for devices can be entered,<br />
edited and deleted. The window comprises the two tabs “Device list” and “Group list”.<br />
Three hierarchy levels are used on the “Device list” tab”: The first level distinguishes<br />
the device manufacturers, the second level specifies device types, e.g. frequency<br />
converters, and the third level displays the individual devices with the heat loss data.<br />
When you call the device list, the display is automatically switched to the level of<br />
individual devices; the two higher hierarchy levels can be modified via the group list.<br />
Created 01/2010 Page 17 of 17
<strong>Rittal</strong> <strong>Therm</strong> 6.0<br />
<strong>User</strong> <strong>Manual</strong><br />
To enter a new device, you must first define a corresponding top-level group: Click<br />
on the “Group list” tab, but then click on the button “Add group” instead of selecting<br />
one of the listed groups. A small input window is opened, in which you must enter a<br />
group name in English and Russian, and then click on “OK” to confirm your inputs.<br />
Now scroll down the displayed list to find the new entry, which has been added to the<br />
bottom of the list. Click on the new entry – the corresponding line is then highlighted<br />
yellow. Next, click on the button “Add group” once more. Another small input window<br />
is opened for you to enter a group name in English and Russian; click on “OK” to<br />
confirm. This creates a device group on the second hierarchy level. Now select the<br />
“Device list” tab and click on the plus sign in front of the newly created top-level<br />
group. Select the new device group created at the second step – the corresponding<br />
line is then highlighted blue. When you now click on the button “Add device”, a small<br />
input window is opened for your specifications of a device name in English and<br />
Russian, together with the appropriate heat loss in watts; again, click on “OK” to<br />
confirm the input.<br />
Created 01/2010 Page 18 of 18
<strong>Rittal</strong> <strong>Therm</strong> 6.0<br />
<strong>User</strong> <strong>Manual</strong><br />
The data entered here are added directly to the database and are thus available<br />
immediately in all projects.<br />
To ensure that the device designations are shown correctly after switching to another<br />
language, it is important always to enter at least an English designation. English is<br />
the fall-back language which is used if no entry exists in the selected language.<br />
Created 01/2010 Page 19 of 19
<strong>Rittal</strong> <strong>Therm</strong> 6.0<br />
<strong>User</strong> <strong>Manual</strong><br />
9.4 Menu function “Update via the Internet”<br />
This function is used to check for the latest <strong>Therm</strong> program version. It also specifies<br />
where the latest version can be found and downloaded.<br />
<br />
Note:<br />
This check requires<br />
an active Internet connection.<br />
Created 01/2010 Page 20 of 20
<strong>Rittal</strong> <strong>Therm</strong> 6.0<br />
<strong>User</strong> <strong>Manual</strong><br />
9.5 Menu function “Settings”<br />
This function opens the “Settings” window with the input fields “Introduction page”,<br />
“maxTemp”, “minTemp” and “Save file as”.<br />
In the input field “Introduction page”, you can specify a time in seconds as the<br />
duration for the Flash animation of the welcome screen. If a time of 0 s is set, the<br />
welcome screen is skipped.<br />
The fields “maxTemp” and “minTemp” define the permissible range for temperature<br />
inputs.<br />
The path entered under “Save file as” specifies the folder in which the heat loss data<br />
and projects are to be saved.<br />
Created 01/2010 Page 21 of 21
<strong>Rittal</strong> <strong>Therm</strong> 6.0<br />
<strong>User</strong> <strong>Manual</strong><br />
10 Main menu “Help”<br />
10.1 Menu function “Help”<br />
This function calls up context-sensitive help information relating to the current screen<br />
contents. The same help information is obtained by clicking on the button with a<br />
question mark in the bottom left corner of the screen.<br />
Created 01/2010 Page 22 of 22
<strong>Rittal</strong> <strong>Therm</strong> 6.0<br />
<strong>User</strong> <strong>Manual</strong><br />
10.2 Menu function “Info”<br />
Selecting this function displays the current version number and further information<br />
relating to the program.<br />
11 Expert and express modes<br />
The expert mode provides a series of setting possibilities which have been disabled<br />
in the express mode in favour of simpler and faster calculations. For example, the<br />
express mode only permits calculation of the climate control for a single enclosure.<br />
The heat loss values, furthermore, can only be entered directly, whereas they can be<br />
determined from measured temperatures or lists in the expert mode.<br />
Created 01/2010 Page 23 of 23
<strong>Rittal</strong> <strong>Therm</strong> 6.0<br />
<strong>User</strong> <strong>Manual</strong><br />
12 Calculation<br />
The calculations to determine the suitable climate control units for a particular cooling<br />
problem take into account not only the ambient conditions and the specified heat<br />
losses, but also the geometry specifications of the selected enclosure. Each<br />
calculation is structured over 5 tabs<br />
• Project data<br />
• Enclosure selection<br />
• Calculation<br />
• Accessories<br />
• Summary<br />
The parameters “Max. external temperature”, “Max. internal temperature”, “Voltage”<br />
and “Frequency” can be modified at any time during calculation. The “Project data”<br />
tab contains general project information to enable the project to be identified in the<br />
overview table and in the results summary.<br />
Three special cases are taken into account under “Enclosure selection:<br />
• The product group “SO” denotes special enclosures whose dimensions and<br />
k-factor can be specified freely<br />
Created 01/2010 Page 24 of 24
<strong>Rittal</strong> <strong>Therm</strong> 6.0<br />
<strong>User</strong> <strong>Manual</strong><br />
• TS encloses can be combined into suites if the heights and depths of the<br />
enclosures are identical<br />
• CP 6372.009, 6382.009, 6292.009, 6292.109 and 6392.209 are operating<br />
housings with variable depths and surfaces<br />
When you click on the button “Save enclosure”, a message box is displayed to ask<br />
whether heat loss data are to be assigned to the selected enclosure. If no data are to<br />
be entered at this point, you must select “Cancel”. When you click on “OK”, a new<br />
window is opened with three tabs:<br />
• Direct input<br />
• Measured temperature<br />
• Device list<br />
Created 01/2010 Page 25 of 25
<strong>Rittal</strong> <strong>Therm</strong> 6.0<br />
<strong>User</strong> <strong>Manual</strong><br />
Subsequently, you can select further enclosures and – if appropriate – then combine<br />
them into a suite in a new window. It is only possible to combine enclosures into a<br />
suite in the case of TS enclosures of identical height and width, subject furthermore<br />
to the specification of correct enclosure position types (end and centre enclosures).<br />
Created 01/2010 Page 26 of 26
<strong>Rittal</strong> <strong>Therm</strong> 6.0<br />
<strong>User</strong> <strong>Manual</strong><br />
The calculated results are displayed on the “Calculation” tab. On the basis of these<br />
results, a climate control recommendation can be called up by clicking on the buttons<br />
corresponding to different types of climate control unit.<br />
Fans and air/air heat exchangers can only be selected if the maximum external<br />
temperature is colder than the maximum permissible internal temperature.<br />
Otherwise, the external air would not be able to cool the enclosure interior to the<br />
desired temperature.<br />
Furthermore, no climate control units are displayed if no cooling is necessary, i.e. the<br />
prescribed internal temperature is already observed without climate control.<br />
One special case relates to calculations for outdoor installation: The results are here<br />
derived from empirical measurement data. Such measurements have to date only<br />
been performed for enclosures of the CS product group, and even then permit only a<br />
very limited selection of installed devices.<br />
Created 01/2010 Page 27 of 27
<strong>Rittal</strong> <strong>Therm</strong> 6.0<br />
<strong>User</strong> <strong>Manual</strong><br />
Created 01/2010 Page 28 of 28
<strong>Rittal</strong> <strong>Therm</strong> 6.0<br />
<strong>User</strong> <strong>Manual</strong><br />
Created 01/2010 Page 29 of 29
<strong>Rittal</strong> <strong>Therm</strong> 6.0<br />
<strong>User</strong> <strong>Manual</strong><br />
The tab “Accessories” offers only compatible accessories. If two cooling units are<br />
selected, the connecting cable will also be offered automatically.<br />
The tab “Summary” serves to document the defined project. The button “GM” creates<br />
a file in a special file format used by General Motors. The buttons “XML”, “HTM” and<br />
“TXT” serve to output the calculation results in the respective formats.<br />
13 Interface<br />
The subfolder “htdocs/interface” contains three example files: “data.txt”, “data.xml”<br />
and “startdatatransfer.bat”. These three files contain comments describing the<br />
interface for data transfer to <strong>Therm</strong>.<br />
You can open either of the files “data.txt” or “data.xml” with a text editor of your<br />
choice and can then enter data for use in <strong>Therm</strong>. The file “data.txt” possesses a<br />
simpler data structure, but is limited to one enclosure and a maximum of 20 devices<br />
with heat loss data. If the project in hand is more complex, then it is necessary to use<br />
the file “data.xml”. The process of data transfer to <strong>Therm</strong> is started with the batch file<br />
“startdatatransfer.bat”, in which it is specified, which of the two text files is to be read.<br />
The batch file then starts the <strong>Therm</strong> software and displays the project overview.<br />
14 File “microweb.ini”<br />
The file “microweb.ini” is to be found in the root folder of <strong>Therm</strong>. It is a text file<br />
containing setting parameters and can be opened in the text editor with a doubleclick.<br />
The following parameters can be edited there:<br />
• Name of the Web page in the browser:<br />
o hostName=localhost<br />
The real host with this name will then be temporarily unattainable,<br />
however, because the IP is saved intermediately by the browser. The value<br />
hostname=default tells Microweb to take the host name of the computer on<br />
which it is currently running.<br />
• Port number of the Web page:<br />
o Normally, Microweb will always assign a port number which is not in use. It<br />
is also possible, however, to assign a specific port number:<br />
port=4001<br />
• Browser selection:<br />
o Microweb starts the default browser. It is also possible, however, to select<br />
a different browser with one of the following entries:<br />
browser=ie<br />
Created 01/2010 Page 30 of 30
<strong>Rittal</strong> <strong>Therm</strong> 6.0<br />
<strong>User</strong> <strong>Manual</strong><br />
browser=netscape<br />
browser=none<br />
Furthermore, you can start a browser from the command line with one of<br />
the following commands:<br />
-browser=ie<br />
-browser=netscape<br />
-browser=none<br />
If no browser is selected, the only way to close the Web server is to press<br />
CTRL-ALT-DEL or else to terminate the program via the Task Manager<br />
menu. A warning message will be displayed, but can be ignored in this<br />
case.<br />
You can also start a specific different browser using the following<br />
command line:<br />
browserpath=<br />
The location can be specified either as an absolute path or relative to the<br />
server root directory. To start the browser in kiosk mode, you should use<br />
the following entry:<br />
browseroptions=-k<br />
• Use of a MySQL database:<br />
o Microweb automatically copies the whole contents of “mysql\data” into a<br />
temporary folder when it is started for the first time. If you are not running<br />
<strong>Therm</strong> from a CD, you can deactivate this copying with the following entry:<br />
CopyMysqlFiles=0<br />
The working copy of the data is only created when Microweb is used for<br />
the first time. If Microweb is to copy the data again, it is necessary to<br />
change the version number of the database:<br />
DatabaseVersion=0043<br />
The value can be any valid folder name. It is appended to the path to the<br />
working copy of the database.<br />
If a MySQL database server is already running on the target computer, you<br />
must use an alternative port. To change the MySQL server port number,<br />
use the following entry:<br />
OnStart=%%$server_root\mysql\bin\mysqld%% --skip-innodb --standalone<br />
-- basedir=%%$unix_server_root/mysql%% --<br />
datadir=%%$mysql_data_dir%% -- port=3000<br />
OnExit=%%$server_root\mysql\bin\mysqladmin%% --user=root -port=3000<br />
shutdown<br />
Created 01/2010 Page 31 of 31
<strong>Rittal</strong> <strong>Therm</strong> 6.0<br />
<strong>User</strong> <strong>Manual</strong><br />
Note that pairs of percentage signs must be used in place of a quotation<br />
mark in the INI file.<br />
• Permit display of folder contents:<br />
o AllowListing=1<br />
• Permit remote access from other computers:<br />
o By default, a Web page can only be viewed on the PC on which it is<br />
running. The following entry also permits viewing from other computers on<br />
the network:<br />
allowRemoteAccess=1<br />
Created 01/2010 Page 32 of 32


