xTalk Management Console for Windows User's Guide
xTalk Management Console for Windows User's Guide
xTalk Management Console for Windows User's Guide

Create successful ePaper yourself
Turn your PDF publications into a flip-book with our unique Google optimized e-Paper software.
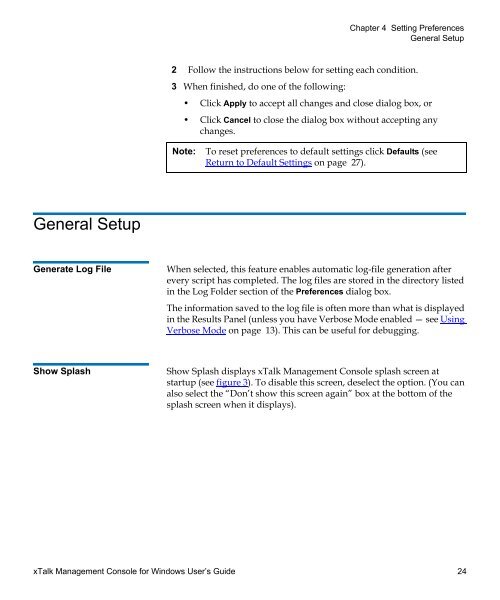
Chapter 4 Setting Preferences<br />
General Setup<br />
2 Follow the instructions below <strong>for</strong> setting each condition.<br />
3 When finished, do one of the following:<br />
• Click Apply to accept all changes and close dialog box, or<br />
• Click Cancel to close the dialog box without accepting any<br />
changes.<br />
Note: To reset preferences to default settings click Defaults (see<br />
Return to Default Settings on page 27).<br />
General Setup 4<br />
Generate Log File 4 When selected, this feature enables automatic log-file generation after<br />
every script has completed. The log files are stored in the directory listed<br />
in the Log Folder section of the Preferences dialog box.<br />
The in<strong>for</strong>mation saved to the log file is often more than what is displayed<br />
in the Results Panel (unless you have Verbose Mode enabled — see Using<br />
Verbose Mode on page 13). This can be useful <strong>for</strong> debugging.<br />
Show Splash 4 Show Splash displays <strong>xTalk</strong> <strong>Management</strong> <strong>Console</strong> splash screen at<br />
startup (see figure 3). To disable this screen, deselect the option. (You can<br />
also select the “Don’t show this screen again” box at the bottom of the<br />
splash screen when it displays).<br />
<strong>xTalk</strong> <strong>Management</strong> <strong>Console</strong> <strong>for</strong> <strong>Windows</strong> User’s <strong>Guide</strong> 24