Owner's Manual - Touchboards.com
Owner's Manual - Touchboards.com
Owner's Manual - Touchboards.com

Create successful ePaper yourself
Turn your PDF publications into a flip-book with our unique Google optimized e-Paper software.
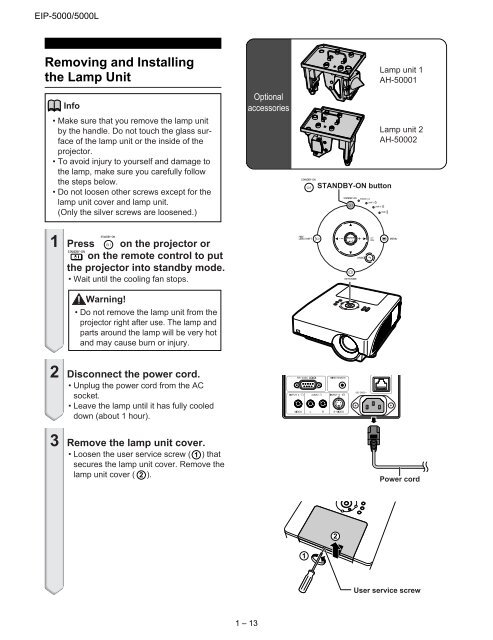
EIP-5000/5000L<br />
Removing and Installing<br />
the Lamp Unit<br />
Info<br />
• Make sure that you remove the lamp unit<br />
by the handle. Do not touch the glass surface<br />
of the lamp unit or the inside of the<br />
projector.<br />
• To avoid injury to yourself and damage to<br />
the lamp, make sure you carefully follow<br />
the steps below.<br />
• Do not loosen other screws except for the<br />
lamp unit cover and lamp unit.<br />
(Only the silver screws are loosened.)<br />
1 Press on the projector or<br />
on the remote control to put<br />
the projector into standby mode.<br />
• Wait until the cooling fan stops.<br />
Warning!<br />
• Do not remove the lamp unit from the<br />
projector right after use. The lamp and<br />
parts around the lamp will be very hot<br />
and may cause burn or injury.<br />
2 Disconnect the power cord.<br />
• Unplug the power cord from the AC<br />
socket.<br />
• Leave the lamp until it has fully cooled<br />
down (about 1 hour).<br />
3 Remove the lamp unit cover.<br />
• Loosen the user service screw ( 1 ) that<br />
secures the lamp unit cover. Remove the<br />
lamp unit cover ( 2 ).<br />
Optional<br />
accessories<br />
1 – 13<br />
1<br />
STANDBY-ON button<br />
2<br />
Lamp unit 1<br />
AH-50001<br />
Lamp unit 2<br />
AH-50002<br />
Power cord<br />
User service screw