Operating Instructions - Panasonic Business
Operating Instructions - Panasonic Business
Operating Instructions - Panasonic Business

Create successful ePaper yourself
Turn your PDF publications into a flip-book with our unique Google optimized e-Paper software.
20<br />
Basic Controls<br />
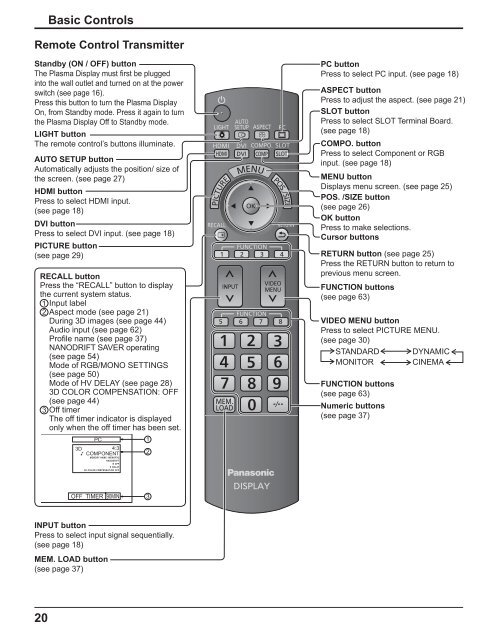
Remote Control Transmitter<br />
Standby (ON / OFF) button<br />
The Plasma Display must rst be plugged<br />
into the wall outlet and turned on at the power<br />
switch (see page 16).<br />
Press this button to turn the Plasma Display<br />
On, from Standby mode. Press it again to turn<br />
the Plasma Display Off to Standby mode.<br />
LIGHT button<br />
The remote control’s buttons illuminate.<br />
AUTO SETUP button<br />
Automatically adjusts the position/ size of<br />
the screen. (see page 27)<br />
HDMI button<br />
Press to select HDMI input.<br />
(see page 18)<br />
DVI button<br />
Press to select DVI input. (see page 18)<br />
PICTURE button<br />
(see page 29)<br />
RECALL button<br />
Press the “RECALL” button to display<br />
the current system status.<br />
1 Input label<br />
2 Aspect mode (see page 21)<br />
During 3D images (see page 44)<br />
Audio input (see page 62)<br />
Pro le name (see page 37)<br />
NANODRIFT SAVER operating<br />
(see page 54)<br />
Mode of RGB/MONO SETTINGS<br />
(see page 50)<br />
Mode of HV DELAY (see page 28)<br />
3D COLOR COMPENSATION: OFF<br />
(see page 44)<br />
3 Off timer<br />
The off timer indicator is displayed<br />
only when the off timer has been set.<br />
PC<br />
3D<br />
4:3<br />
COMPONENT<br />
MEMORY NAME: MEMORY2<br />
NANODRIFT<br />
R OFF<br />
H DELAY<br />
3D COLOR COMPENSATION OFF<br />
OFF TIMER 90MIN<br />
INPUT button<br />
Press to select input signal sequentially.<br />
(see page 18)<br />
MEM. LOAD button<br />
(see page 37)<br />
1<br />
2<br />
3<br />
PC button<br />
Press to select PC input. (see page 18)<br />
ASPECT button<br />
Press to adjust the aspect. (see page 21)<br />
SLOT button<br />
Press to select SLOT Terminal Board.<br />
(see page 18)<br />
COMPO. button<br />
Press to select Component or RGB<br />
input. (see page 18)<br />
MENU button<br />
Displays menu screen. (see page 25)<br />
POS. /SIZE button<br />
(see page 26)<br />
OK button<br />
Press to make selections.<br />
Cursor buttons<br />
RETURN button (see page 25)<br />
Press the RETURN button to return to<br />
previous menu screen.<br />
FUNCTION buttons<br />
(see page 63)<br />
VIDEO MENU button<br />
Press to select PICTURE MENU.<br />
(see page 30)<br />
STANDARD<br />
MONITOR<br />
FUNCTION buttons<br />
(see page 63)<br />
Numeric buttons<br />
(see page 37)<br />
DYNAMIC<br />
CINEMA