- Page 1 and 2:
Ektron® eWebEditPro Developer’s
- Page 3 and 4:
EKTRON, INC. SOFTWARE LICENSE AGREE
- Page 5 and 6:
DAMAGES FOR: LOSS OF PROFITS, LOSS
- Page 7 and 8:
Managing Images ...................
- Page 9 and 10:
Memory Considerations..............
- Page 11 and 12:
Modifying the Standard Text of a Tr
- Page 13 and 14:
selections.........................
- Page 15 and 16:
Spellayt ..........................
- Page 17 and 18:
FTP File Upload....................
- Page 19 and 20:
Element Hierarchy .................
- Page 21 and 22:
Content Setting API ...............
- Page 23 and 24:
Declaring the Schema File..........
- Page 25 and 26:
Ektron® eWebEditPro Developer’s
- Page 27 and 28:
eWebEditPro Object Model Ektron® e
- Page 29 and 30:
eWebEditProUtil Object Name API Typ
- Page 31 and 32:
Name API Type Return Type ontoolbar
- Page 33 and 34:
Name API Type Return Type maxConten
- Page 35 and 36:
Name API Type Return Type InstallPo
- Page 37 and 38:
Button Tag Object Name API Type Ret
- Page 39 and 40:
Name API Type Return Type disableAl
- Page 41 and 42:
Image Editor Object Name API Type R
- Page 43 and 44:
Name API Type Return Type SetValidF
- Page 45 and 46:
Name API Type Return Type FWLoginNa
- Page 47 and 48:
Syntax for retrieving object: eWebE
- Page 49 and 50:
Name API Type Return Type Descripti
- Page 51 and 52:
Method/Property/ Event AllowUpload
- Page 53 and 54:
Method/Property/ Event Details In o
- Page 55 and 56:
Method/Property/ Event eWebEditProM
- Page 57 and 58:
Method/Property/ Event getPropertyB
- Page 59 and 60:
Method/Property/ Event isEditor 76
- Page 61 and 62:
Method/Property/ Event onbeforeload
- Page 63 and 64:
Method/Property/ Event popup 133
- Page 65 and 66:
Method/Property/ Event SetContent 9
- Page 67 and 68:
Method/Property/ Event type 128 ”
- Page 69 and 70:
Parameters Example objAuto.AddFileF
- Page 71 and 72:
The new style sheet overrides rules
- Page 73 and 74:
Method: autoInstallExpected Method:
- Page 75 and 76:
Object: ”ObjectCommand Item Objec
- Page 77 and 78:
Parameters: Parameter Type Descript
- Page 79 and 80:
Method: CreateNew Method: disableSt
- Page 81 and 82:
Method: EditFromHtml Remarks If the
- Page 83 and 84:
Method: EnableNameChange Parameter
- Page 85 and 86:
Method: ErrorValue Method: Estimate
- Page 87 and 88:
Return: None Method: ExecCommand Me
- Page 89 and 90:
Syntax strResult = eWebEditPro.Edit
- Page 91 and 92:
Example: Method: getDocument Method
- Page 93 and 94:
Parameters Syntax var sFileDesc = o
- Page 95 and 96:
Parameters Method: getOpenerInstanc
- Page 97 and 98:
Method: getPropertyString Object:
- Page 99 and 100:
Method: HideAllMenus Method: HTMLEn
- Page 101 and 102:
Method: IsDirty Method: isEditor Me
- Page 103 and 104:
This information could be used to a
- Page 105 and 106:
Method: ListCommandName You can use
- Page 107 and 108:
function ListFilesWithStatus(iSelec
- Page 109 and 110:
Description: Sets the current refer
- Page 111 and 112:
Object: ”eWebEditPro ActiveX Cont
- Page 113 and 114:
Method: ReadNamedData Description:
- Page 115 and 116:
Method: RemoveFieldValue Descriptio
- Page 117 and 118:
Method: save Method: Save Method: s
- Page 119 and 120:
Parameter Type Description iPositio
- Page 121 and 122:
Description: Replaces the entire do
- Page 123 and 124:
If the file does not exist, no acti
- Page 125 and 126:
NOTE This property is intended for
- Page 127 and 128:
Method: ShowAllMenus Method: TagCou
- Page 129 and 130:
Parameters Parameter Type Descripti
- Page 131 and 132:
Method: XMLProcessor Master List of
- Page 133 and 134:
Property: CmdVisible Property: MaxL
- Page 135 and 136:
Object: ”Automatic Upload Object
- Page 137 and 138:
Property: allowupload Property: Bas
- Page 139 and 140:
Object: ”Parameters Object” Pro
- Page 141 and 142:
Property: HorizontalSpacing Propert
- Page 143 and 144:
Type: Integer Property: ProxyServer
- Page 145 and 146:
Property: TransferRoot function Rea
- Page 147 and 148:
This parameter may be set before or
- Page 149 and 150:
Property: Get WDDX Property: hideAb
- Page 151 and 152:
Major Major, Minor Major, Major Min
- Page 153 and 154:
Property: Type Property: tagAttribu
- Page 155 and 156:
Property: clientInstall Property: c
- Page 157 and 158:
Property: readOnly Property: rows D
- Page 159 and 160:
Property: url Property: windowName
- Page 161 and 162:
Property: windowName Property: edit
- Page 163 and 164:
Property: name Property: readOnly P
- Page 165 and 166:
Value Description EWEP_ONUNLOAD_ PR
- Page 167 and 168:
• EWEP_STATUS_UNABLETOSAVE • EW
- Page 169 and 170:
Object: ”eWebEditProUtil Object
- Page 171 and 172:
Event: ImageError Event: LoadingIma
- Page 173 and 174:
Event: ondblclickelement Occurs whe
- Page 175 and 176:
Event: onbeforeedit Event: onedit E
- Page 177 and 178:
Event: onready window.eWebEditProLo
- Page 179 and 180:
strTextData - a string that may con
- Page 181 and 182:
Object: ”ewebeditproevents Object
- Page 183 and 184:
Sources of Commands Command source
- Page 185 and 186:
Maximum Size of Content See ”Prop
- Page 187 and 188:
eWebEditPro Dataflow This section d
- Page 189 and 190:
Language Example 2. The Hidden Fiel
- Page 191 and 192:
Defining the Toolbar Modifying Conf
- Page 193 and 194:
• Add a custom toolbar menu • R
- Page 195 and 196:
Removing a Toolbar Menu Defin
- Page 197 and 198:
To change the wrap attribute, follo
- Page 199 and 200:
external section of the configura
- Page 201 and 202:
Defining the Toolbar 10. Place the
- Page 203 and 204:
Changing the Image that Appears on
- Page 205 and 206:
Defining the Toolbar You should onl
- Page 207 and 208:
Defining the Toolbar 2. Move to the
- Page 209 and 210:
Defining the Toolbar NOTE • A fon
- Page 211 and 212:
Dynamically Changing the Editor Thi
- Page 213 and 214:
Dynamically Changing the Editor var
- Page 215 and 216:
Customizing the Popup Button ”Cus
- Page 217 and 218:
Customizing Context Menus This sect
- Page 219 and 220:
The Toolbar Object Interface This s
- Page 221 and 222:
etbToolbarStyles etbCaptionAlignmen
- Page 223 and 224:
etbCommandOptions etbCommandStyles
- Page 225 and 226:
3 Invalid ID given for a command or
- Page 227 and 228:
Locale Files Modifying the Language
- Page 229 and 230:
To have eWebEditPro appear in this
- Page 231 and 232:
Translating the Locale File (locale
- Page 233 and 234:
eWebEditPro Automatic Download and
- Page 235 and 236:
Modifying the Language of eWebEditP
- Page 237 and 238:
Modifying the Language of eWebEditP
- Page 239 and 240:
Modifying the Language of eWebEditP
- Page 241 and 242:
Azeri (Cyrillic) 0x082c Basque 0x04
- Page 243 and 244:
Windows 2000: Hindi. This is Unicod
- Page 245 and 246:
Spanish (Paraguay) 0x3c0a es-py Spa
- Page 247 and 248:
How to Fix in Windows XP and 2000 M
- Page 249 and 250:
Modifying the Language of eWebEditP
- Page 251 and 252:
Modifying the Language of eWebEditP
- Page 253 and 254:
• “Event: onfocus” on page 14
- Page 255 and 256:
Disabling the "Click OK to Preserve
- Page 257 and 258:
eWebEditProMsgsFilename, "ewep.js",
- Page 259 and 260:
Client Installation Pages eWebEditP
- Page 261 and 262:
JavaScript Objects This section des
- Page 263 and 264:
} JavaScript Objects eWebEditPro.in
- Page 265 and 266:
Using Toolbarreset to Reset Customi
- Page 267 and 268:
The Parameters Object JavaScript Ob
- Page 269 and 270:
JavaScript Objects The eWebEditProU
- Page 271 and 272:
Instance JavaScript object ActiveX
- Page 273 and 274:
The Configuration Data eWebEditPro
- Page 275 and 276:
The Configuration Data • Use the
- Page 277 and 278:
Managing the Configuration Data If
- Page 279 and 280:
Letting Users Customize the Toolbar
- Page 281 and 282:
Overriding User Customization Letti
- Page 283 and 284:
Overview of Configuration Data This
- Page 285 and 286:
Configuration Data: Functional View
- Page 287 and 288:
Element Function For more info, see
- Page 289 and 290:
Element Function For more info, see
- Page 291 and 292:
Overview of Configuration Data NOTE
- Page 293 and 294:
User Interface Elements: Standard,
- Page 295 and 296:
User Interface Elements in Alphabet
- Page 297 and 298:
Element Hierarchy Attributes Exampl
- Page 299 and 300:
Caption Element Hierarchy User Inte
- Page 301 and 302:
Attributes Name Attribute Type User
- Page 303 and 304:
Example cmd Element Hierarchy User
- Page 305 and 306:
Element Hierarchy Child Elements At
- Page 307 and 308:
Attributes Example Using only a Key
- Page 309 and 310:
Name Attribute Type Example listcho
- Page 311 and 312:
Attributes Name Attribute Type Exam
- Page 313 and 314:
User Interface Elements: Standard,
- Page 315 and 316:
Name Attribute Type Example popup E
- Page 317 and 318:
Attributes Example space User Inter
- Page 319 and 320:
Attributes Name Attribute Type User
- Page 321 and 322:
Name Attribute Type style Element H
- Page 323 and 324:
Attributes Example User Interface E
- Page 325 and 326:
Button Images organization has purc
- Page 327 and 328:
• default - • delcell - • del
- Page 329 and 330:
• justify - • key - • ldquo -
- Page 331 and 332:
• rbtn - • rdquo - • *rectang
- Page 333 and 334:
• vidcam - • viewprop - • wan
- Page 335 and 336:
Managing Tables eWebEditPro’s con
- Page 337 and 338:
Attribute Determines whether this s
- Page 339 and 340:
Customizing the Tables Menu Managin
- Page 341 and 342:
Setting Default Values for the Inse
- Page 343 and 344:
Controlling Responses for the Ver
- Page 345 and 346:
fontsize Remarks Fonts and Headers
- Page 347 and 348:
Element Hierarchy Attributes he
- Page 349 and 350:
Attributes Name Attribute Type Defa
- Page 351 and 352:
Safe as a PDF file. Saves as PDF.
- Page 353 and 354:
Element Hierarchy Child Elements At
- Page 355 and 356:
Form Elements Description Let the u
- Page 357 and 358:
Cleaning HTML Clean Element Hierarc
- Page 359 and 360:
Attributes Name Attribute Type Defa
- Page 361 and 362:
Name Attribute Type Default Descrip
- Page 363 and 364:
Name Attribute Type Remove Element
- Page 365 and 366:
Attribute Element Cleaning HTML Whe
- Page 367 and 368:
xsltFilter Element SPAN Cleaning
- Page 369 and 370:
Spellcheck The Spellcheck Feature D
- Page 371 and 372:
Element Hierarchy Attributes Na
- Page 373 and 374:
Editing in Microsoft Word Element H
- Page 375 and 376:
Conserve Word Formatting Pros Cons
- Page 377 and 378:
Conform by Discarding Pros Cons Con
- Page 379 and 380:
Encoding Special Characters Factors
- Page 381 and 382:
Displaying Asian Languages Unicode
- Page 383 and 384:
Value of charencode Description Sam
- Page 385 and 386:
Condition Recommended charencode Va
- Page 387 and 388:
Encoding Special Characters the pag
- Page 389 and 390: Implementing a Web Site that Uses U
- Page 391 and 392: Implementing a Web Site that Uses U
- Page 393 and 394: Using Style Sheets to Standardize F
- Page 395 and 396: Style Sheets Dynamically Changin
- Page 397 and 398: For example, assume you have this c
- Page 399 and 400: NOTE Property values are ignored -
- Page 401 and 402: Implementing Style Class Selectors
- Page 403 and 404: Style Sheets • the style must hav
- Page 405 and 406: .italic {font-style: italic; } Befo
- Page 407 and 408: Managing Hyperlink Dialogs eWebEdit
- Page 409 and 410: Managing Hyperlink Dialogs 3. If th
- Page 411 and 412: Illustration Example Directions for
- Page 413 and 414: Illustration Example Managing Hyper
- Page 415 and 416: Field How to Set Default Value Ente
- Page 417 and 418: Managing Images How Image Selection
- Page 419 and 420: Managing Images Customizing the Ali
- Page 421 and 422: Managing Images NOTE The selections
- Page 423 and 424: Managing Images As a result, the fo
- Page 425 and 426: Managing Images 3. Still within the
- Page 427 and 428: Managing Images Below is the entire
- Page 429 and 430: Minimum Configuration Requirements
- Page 431 and 432: Managing Images If a user clicks th
- Page 433 and 434: Frame Name server selection Managin
- Page 435 and 436: Security with FTP Managing Images e
- Page 437 and 438: Security with ASP The EktronFileIO
- Page 439: Parameter Data Type Required / Opti
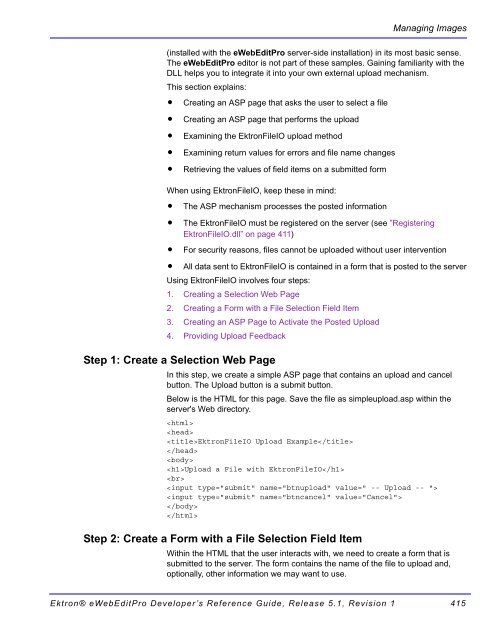
- Page 443 and 444: Here are some things to notice in t
- Page 445 and 446: Making the Destination Location Dyn
- Page 447 and 448: Other Web Servers Security Managing
- Page 449 and 450: Base URL Given Resolution Type Mani
- Page 451 and 452: getProperty(strName) as Object getP
- Page 453 and 454: Manipulating Media File Methods and
- Page 455 and 456: The Mediafiles Feature Mediafiles E
- Page 457 and 458: Mediafiles Element Description Defi
- Page 459 and 460: Attributes Name Attribute Type Defa
- Page 461 and 462: Attributes Name Attribute Type Defa
- Page 463 and 464: Name Attribute Type Default Descrip
- Page 465 and 466: Attributes Name Attribute Type Defa
- Page 467 and 468: Attributes Name Attribute Type Defa
- Page 469 and 470: Attributes Name Attribute Type D
- Page 471 and 472: Attributes Name Attribute Type Def
- Page 473 and 474: Inserting an Image into a Web Page
- Page 475 and 476: Dynamically Selecting Upload Destin
- Page 477 and 478: Sample HTML Page Dynamically Select
- Page 479 and 480: Full Example Dynamically Selecting
- Page 481 and 482: Dynamically Selecting Upload Destin
- Page 483 and 484: • Specific File Types • Appropr
- Page 485 and 486: cmdmfuuploadall Command Automatic U
- Page 487 and 488: Information Components Concepts Aut
- Page 489 and 490: Entry Description Automatic Upload
- Page 491 and 492:
Custom Field Set Example HTML Form
- Page 493 and 494:
4. Extract the File Binary and Save
- Page 495 and 496:
Add the File Information Tag Automa
- Page 497 and 498:
Automatic Upload Below is a sample
- Page 499 and 500:
Automatic Upload mdf171290.jpg
- Page 501 and 502:
No files were uploaded. Steps
- Page 503 and 504:
Automatic Upload See Also: ”Clien
- Page 505 and 506:
EkFormFieldValue Automatic Upload D
- Page 507 and 508:
Description FileDimensions • Desc
- Page 509 and 510:
FileName FileSize FileType Automati
- Page 511 and 512:
Fragment Automatic Upload NOTE If t
- Page 513 and 514:
XML Element Descriptions DBORDER DE
- Page 515 and 516:
FILEINFO FRAGMENT Automatic Upload
- Page 517 and 518:
FURL THUMBNAIL Example image/jpeg A
- Page 519 and 520:
image/gif 0 0 0 ColdFusion E
- Page 521 and 522:
Content Received Upload comma
- Page 523 and 524:
Dim strResp Dim ErrorCode Dim strTi
- Page 525 and 526:
Content Upload The content upload f
- Page 527 and 528:
Property Name Type Description Java
- Page 529 and 530:
'''''''''''''''''''''''''''''''''''
- Page 531 and 532:
Creating a Receiving Page Content U
- Page 533 and 534:
Content Type Description Parameters
- Page 535 and 536:
WebImageFX WebImageFX is an externa
- Page 537 and 538:
Displaying WebImageFX { WebImageFX
- Page 539 and 540:
WebImageFX’s Configuration Data W
- Page 541 and 542:
Attributes Name Attribute Type Defa
- Page 543 and 544:
Effect of Setting Namechange to Fal
- Page 545 and 546:
Attributes Name Attribute Type Defa
- Page 547 and 548:
• a remote name, such as ../image
- Page 549 and 550:
WebImageFX The table’s columns in
- Page 551 and 552:
Commands Unique to WebImageFX Comma
- Page 553 and 554:
Command Name Function The lData Par
- Page 555 and 556:
ValidExtensions TransferRoot Port M
- Page 557 and 558:
Return Type Parameters String Clien
- Page 559 and 560:
Integrating eWebEditPro with ASP Us
- Page 561 and 562:
This illustration depicts it as a b
- Page 563 and 564:
Adding a Submit Button Argument Des
- Page 565 and 566:
Using a Function Integrating eWebEd
- Page 567 and 568:
Setting up a Form Place the Editor
- Page 569 and 570:
Integrating eWebEditPro with ASP.NE
- Page 571 and 572:
Integrating eWebEditPro with ASP.NE
- Page 573 and 574:
Integrating eWebEditPro with ASP.NE
- Page 575 and 576:
• parameters.installPopup.query
- Page 577 and 578:
Here is an example of a line that c
- Page 579 and 580:
Attribute Description Integrating e
- Page 581 and 582:
Integrating eWebEditPro with ColdFu
- Page 583 and 584:
Placing the Editor on the Form Inte
- Page 585 and 586:
Integrating eWebEditPro with PHP Us
- Page 587 and 588:
Changing Parameter Values Inserting
- Page 589 and 590:
Integrating eWebEditPro Using JavaS
- Page 591 and 592:
Creating Your Own Page Integrating
- Page 593 and 594:
Argument Description For example
- Page 595 and 596:
Integrating eWebEditPro Using JavaS
- Page 597 and 598:
Manually Loading Content into the E
- Page 599 and 600:
Integrating eWebEditPro Using JavaS
- Page 601 and 602:
Appendices Appendix A: Naming the e
- Page 603 and 604:
Click OK to preserve changes when m
- Page 605 and 606:
Appendix B: Error Messages Error Me
- Page 607 and 608:
Unable to find content field (typic
- Page 609 and 610:
Appendix C: eWebEditPro Architectur
- Page 611 and 612:
Images File extension Appendix D: A
- Page 613 and 614:
Audio File extension Appendix D: Au
- Page 615 and 616:
Text File extension Appendix D: Aut
- Page 617 and 618:
File extension Appendix D: Automati
- Page 619 and 620:
File extension Appendix D: Automati
- Page 621 and 622:
File extension Appendix D: Automati
- Page 623 and 624:
Other File extension Appendix D: Au
- Page 625 and 626:
Index Symbols tags removing 295 A
- Page 627 and 628:
password element 439 port element 4
- Page 629 and 630:
GetContentType 502 getDocument, Act
- Page 631 and 632:
media file object using 451 Media F
- Page 633 and 634:
ows parameters object property 132